Many FlightGear aircraft modellers prefer Blender as their 3D-modelling editor. Blender is a powerful, robust and open-source 3D modelling suite. FlightGear primarily uses the AC3D file format (.ac) to model aircraft, scenery models, and many other things. With the AC3D file format first released in 1996[1], modern versions of Blender do not bother maintaining support for the format. However, add-ons exist to extend Blender's functionality in order to allow the import and export of these files.
Importing and exporting AC3D files
Note Modern versions of Blender (2.5+) require an add-on to work with AC3D (.ac) files.
|
Addons
The prominent add-on for using AC3D files in Blender is called Blender-AC3D. It has been forked from its original to provide support for Blender 2.8.
Notes
- Materials are not exported correctly in Blender 2.8+. You need to fix them in AC3D or a text editor.
- Before you export a model with this addon, make sure that you set the UV map and texture inside the material, not just inside the UV editor. See the video tutorial here.
- Before you export make sure to exit Edit Mode or some of your last changes won't be exported.
- Inside Blender when you want to see the textures, be sure to set the shader to GLSL (or for 2.7+ just set view mode to materials). Alternatively set textured solid in solid view.
- To see textured surfaces as they will be shown in FlightGear, go into the material texture and set the blend type to Multiply instead of the default Mix (the importer will also do this automatically). An example plane that will look very different if this is not done is the FGAddon aircraft ASK-13, notice the wingtips.
- The final model might display color mismatches (Texture color vs Material color) when viewed in Flightgear. Hand editing the materials section of the exported AC3D file might fix this.
- If you wonder where to put the scripts you could open blender's user preferences (Ctrl+Alt+U, or File > User Preferences) tick for example Import/Export and extent the information concerning an existing script. Usually this throws the path. For for example Ubuntu 14.04LTS/Blender 2.79b it is:
/usr/share/blender/scripts/addons/. In recent Ubuntu versions blender is distributed as a snap image. In such cases blender addon scripts are placed in: $HOME/.config/blender/X.YY/scripts/addons/ (where X.YY is blender version, for example 2.82).
- Be aware that Blender only has greyscale for emission and ambient colors. If you want to export/import a color for those, import/export options gives you capability to choose to use Blenders mirror color for that.
- The importer will not fail if it does not locate a texture, instead it will issue warnings. Pull down the top bar to see if there was any, they will be orange lines.
- The exporter will not fail if it tries to save a texture without data, instead it will issue warnings. Pull down the top bar to see if there was any, they will be orange lines. Notice that since AC3D only support 1 texture per object, if multiple textures are attached to an object in Blender the last of the textures that has any data, if any, will be the one that get exported, but it will still warn about the missing data in the others, so take care.
- Orientation: The default settings in the plugin correspond to the FlightGear coordinate system (-X forward and Z up, also see: Howto:3D_Aircraft_Models). The default settings are: Forward -Z and Up Y.
You can report bugs with the addon here, but please include problematic .ac/.blend files and their textures.
Importing
Note If you do not see the option for AC3D (.ac) under File > Import, your add-on is either not installed, not enabled, or not working correctly.
|
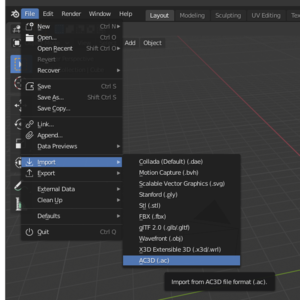
Once the add-on is installed, AC3D models can be imported in the same manner as any other model foramat into Blender by using the File > Import > AC3D (.ac) dialog.

This figure demonstrates how to import an AC3D model in Blender using a third-party addon.
