Howto:Working with FlightGear models in Blender
| This article is a stub. You can help the wiki by expanding it. |
| Work in progress This article or section will be worked on in the upcoming hours or days. Note: In progress as of Sept 4th, 2024 See history for the latest developments. |
FlightGear uses the AC3D file format for its models. AC3D files are denoted by the .ac file extension. It is a niche legacy format native to the AC3D modelling software, and its adoption is not widespread in computer graphics (being used mainly by X-Plane[1] and FlightGear). This lead to support for the format eventually being removed from Blender. In order to work with models in the AC3D format in Blender, and thus do any modelling work for the FlightGear project, the use of an add-on is required.
Installing the Blender add-on for AC3D models
| Warning While Blender offers an "Install From File" option to simplify the installation of add-ons, it is not supported by Blender-AC3D and should not be used. |
The Blender-AC3D add-on is one such add-on that allows AC3D models to be used in Blender. It is an open-source project licensed under the GNU GPL. It is hosted on GitHub, and it can be accessed here: Blender-AC3D. To install the Blender-AC3D add-on, you must complete the following steps:
- Identify the version of Blender you are using. This can be done by simply opening Blender, and checking the version number in the top-right corner of the startup / splash screen:
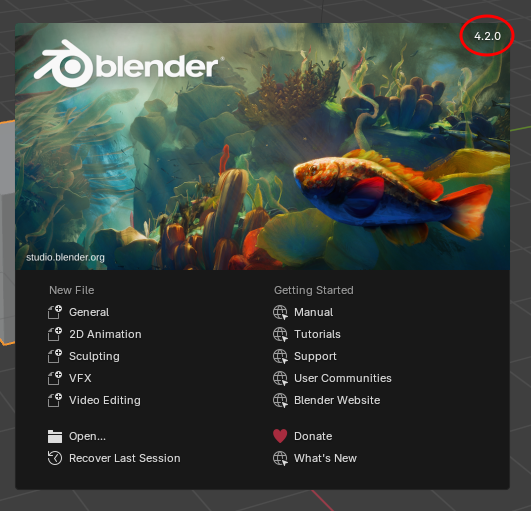 Determining Blender version from the splash screen
 - Close Blender.
- Download the correct version of the Blender add-on for your version of Blender. You can download the add-on at: https://github.com/NikolaiVChr/Blender-AC3D
- Once you have downloaded the Blender add-on, extract the
.zipfile so that you have a folder calledio_scene_ac3d. - Next, you will need to place the add-on (the
io_scene_ac3dfolder) in the correct directory in order for Blender to be able to load it. It will vary based on platform, wherex.xis the version of Blender you are using.- For Linux users, the location may be in one of two places. If you installed it through your package manager, it will be the first path. If you installed Blender as a Flatpak, it will be the second path.
~/.blender/x.x/scripts/addons~/.var/app/org.blender.Blender/config/blender/x.x/scripts/addons. - For Windows users, the location is:
C:\Users\yourusername\AppData\Roaming\Blender Foundation\Blender\x.x\scripts\addons - For macOS users, the location is:
Macintosh HD/Users/yourusername/Library/Application Support/Blender/x.x/scripts/addons
- For Linux users, the location may be in one of two places. If you installed it through your package manager, it will be the first path. If you installed Blender as a Flatpak, it will be the second path.
- Re-open Blender.
- Navigate to Edit > Preferences, and select Add-ons from the side-bar. If you downloaded the correct version of the add-on, and place it in the right location, you should see it in the list of available add-ons.
- Select the checkbox next to AC3D (.ac) format to enable the plugin. This step is critical, otherwise the add-on won't actually become active.

| Note The add-on will not be active after installing, you must manually enable it. |

- Once you have enabled the Blender add-on, restart Blender.
If you have completed the above steps and encountered no error messages, the Blender-AC3D add-on should be correctly installed and enabled, and is ready for use.
Importing models
- Once the add-on is installed, AC3D models can be imported in the same fashion as any model format supported by Blender. To import a model, navigate to File > Import > AC3D (.ac)
| Note If you do not see the option to import AC3D models, the add-on either has not been correctly installed, or enabled. |

- A file chooser dialog will appear. Select your AC3D (
.ac) file and select Import AC3D.
| Work in progress This article or section will be worked on in the upcoming hours or days. See history for the latest developments. |
Editing models
Once the model has been successfully imported into Blender using the add-on, the
| Work in progress This article or section will be worked on in the upcoming hours or days. See history for the latest developments. |
Configuring accurate model previews
| Work in progress This article or section will be worked on in the upcoming hours or days. See history for the latest developments. |
Viewing liveries
Blender can be used as a 'livery viewer' for your FlightGear models.
| Work in progress This article or section will be worked on in the upcoming hours or days. See history for the latest developments. |
Exporting models
| Warning To ensure that models exported from Blender are displayed and function correctly in FlightGear, special steps must be followed. |

| Work in progress This article or section will be worked on in the upcoming hours or days. See history for the latest developments. |
| References |
| ||||||||||||||||||||