Modeling - SketchUp
On this wikipage I'll add some information about placing objects from SketchUp into FlightGear.
Download
SketchUp
You can download a free version of SketchUp at http://sketchup.google.com. But as far as I know you need the Pro version to convert models into .3ds or .obj. A free demo version is found at http://www.sketchup.com/?sid=509.
This tutorial is based on the .obj fileformat, if you use another format (because of the free version), please make sure you select the right options.
Blender
Download Blender for free through http://www.blender.org/download/get-blender/.
Automatic Export
An experimental SketchUp plugin to export directly to .ac format - and works with the free version of SketchUp, as well as pro. See SketchUp to AC3D exporter for the latest information about the exporter, including current issues and limitations.
Manual
1. SketchUp
After you modeled a building, bridge or tower etc., you need to be sure that the units are in meters. To check this, go to Window > Model Info > Units. Format should be Decimal and Meters. Then, go in SketchUp to File > Export > 3D Model and choose the file format .obj (or any other format that is supported by Blender, I use the .obj format in this tutorial, but other formats will look like this). Save that file somewhere on your computer where you can find it later on (maybe your desktop?).
2. Blender
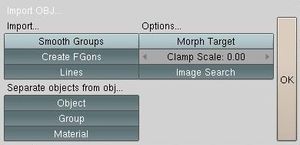
Open Blender and remove the kubus with Delete. Go to File > Import > Wavefront object (.obj). Select your .obj file we've just saved and click on Import a Wavefront OBJ. Choose for Clamp scale: 0.00 and press OK. This is very important to get the right scale of the model!
If your building has faces that need to be visible from two sides we need to do some additional work. Go to the UV Face Select mode and select the faces that should be visible from two sides (like fences). Then hit the Editing (F9) button, hit the Twoside button in the Texture Face menu, and finally hit the Copy Draw Mode button. Set the Draw Type to textured to check if all faces are correct. If some are not, redo the process for those faces, you might have missed them out.
Select your model through the A-key and go to File > Export > AC3D (.ac). Save the file in the coordinate-folder where your model is placed. The folder for the Empire State Building is w073n40. But in that folder we must place an other folder called 1745064. That's the tile-id of the scenery in FlightGear. You can find that one through the UFO. Fly to your location (use Location from the menubar) and go to File > Internal properties > Environment. There should be a property called current-tile-id. That's your tile-id.
Find the long-, alt- and latitude of your building with http://www.gpscoordinates.eu/determine-gps-coordinates.php.
3. Textures
To view the textures in FlightGear we need to give them the .png extension (there are some more, but .png is the best and easiest way to go). You could use the free program Gimp to do it. You'll find your textures in a map on the same location on your computer as where you stored the .obj file. It's called the same. Open your textures in Gimp and save them all as .png.
Now, place the texture file(s) in the same folder as your .ac model file. Be sure to use .png textures.
4. The .stg file
To tell FlightGear where the models have to be placed we use .stg files, which you can open and edit with almost any text editor like Notepad.
There are two types of objects: shared and static objects. Shared are objects that are located at a lot of locations, like wind turbines and ships. Static ones are unique and are only located at one location, like the Empire State Building or the Golden Gate Bridge. This is an example of a .stg file with a static object (Empire State Building).
OBJECT_STATIC united_states/empire_state_building.ac -73.98594 40.74849 10 0
We'll have a closer look at the code.
- OBJECT_STATIC tells FlightGear we use a static object. If you use a shared object use OBJECT_SHARED.
- empire_state_building.ac: the model-file FlightGear has to use (we've saved this one earlier on this wikipage). When you use static objects this has to be in the same coordinate-folder as your model.
- -73.98594: the longitude.
- 40.74849: the latitude.
- 10: the elevation level in feet (altitude).
- 0: the rotation in degrees.
See Howto: Place 3D objects with the UFO for the main article
As you should know the FlightGear scenery isn't very matching the reality according to height, rivers, woods etc. But when the scenery is becoming nicer and more matching the reality we need to have our buildings at the good spots. So don't place your buildings according to the scenery but to the reality. Example: if you've placed a building on the right location, but in FlightGear it's standing in the middle of a river: just leave it.
4. Testing
Let's test our scenery now! This is the nice part of placing objects in the scenery ;)
Open FlightGear and choose an aircraft (you may use the UFO, because that one is very easy to fly and you can look from all the different sides to the object(s) we've placed). When using the FlightGear Wizard fill in a location near your objects through Advanced > Initial position. Press run and...
Enjoy your flight!
5. Sharing
To share your models please go to the FlightGear Scenery Object Database.
External tutorials
| ||||||||||||||||||||
