OpenRadarGuide
Preface
OpenRadar supports FlightGear-ATCs when guiding/controlling Multiplayer-traffic within FlighGear.
Some words to our project targets:
- Realism: That means we show all the data a Real-Live ATC would need for his job. For instance we simulate a radar antenna and perform one position update per antenna rotation. But we don't have professional ATCs, neither do we have professional pilots contacting our ATCs. So we have to make some compromises to a Real-Life operation.
- Usability: The application should be handy, behave consistently and require almost no training. The ATC has other things to do than to fight the application.
We hope that we met your needs and are happy to get feedback!
Important: We support you with tooltip texts, that appear when you hover over an active area with your mouse. They shall remind you of possible interactions that you may have forgotten. Try pointing your mouse everywhere - maybe there is something available that you missed until now...
Prerequisites
Internet
Of course you need an uninterrupted Internet access to exchange data between You and your clients/targets. The requirements for that connection are not very high -- but they must be uninterrupted!
Communication
We urge you to always offer your services as well in typing (MPchat) as in speech (Radio). You soon will discover that using a Radio-application makes it much easier to communicate for you (who hopefully will control many pilots at the same time) *as well for the pilots (who need both hands to control their plane).
Typically available ways of communication are:
- MPchat is an integral part of FGFS and OpenRadar and needs no further installations. (ref.: http://wiki.flightgear.org/Howto:Multiplayer ) - so it is always available for communication between you and all pilots. You always should offer this option (and try to convince pilots to use a Radio-Option!).
- A Radio is not directly integrated into OpenRadar but must be installed in addition. Right now there are 2 versions in use:
- FGcom is the more realistic Radio-operation with realistic frequencies for each function and a limited work-range based on frequency.
- If FGCOM is not yet installed, you need to install a "standalone version of FGCom 3.0", which then can be controlled directly from within OpenRadar. For installation see http://wiki.flightgear.org/FGCom_3.0, item "3 FGCom standalone".
- Mumble is an easier to handle application, that provides "named groups" that people with the same reason move/change into. Thus Mumble is not limited by range and much easier to use for defining by "groups" which people will communicate with each other.
- If Mumble is not installed you may install it according to http://mumble.sourceforge.net/Installing_Mumble.
- To activate it see http://mumble.sourceforge.net/Mumbleguide
- The most used Mumble-server is "itpns.ddns.net"
Java V7
Make sure you have installed at least version 7 of Java. Verify and/or download the installation packages from: http://www.java.com/en/download/index.jsp
OpenRadar
For the latest stable version of OpenRadar see https://sourceforge.net/projects/openradar/files/
- Download "Latest Release" for the latest version prior to the new "Flight-Strip-Bay" version
- Download "Next Release" for the really newest version.
Prior to extracting move the ZIP to a place where it is easy to find. Make sure you have read and write permissions for that directory.
If you did already work with an OpenRadar installation you may want to
- RENAME your current OpenRadar-directory (i.e. to "OpenRadar-BU")
- then download and extract the new version into a newly created directory with the name of the old one (without the "-BU")
- now you can replace all data in the new "OpenRadar/data" directory with the ones in the "OpenRadar-BU/data"
- if you expect changes in the scenery etc. do not copy the the Airport (ICAO) directories
- delete the BU-version only after you are sure you verified that all your personal data were transferred, i.e. still accessible!
Startup
Inside the downloaded OpenRadar base-directory you will find start-scripts. See
- for Windows: OpenRadar.bat
- for Linux: OpenRadar.sh
- for OSX: OpenRadar.jar
OpenRadar-Welcome - Select Airport
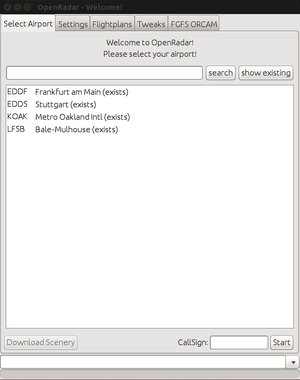
OpenRadar will always start with this Window in which you define the airport on which you want to operate:
- If this is the first time you work with OpenRadar you first must check/set your options also in all the other tabs!
- If the wanted airport is not yet listed:
- type the wanted airport ICAO (e.g. KSFO or EDDF or ...) into the inputline left of "search" and click onto "search"
- if that ICAO code is available, then OpenRadar will add it to the list
- then a single mouseclick onto one of the listed airports will activate that selection
- and will set a default into the "CallSign" field at the lower right corner. You may overwrite that here or later on during the session (ref. chapter #Status_Informations)
- then you can review all settings prior you click onto Start
- type the wanted airport ICAO (e.g. KSFO or EDDF or ...) into the inputline left of "search" and click onto "search"
- If the wanted airport is already in the list of airports then you may directly start with a mouse-double-click onto that ICAO-code (or single click and then "Start" at the bottom)
- a double-click on it will order OpenRadar to search and load all the required data (into your local file "OpenRadar/Data/ICAO")
- that may take some time → wait till the "Ready" appears in the lower Textfield → then click onto "Start"
- To delete an airport form your PC delete its ICAO code out of your local directory "OpenRadar/Data/"
Settings (Communication)
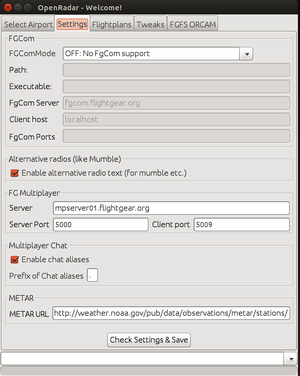
This window lets you define your communication settings:
FGCom (Radio/Voice Communication)
- OpenRadar can support up to 4 instances of FGcom in 2 ways:
- It can start and control FgCom instances that operate in the background as sub-tasks of OpenRadar (except for OSX where FgCom must be run in a separate Terminal window)
- or just control manually started FgCom-sessions.
- You select these modes of operation by the “FgComMode” selection:
- 1a) Internal: FGCom(s) are started and controlled internally by OpenRadar
- For this mode you have to define all available fields to tell OpenRadar where your FGcom resides and what options shall be used:
- Path: Here you define where your FGcom is installed.
- In the following some examples:
type Windows Linux OSX a standard installation C:\Programs\FGcom /home/YourName/fgcom *) on another disk D:\FlighGear_2.6\FGcom /media/DiskName/FGFS/fgcom *) on a LAN-server \\ServerName\Central\FGFS /home/YourName//.gvfs/fgfs on nas-server/fgcom *)
- *) for OSX this does not apply because you will be starting FgCom in a Terminal window before starting OpenRadar, see 1b
- Executable: Here you define the program-name that shall be started
- For Windows: "fgcom.exe" or "anyName.bat"
- for Linux: "fgcom" or "anyName.sh"
- OSX: again for OSX this does not apply, see 1b
- Do not forgett to mark "FGCom3" if you are using the new FGCom versions (e.g. with FGFS ver.3.0)
- Server: As of today there is only one FGCom-server available that also supports FGFS ver.3.0: fgcom.flightgear.org
- You still may be using fgcom01.flightgear.org in a group in that all users use this server
- Client: must always be “localhost”
- FGcom Ports: The here defined values are crucial for the operation because:
- They are the only connection between the OpenRadar and FGcom. So you must define those the same in OpenRadar as well as in FGcom !!
- They also define how many “Radio Units” (COM0, COM1, etc.) are generated within OpenRadar
- Simply provide a coma separated list of UDP Ports to be used by FGcom. But be warned: More than two are hard to handle!
- e.g. 16661,16662
- Executable: Here you define the program-name that shall be started
- 1b) External: OpenRadar controls a manually started instance of FGcom - via the defined Port.
- For this one you only need to define where that FGcom is running and what the connecting port is. e.g.:
- Client: localhost
- If you want to run FGcom on a different PC you must define here the IP of the remote PC and you must start FGCOM on that PC with the option -s,
- e.g. "fgcom -Sfgcom.flightgear.org/ -p16662 -i1 -o1 -s192.168.178.23"
- If you want to run FGcom on a different PC you must define here the IP of the remote PC and you must start FGCOM on that PC with the option -s,
- FGcom Ports: 16661,16662 (if e.g. 2 FGcom instances were started)
- For this one you only need to define where that FGcom is running and what the connecting port is. e.g.:
- 1c) OFF: No FGcom support (e.g. using MUMBLE or similar)
- That means that You do not want to work with FGcom during your ATC-session – thus you do not need to define any of the FGCOM-fields.
Alternative Radios (e.g. Mumble)
- Mark this option if you want to use e.g. Mumble - that has no functional implications, but will add an information to that effect onto your OpenRadar Operating-Panel.
- If you want to use mumble see http://wiki.mumble.info/wiki/Main_Page and/or http://www.emmerich-j.de/Mumble/mumble.html for installation and operation
FG Multiplayer
- Here you find the server and connection port for the "FlightGear multiplayer server". It delivers the radar contact position informations and is used for chat. You won't have to change the settings, as long as the server won't change.
- In case you experience problems with the outside you may check and/or choose any "Server" that is listed in http://mpserver15.flightgear.org/mpserverstatus/: Look for a server nearest to your location that has a status of "OK" and shows the most "totals".
- PLEASE NOTE: The "Client port" is the port used by your computer to talk with that server. If you want to use FlightGears internal chat parallel to OpenRadar, you must use a different port than FlightGear. Because of that, the default port of OpenRadar is 5001 (in order to differentiate it to the 5000 used in FGFS).
Multiplayer Chat
- In addition to the standard List of ATC-commands selected out of of the drop-down-select-list (right click onto a target) there is a list of codes that you can type into the MPchat. See the list in "../OpenRadar/data/atcMessages/alias.txt". This list you may extend for any (standard) messages you want to sent to pilots via MPchat.
- Define as "Prefix" any character that you will use to indicate that the following is a command (default is a dot ".").
- e.g. if you type ".rs" → MPchat will replace that with "Reduce speed to ".
- Define as "Prefix" any character that you will use to indicate that the following is a command (default is a dot ".").
METAR
- OpenRadar retrieves the weather information via METAR messages from a server in the INTERNET. This information is being displayed and used to calculate the usability of runways and the air speed of the radar contacts.
- If your airport is too small to be in that worldwide list, you can provide the code of another bigger airport with METAR data nearby in the sector.property file. But be aware that then your customers weather-settings may differ to yours, because they may use the standard FGFS-METAR-Source!
Flightplans
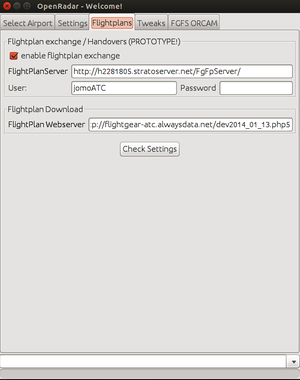
In order to exchange information’s about targets with other OpenRadar-locations, You must define the Server for the distribution of FlightPlan data between all OpenRadar-ATCs. So activate "enable flightplan exchange" and insert the server address:
http://h2281805.stratoserver.net/FgFpServer/
Under this address you can also check where ATC's are offering services right now.
Please click on the "Check Settings" button to have your settings checked prior to continue:
Tweaks
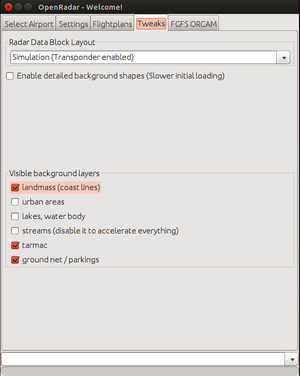
Select/enable according to the descriptions.
Be aware that these option may influence the responstimes of your PC drastically!
FGFS ORCAM
This is an additive feature to OpenRadar, that enables you to view OpenRadar targets as Models - e.g. while they are taxiing on GND or are approaching/departing your airport. For this you can position your "Viewpoint" where you want and watch from there.
For details on how to install and operate see: OpenRadar_FGFS_ORCAM
Operating
Note: As of this version when the main screen starts in OSX it is completely minimized at the bottom left corner of the screen and you must expand this window.
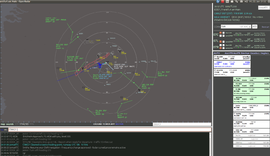
The OpenRadar main screen is divided into four regions:
- Top left you see the big Radar Map showing the airport, its surrounding, the navaids, and the radar targets.
- At the bottom of that Radar Map there is a line for Radar Options
- Bottom left you see the MPchat Area for the FlightGear MultiPlayer chat feature
- On the right side you see the Service Area with 4 subparts. From top to bottom those are
- Status Information
- Radios for Communication (only if you have defined one or more in chapter #Settings )
- Runway Manager to set up runways used
- the Flight Strip Manager, where you can manage your radar targets.
To see examples of actual ATC-events with OpenRadar you may visit http://www.emmerich-j.de/EDDF/Films/Films.html.
Radar Map
The radar map is the most complex part of OpenRadar, thus you have many options to zoom into any detailed area you are interested in. To do that you can:
- zoom in and out using your mouse wheel (Mac: hold your right mousebutton pushed while moving over the radar-background in NorthWest respectively SouthEast)
- adjust the map-center by dragging it with your mouse (click-hold left and drag)
- a double mouse-click onto the scope will move that point into the center of the scope
- a double right mouse-click will center the scope back to your location
- a double mouse-click onto a Flightstrip will center the "Target and Airport" into the center of the map and resize accordingly
- set the four functional zoom levels GROUND, TOWER, APP and SECTOR by zooming the radar map to your taste and then do a "right mouse-click" onto the zoom level wanted for it. Then you can always resize the map to that zoom again by just clicking onto the wanted zoom-level.
The standard Radar-targets
- do have a label attached with the following informations:
- (See also the chapter #Flight-management)
UID heading direction Airplane type Flightplan controlling ATC (if not you) Flight Level Airspeed
- and are displayed in 6 different colors:
blue That are all targets that you controll see e.g. "KL-666" on approach and "B777-20" ready for TakeOff
their Flightstrips are placed to the leftwhite That is always the currently selected target for ATC messages. It's UID is also placed into the MPchat inputline for immediate messages see e.g. "G-MNKY" who just gets his taxi-instructions from you
his Flightstrip may be in any position - it's control-status does not matter because you can talk to any target on the screen (but please do not interfere with the operation of other ATC's in the area!)yellow may be used for targets that are not under your controll - but may ask for your attation soon or may become hazardous for your operations! their Flightstripes are placed into the middle
green targets who are not controlled by you see e.g. "CEMI198" just crossing in high altitude - outside your control
their Flightstrips are placed to the right - that is also the position in which all new targets are placed initiallygray is a neglected target or one for which there were no refresh data received from the MPserver for some time. In those cases the aircraft-type will be replaced by either "neglected" or by the time that elapsed since the last MPserver-update.
Radar-Options
The radar map has so many details to display, that it is impossible to display all at once. Because of that we display details depending on the zoom level. For instance we hide Fixes and/or Runway Numbers etc. at a certain level of zoom. Thus OpenRadar features an adaptive detail level. In addition you can show/noShow types of data by the following buttons at the lower botton of the radar-scope:
![]()
a) map:
| STP | Show/NoShow the "Selected (target) To Pointer" (doggy), an attachment to the mousepointer, showing
|
| PPN | Show/NoShow Parking/Gate names (those will automatically be set "NoShow" above distinct scale-settings!) |
| FIX | Show/NoShow FIX's (those will automatically be set "NoShow" above distinct scale-settings!) |
| RW-FIX | Special Waypoints for automatic approaches/departures (those will automatically be set "NoShow" above distinct scale-settings!) |
| NDB | Show/NoShow NDB's |
| VOR | Show/NoShow VOR's |
| Airports | Show/NoShow Airports, inclusive their groundlayout (You may double-click onto a wanted airport and zoom in to see the layout) |
| Circles | Show/NoShow circles at distinct distances around your present location. The distance between the circles shown depends on the chosen zoom-factor! |
| GS Heights | Show/NoShow Glide-Slope-Heights along the centerline of the runway for landings. (They will automatically be set "NoShow" above distinct scale-settings!) |
| data mode | Defines different modes of Transponder-operations. Try it and notice the differences in the Target-tags and Flightstrips. |
| update frequencies | allows you to vary the timespan between refreshing the radar-picture |
| contact tail | adds a tail of points to the targets - thus indicating the past way of the target |
| layers | lets you select to add overlays to the radar:
|
b) sounds:
Here you can select which "happenings" will produce an additional sound (This list may change in further releases)
c) STP:
Show/NoShow the "Selected (target) To Pointer" (doggy) (Same as in table above - just for faster access)
d) STAR/SID:
Show/NoShow the unique Waypoints defined in the STAR/SID's
e) PPN:
Show/NoShow Parking/Gate names (Same as in table above)
MPchat area
This area allows you to enter chat messages, view the chat history and filter it.
In the entry-line atop you define your messages to any radar-target by:
- Manually typing a message:
- A left mouse-click onto a Flight-Stripe or onto a Radar-Target will place the Target-UID at the beginning of the entry-line
- Then you may type or copy/past anything behind that - and send it out by ENTER
- The font-color will change to red if the message becomes too long for the multiplayer distribution - shortly bevor that the font-color changes to blue as an early warning.
- Generate a standard message:
- A right mouse-click onto a Flight-Stripe or onto a Radar-Target (or the TAB-key if the target is already active) will open a list with the available messages - select one with a left mouse-click
- That will place the message into the entry-line - you may now review/edit it and then send it out by ENTER
- Repeat a message:
- With the cursor-keys "up" and "down" you can scroll thru the list of messages and place them into the entry-line - then you may edit it and send it out by ENTER.
- OpenRadar will always set the ATC-name (as it appears on the very top of the service area - see the following chapter) in front of the message.
Below that entry-line is the scrollable list of exchanged MPchat-messages. In that list the messages related to the selected target are colored cyan. With the button "SEL" you set a filter to show only the messages related to the selected target. This filter will be reset as soon as you select another target - or by clicking onto "ALL".
You may enlarge that MPchat-area by grabbing the upper edge with the left mouse-button and move it upward. Of course that will reduce the size of the radar-screen -- so use it with care!
Service Area
This column at the right side of the screen is for setting up the base-data for the operation, display needed data for traffic-guidance, and provide tools for guiding the pilots.
Status Informations
This area shows in 4 lines the status-informations of your session (compare the picture):
- The first line contains several informations:
- "19:46 UTC" is the actual "Coordinated Universal Time" (replacing nowadays the formerly used "Greenwich Mean Time" (GMT))
- "5000/TL055" is the so called Transition Altitude for that airport/area, in which:
- 5000 gives the "Transition Altitude" in feet when climbing
- TL055 gives the "Transition Level" when descending into that area (in FlightLevels: 1 FL = 100 feet))
- Above that level the altimeter must be set to the standard pressure setting of 1013 hectopascals (millibars) or 29.92 inches of mercury
- At the very right is a text box that allows you to see and change your current MP-callsign. So you can quickly change it, if e.g. a second ATC takes another role at the same airport (TW/APP/GND/RADAR, etc). You may change that ID also when starting the OpenRadar. (ref. chapter #Startup)
- The second line displays the [ICAO] and the long name of your airport.
- The last 2 lines show the current Weather_reports (also called ATIS or METAR):
- At the begining there will be placed a short summary of the flight-conditions:
Code Meaning Cloud Ceiling Visibility LIFR Limited IFR <500 ft visibility <1 nm IFR Instrument Flight Rules <1000 ft visibility <3 nm MVFR Marginal VFR <3000 ft visibility <5 nm VFR Visual Flight Rules >3000 ft >5 nm
- With a mouse-click on the upper line only that line will be sent to the target
- A mouse-click to the lower line will send both lines to the target
COM-Radios
if FGCOM
- According to the amount of FGcom-Ports you defined during setup you find here as many COM-Units (COM0 to max COM3). Each of them has a PopUp-List of Radio-frequencies available for the airport you are located on. You may
- choose a frequency out of the list by clicking onto the arrow at the right of the input-field
- or empty the field by a right mouseclick and enter any other frequency wanted.
- At the right of that field you find a "Push To Talk" (PTT) button that you can operate by mouseclick -- or you can use the shortcuts given in the following table.
COMx left on keyboard right on keyboard COM0 Ctrl NumOff+Num0 COM1 SHIFT NumOff+Num1 COM2 NumOff+Num2 COM3 NumOff+Num7
- Please watch the color change of the PTT buttons to know, when you can speak.
- In case you operate the FGcom in the "controlled by OpenRadar" mode (compare the Setup), then
- the radio label turns to red when FGcom is unable to establish a connection on this frequency. (Remember: OpenRadar has more frequencies available than FGcom knows of!!)
- you have an additional "Restart"-button: In case the communication becomes chopped or interrupted, you may click here to restart the FGCOM-program.
if e.g. MUMBLE
- In case you use mumble there will be just a blank input-field. Into that field you may insert any text that will then show up in your advises to pilots. We suggest e.g. the to use the mumble-server:
- radio-mumble.flightgear.org
Runway Settings
Here you define the major variables for your airport operations: That are the assignments of the runways! For this purpose OpenRadar gives you a lot of precalculated and or default values to support your decisions. See e.g. the pictures on the right:
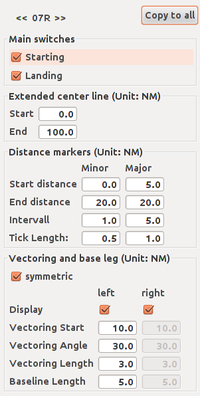
- From top to bottom OpenRadar lists all runways available for that airport. For each runway you may define unique operating/display values (see the picture "The Runway Manager Settings" below). You open these settings by a right-mouse-click onto the runway-number (in the following describtion we clicked onto the "07R" in EDDF):
- In the header line you see left the now chosen runway to be edited, and at the right a button "Copy to All". With this button you can copy the settings you make here to all the other runways - so e.g. for EDDF with its 8 runways you can save a lot of time! With that copy only the numeric-values will be changed - all the selection-markers will remain as are in each unique setting table. (e.g. the length-definitions will be copied for all - the markers "Landing" will remain unique!). These settings will then be saved separately for each unique runway and airport in you private settings.
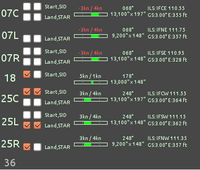
- With "Main switches" you define which functions may be available for that runway. Usually you can define for each runway as well a "Starting" as also a "Landing" function. In the given example for EDDF there is a complication: Per Law you may
- not use runway 36 at all --> thus disable both lines: All data for that runway disappear
- use runway 18 for "Starts" only --> thus enable "Starts" only
- use runway 07L and 25R for "Landings" only --> thus enable only "Landing"
- (Compare the picture "The Runway Manager" on the right: The left marks enable the function - the right ones enable the SID/STAR functions)
- (How do you know those details? Well, as a good ATC you prepare yourself by reading the official airport data (or look for something like e.g. http://en.wikipedia.org/wiki/Frankfurt_Airport, see on that page in the right column).
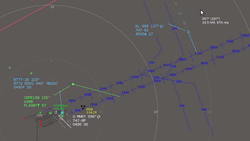
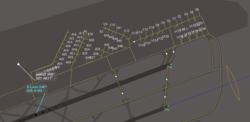
- The "Extended center line" are the blue lines you see in the picture "Typical runway/approach definitions" at the right. If you want that line you may define how long it should be. Some people do not want it reaching over the whole screen. We suggest to limit it to the MPserver-range of 100 mi. It will only be visible for the runways defined for "Landing"!
- The "Distance markers" are measurement markers on that "Extended center line". Here you define from were to were you want to have such markers (they may restrain your eyes if you use them all over!).
- "Vectoring and base leg" define that funnel that you also see in that picture "Typical runway/approach definitions". Also this will be shown only for the "Landing" runways.
Finally your picture will look similar to the right/above shown "The Runway Manager"!
- In that one you see from left to right the following informations for each runway:
- The runway-name
- Check-boxes to define if that runway is used at all, may be just for landings or just for starts or for both. The program prevents you from assigning a runway in both directions (e.g. 25R and 07L)
- A second check-box to display SID/STAR graphics for that runway (if they are defined, check for them in .../OpenRadar/data/routes/ICAO/ICAO.xml).
- A graphical display of the cross winds and and gusts: They are green from 0-5kn, orange 5-10kn and red above. When there are significant gusts that color-bar is divided into two. Typically the gusts then will be represented by the longer bar!
- Above that bar you see the fractions of head- and crosswind. You may use especially the crosswind-fraction to warn pilots if those are => 10 kn! (Remember: You find the normal wind values in the METAR-data further up in the #Status_Informations)
- To the right follows
- in the upper line the exact runway heading (as needed for older type autopilots)
- in the lower line the length and width of the runway in feet!
- Then follow the ILS informations, if ILS is available for that runway. The data shown are: the ILS-beacon-name, the frequency, the glideslope, and the altitude at the threshold.
After you have defined all runways and activated your choice of active runways, you will exit the "Runway Manager" by moving the mouse-pointer out of it. Then the "Runway Manager" will reduce and show only the active runways. (You may move the mouse very fast - then all runways remain visible). Click into that remaining "Runway Manager" to show again all runways.
Flight Strip Manager
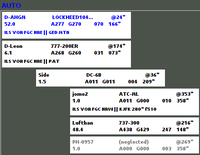
Paper Flight Strips are the ATCs help to coordinate his traffic. In reality those strips contain many details about the flight, that we do not have (yet). Based on vertical space-limitations we have gathered the most critical informations into 2 lines, which are automatically initiated and controlled by the program. Those are:
Target UID Aircraft Type direction to it from ATC distance to it IAS+GND speed Altitude (FL) current heading
In addition You may add some more unique informations in additional lines. We urge you to reduce these additional lines to a minimum, because already with 2 lines the list may become that long, that you must scroll constantly! These additional lines will be saved as target-data (see ../OpenRadar/Settings/atcComments.xml) and inserted each time a new stripe is created for that target! See as a suggestion a typical last line for a unique target name:
- "ILS VOR FGC NRW || and personal remark"
- This pilot knows how to use ILS, VOR, FGcom, the new Runway at EDDF || and personal remark
You are absolutely free to define your own codes and whatever. To do so:
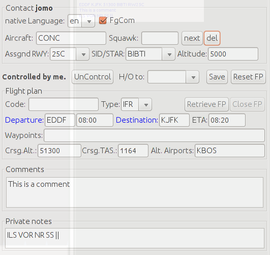
- enter/edit those data by opening the "Note Editor" with a center mouse-click (Mac: Alt + right mouse-click) onto the stripe. There you have several areas to add unique informations:
- At the top of this editor you can
- select in which native language the "standard commands" shall be transmitted (in addition) to that target
- mark if that target uses Radio (the label now says "FgCom", but you may use that for any Radio-usage)
- the upper, larger input-block at the bottom is planed to be used for additonal FligtPlan-data or extended lists of waypoints.
- The above data may be distributed to all ATC's.
- the lower, smaller input-block you may use for your personal requirements, they will not be distributed, but they will be retrieved automatically each time that target reappears on your screen.
- all other (Flight-Plan) data will be explained in the next chapter: #Flight-Plan & Flight-Management
- exit the Flight-Stripe-Editor clicking into any area outside of it.
You can manipulate the listing regarding the vertical and horizontal position of the flight strips:
- New radar-targets will always appear at the end of the list on the right side and will be colored in lightgreen (that green will disappear when you touch that lable first time - thus you always know which ones you have already actively noticed!)
- You can move the stripes in vertical order by drag and drop
- You can place them in three horizontal columns (left, middle and right) either by dragging them with the hold-down mouse button or by mouse-clicks left or right of the stripes (you may double-click to move directly from one side to the other)
- with the "AUTO"-button at the upper edge of this area you can define that the stripes will be sorted automatically into groups according to their left/center/right position. This may be very irritating at first - so you may want to switch that "AUTO" off at first usages!
- The radar-targets will change their color according to the horizontal position of their stripe:
- the radar-targets for stripes at the right side will be green - these are all targets when initialized - i.e. they are not under your controll - any ATC in the area can take control of them
- the radar-targets for stripes in the center will be yellow
- the radar-targets for stripes at the left side will be cyan
On the radar-map the "cyan targets" will overlay the "yellow targets" - and the "yellow targets" will overlay the "green" ones!
You cannot change these combinations of color and position -- but you might define your own definition of what the positions mean! We suggest the following:
- green = right = initial position: Means not yet defined or not under my control (e.g. passing through on high altitude, is controlled by another ATC, etc.)
- yellow = center = I expect him to get under my control when in range (e.g. 60 mi), or he may be transfered to me by another ATC soon, or he may become a danger to the traffic controlled by me if he continues uncontrolled! etc.
- cyan = left = under my control.
Again: That is a proposal - you can define your on meanings!
You can apply the following mouse-actions onto the stripes as well as onto the radar-targets:
- a single left mouse-click selects/activates it, i.e. its radar-target becomes "light cyan" and its UID is set into the MPchat input-line. In addition
- its listed messages in the MPchat-list become colored cyan
- and the "doggy" at the mouse-pointer displays data about the relation between that target and the mouse-pointer
- a double left mouse-click helps you to find the target by highlighting the target on the scope. It also changes the radar-range to show both: The Target and your location. The selection of any of the "preset zoom levels" (GROUND, TOWER, APP, Sector) will reset the map-position again to its center!
- a center mouse-click opens the Note Editor (see above)
- a right mouse-click shows the dialog to choose pre-defined ATC messages to be sent to the current contact
- a CTRL+left mouse-click will define that target as neglected. Thus his radar-target will become just a light gray color, that will not overlay or otherwise disturb the radar-views.
Flight-Plan & Flight-Management
There is now a Flight-Plan feature inside OpenRadar. With this you can define OpenRadar-internal Flight-Plans ("OR-FP") that get distributed to all ATC's within the range of the target, as it moves from area to area. Thus every ATC can decide on first sight whether that flight affects his duties and how. This Flight-Plan can only be generated and/or edited by the ATC that is actually controlling the target at the given time. Due to time-restraints/workload ATC's will only input the most required data (see in the following the "Mandatory fields") - thus that will never substitute a thorough flightplanning by the pilot - nor will ATC take the time to type ALL flightdata as dictated by the pilot!
In future there will be added a common interface to existing Flight-Plan-Programs, so that the pilot himself can pre-define all data for his flights – and OpenRadar takes over that data automatically in its internal Flight-Plan. As of Feb.2015 this is already functional with the Flighplanning on "http://flightgear-atc.alwaysdata.net".
Define/Edit a Flight-Plan:
You open the Flight-Plan for a target by clicking with the “center mouse-button”
- onto the Flight-Strip of the target
- or the target on the radar-screen
- You can also open the "active" target by the ^-key
Before you start defining a new plan
- click onto the button "Retrieve FP" - that will load any Flightplan that may be available on a compatable FP-system
- otherwise you should make sure all data become "newly intialized" click onto the button "Reset FP"
After the Pilot "Landed" and "closes" his FP you should use the "Close FP" so that plan will also be closed in the OpebRadar server
Controlling the ownership:
You can only define/edit a Flight-Plan for a target that is under your Control. i.e. the field
“Controlled/Uncontrolled" must state “controlled by me”!
- If it is “uncontrolled” click onto “control” and that field will indicate your “ownership” and avoid others to change
- If it is “Controlled by …..”
- you must wait till the ATC controlling it now will
- either remove his “ownership” by
- clicking onto “Handover to” and selecting
- another ATC for takeover
- or the “blank” for just removing his control.
- or clicking onto the button “Control” (besides the lable "Uncontrolled...")
- clicking onto “Handover to” and selecting
- either remove his “ownership” by
- or the target gets outside the range of the indicated “Owner”. In that case the Flight-Plan will be set to “Uncontrolled” automatically
- or you send the controlling ATC a mail asking him to release the target
- you must wait till the ATC controlling it now will
- If it shows “Controlled by me” you can release the target
- by clicking onto “Handover to” and selecting another ATC (or “blank”) for takeover
- or you grab the Flight-Strip with the mouse and move it to the left into the radar-scope and select an ATC (or “blank”)
- or you move the Flight-Strip all the way to the right – that will just remove your ownership
Mandatory fields of the OR-Flight-Plan:
- Contact is the FGFS-UID of the target (will be set automatically)
- Radio needs to indicate that the target can use Radio (FGCom or Mumble or ..)
- Aircraft is the model-code of the target (will be set automatically)
- Assgnd RWY needs the planned runway for departure or landing. You assign the runway either by the PullDown or by DoubleClick onto the runway number in the “Runway Settings”
- SID/STAR needs the name of the SID/STAR, if requested by the pilot
- Departure is the departure Airport (will be set automatically to your airport if on GND - or manual)
- Destination needs the ICAO-code of the destination (e.g. EDDF for Frankfurt)
- Crsg Alt needs the planned (initial) cruising altitude for that flight (usually in FL)
- ETA is the “Estimated Time of Arrival” - that is automatically calculated based on the given aircraft type, altitude (CrsgAlt) and speed (Crsg.TAS) (You might override it if you know/want it more realistic)
Optional fields of the OR-Flight-Plan:
- native language is per default “en” for English. If you choose another language, then all your selected MPchat advises to that target will be sent in English and then repeated in that chosen “native language”
- Squawk shows the Squawk-Code you assigned to the target (for details see Transponder)
- Waypoints keeps predefined waypoints (if required or sent by other flightplanning systems)
- Altitude as assigned by ATC from time to time (not the planned/constant "Crsg.Alt"! (compare below))
- Code will be used in future when given by a more professional Flight-Planning system
- IFR/VFR may be defined by the PullDown
- Crsg.TAS.: Define the planned TAS en route (usually as GND-speed)
- Alt.Airports can be defined as a needed deviation in case of bad weather etc. at the planned destination airport
- Comments here you enter comments that will be kept together with the Flight-Plan - and are visible to all ATCs en-route
- Private notes are comments that remain with the ATC making these (stored then in the local file OpenRadar/settings/atcComments.xml). These will always be re-inserted whenever that target is visible to the unique ATC, independent of if he is the “active controller” or not.
Flight-management:
Open the wanted Flight-Plan
- by a center-mouse-click onto the radar-target or the FlightStrip
- you can also use the ^-key to open the FlightPlan of the active target.
Then continue as described in the following scenarios: (In these scenarios only the "Simulation" labels are shown - to see all possibilities see the summary at the end)
1. A target appears on your airport

- There are no data yet filled in yet into the flight-plan from any ATC, and there is no ATC assigned yet. Thus
- the text in the tag-color is “green” - i.e. you did not yet take control
- the flight-strip background color is light green, in order to indicate that you did not yet do anything with it - i.e. it asks for attention from you to decide what to do with it
- a simple mouse-click or any other action will remove the green background (and activate that target as usual - i.e. showing the lable-text and the MPchat messages for this target in cyan).
2. You define a new Flight Plan
- Pull the Flight-stripe all the way to the left (mouse-drag or double click left of the FlightStrip). (If there is still another ATC the owner, then you cannot take over prior that the other ATC released or transferred that target!)
- Generate the Flight-Plan:
- Compare the Informations given in the target-label and the stripe:
- e.g. when there is defined (just below the scope) in “map → data mode → Simulation (Transponder enabled)”

jomo the pilot FGFS-UID 160° the current heading (now on ramp!) HeadSet-sign that pilot uses radio (FGCom or Mumble) CONC the FGFS-model is the Concorde KJFK is the planned destination 260° is the straight heading EDDF (departure) to KJFK (destination) BIBTI is the SID planned for departure (on arrival here would be the STAR) RW25C is the runway assigned for departure (or for arrival) 0400* is the current altitude (on GND in EDDF!) 00 is the speed (still parking!)
- Departing:
- GND will use the data as shown above, to bring the plane to the HoldingPoint
- TWR will take over
- The runway-assignment will be removed automatically after Take-Off
- Transfer Control to next ATC (or blank)
- grab-move the FlightStrip to the left into the Scope and select the next ATC (or open the Flight-plan and select at “Handover to:”).
- if there is no “next ATC” available select the blank entry – the target is then free to be picked up by another ATC en-route.
- the FlightStrip will indicate the pending transfer by showing
- “current ATC” => “next ATC”
- The FlightStrip on the console of the “next ATC” will change the background-color to yellow – to grab his attention!
- as soon as the “next ATC” has taken over the Flight-Strip will turn back to normal – indicating the “next ATC” is active -- and you cannot do any more changes!
3. A target appears in your airspace:
- take over the control (i.e. move the Flight-Strip all the way to the left) if
- there is no ATC assigned yet
- or the FlightStrip indicates that the current ATC wants you to take over the control (see above “current ATC” => “next ATC” indication)
- if the target has no owner yet and is just crossing your airspace and tells you his destination, you may open the FlightPlan and insert that destination so that all the other ATCs know about it.
- If the target lands on your airport:
- assign a RW and optional a STAR
- the needed GND-traffic (Taxiways, Parkinglots, Gates, etc) is not part of the FlightPlan. (But you can always add your remarks for your own usage).
4. A ATC forgets to “reassign” or “free” a target:
- The ownership will automatically be removed as soon as the targets gets out of the rang of that ATC (~100mi). After that any other ATC may take over.
- or you contact that ATC and require to release that target out of his control
Summery of Flight-Strips and Target-Tags
Depending on what you selected in "map" -> "data mode" (see the menu above the MPchat entry-line, at the very left) the Radar labels may look different. See the summary in the following table:
EDDF forwards the target to EDDK:
Functional Keys
Radar Map
- On contact
- left click selects and sets cursor into the chat input field
- middle click opens the radar contact settings (ATC note and native language)
- right click opens the ATC messages selection box
- left double click on map to center it on airport (return to airport)
- middle click on zoom level defines the current view as new center and zoom setting (stored in a file)
- a click on the texts, on the lower left, toggle display of FIX, NDB, VOR,...
Flight Strip Area
- On flight strip
- left click selects the contact and sets cursor into the chat input field
- middle click opens the radar contact settings (ATC note and native language)
- right click (or the TAB-key) opens the ATC messages selection box
- left double click centers radar map on the contact (to find contact)
- CTRL+left click sets the contact to be neglected
- a click beside the flight strips moves the flight strips between the three columns (right, middle, left)
Runway area
- right click on runway number opens the runway settings dialog to define the centerline and vectoring settings
- If at least one runway is active you may double click the runway panel background to hide the inactive runways (frees space for flight strips)
Radios
- a right click on the frequency list changes the input to be editable, so you can define the frequencies by yourself
Shortcuts
| Shortcut | Action |
|---|---|
| ESC | Close all open dialogs and cancel the text input (reset chat input field) |
| ESC,ESC | Deselects the current contact |
| ALT + L | Toggle FGCom Log Window (only if you run FgCom started by OpenRadar) |
| Left CTRL | PTT Radio COM0 (if it has been activated via Port in Settings) |
| NUM off: Num0 | PTT Radio COM0 (if it has been activated via Port in Settings) |
| Left ⇧ Shift | PTT Radio COM1 (if it has been activated via Port in Settings) |
| NUM off: Num1 | PTT Radio COM1 (if it has been activated via Port in Settings) |
| NUM off: Num2 | PTT Radio COM2 (if it has been activated via Port in Settings) |
| NUM off: Num3 | PTT Radio COM3 (if it has been activated via Port in Settings) |
| F1 | Zoom Level GROUND |
| F2 | Zoom Level TOWER |
| F3 | Zoom Level APP |
| F4 | Zoom Level SECTOR |
| F11 | play new Chat, new Contact and new METAR sound (for sound testing) |
| F12 | Copy mouse location (geo coordinates) to clipboard (for route design) |
| ⇧ Shift+F12 | Reload and update standard route
definitions and texts (for development) |
