Howto:Make nice screenshots
This howto will explain how to make nice screenshots in FlightGear.
Basics
What separates good pictures from bad pictures?
Good pictures
- Appeal to us in some way, by telling a story, revealing something unexpected, or showing an interesting point of view.
- Encourage us to look at them for more than just a second, searching for more details. A good screen-shot can invite us to think about how it was made, maybe even inspire us to create images of our own.
The best screenshots are technically correct, the lighting and colors are right, and the composition is good.
Explaining how to compose a picture is difficult, so instead I suggest you to read tutorials and explanations given on many websites on the web like this one: Composition (visual arts) ![]() .
.
Quality
From a broader perspective, it would be desirable if new screenshots could also showcase new FlightGear's capabilities using high quality settings. Say someone googles "VFR guide" because he wants to know something about VFR flying and comes across a bunch of screenshots of FlightGear - we'd really want to impress here so that user gets curious and tries FlightGear. Back when there were still manuals, almost all simulators (Falcon 4.0 for instance) had the highest detail level for all the internal screenshots, not the lowest. So that's something to keep in mind when showcasing FlightGear.
A good virtual picture needs a good quality. That means:
- Enabling anti-aliasing (AA). Enabling some level of Transparency anti-aliasing if using terrain overlays at low altitude.
- Appealing/true colors
- Size of the picture- not too small, not too big
- No Gui/Menu/FPS counter etc. visible
- Full effects
This means you need a decent computer with middle - good specs. At a minimum, you should able to run Flightgear with smooth frame rate with high anti-aliasing settings. Some people don't have this, so there is another solution proposed by Melchior Franz : [1]. Running at a lower resolution will often improve frame-rate when AA or high shader settings cause a frame-rate bottleneck. Windowed mode will let you experiment with different resolutions.
If the intention is to make a screenshot to showcase Flightgear, it's always possible to pause the sim and turn graphics settings up, and then turn settings down to resume flying.
How to get some unusual/ interesting views
To get some ideas, it's a good idea to look for aircraft picture pages around the web like Airliners.net. It will give you some ideas, and in addition, it is always a good idea to think about what you actually want to show case. While a snapshot of an airliner in mid flight is -for instance- a nice way of showing its latest features on the forum, it typically doesn't really last as an overall impressive screen shot. Placing the aircraft in a scene where some implied action is taking place will most of the time already make a huge difference. Capture the plane while it's banking, gear is retracting, etc. will imply some dynamic motion in your otherwise static image. In this respect, it may help to think of a little story, a scenario that you're re-enacting. Trying to capture a few key scenes from a flight may also help to make the difference between an average and an interesting screen shot.
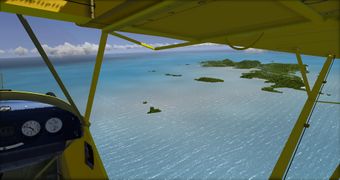
Air to Air
- Helicopter View: This assumes that you are in a virtual, invisible helicopter besides the aircraft. You are always flying level. With the mouse you can choose the position of the "helicopter".
- Chase View: This assumes you are chasing the aircraft. It is very similar to the first one.
- Chase View without yaw: Also chasing the aircraft, but the virtual camera doesn't turn with the aircraft.
- I'm a missile view (on certain aircraft only): This view places itself near an AI air-to-air missile that has been fired, looking forwards. With the mouse you can choose the view direction. Only on the Mirage-2000-5 and Harrier development versions.
Try switching between them to see what you like more(I prefer Chase view). Playing around with position of the camera will help too. As an example if the aircraft is turning and banking, make a shot from the wing to the aircraft facing the ground. Or while approaching the runway, a shot from behind the aircraft would be good. For I'm a missile view, moving the camera forward and looking back at the missile and the aircraft can make compelling shots.
Ground to Air

For this we use the Tower view and Tower View look from. This assumes that the virtual camera is on the Airport Tower, ca. 30ft above the airport level. You can choose via the Menu which airport is used. That's nice, but limited.
Anders Gidenstam made a nice nasal script to move the tower whenever you control-click on the ground.
You can find it here. Copy the code between the <PropertyList>-tags and put in somewhere in your preferences.xml . Now, when you Ctrl + left click somewhere on the ground, you can set the position of the tower view. The view is still about 30 feet above ground level; assuming you want to stand at eye-level, you can change the line
setprop(tower ~ "/altitude-ft", 30 + (click_pos.alt() * M2FT));to
setprop(tower ~ "/altitude-ft", 6.5 + (click_pos.alt() * M2FT));Panorama

A Panorama ![]() is a wide-angle view. With this, you can show large areas of the scenery or flightdecks.
is a wide-angle view. With this, you can show large areas of the scenery or flightdecks.
For this, use the cockpit, passenger, or tower view, then position the virtual camera at the point you want. Pause the sim and pan the virtual camera all the way around, saving many screenshots so they cover the entire visible area.
Now use your favourite panorama software and stitch it!
No software yet? Use a search engine; there are several freeware programs outside. A common choice is Hugin; it's free and open source, cross-platform and used by many professional photographers.
Panoramas with Hugin
There is a (WiP) nasal script in this forum thread that takes a user configurable grid of overlapping screenshots. The script is based on the spherical panorama script. To take a line of screenshots means setting grid size to 1 by n.
A lot of lower FoV and closely overlapping screenshots can eliminate perspective distortion. FG is paused preventing cloud, tree and sun movement. The combination allows creating higher quality panoramas which aren't often practical with a physical camera.
Cylindrical and similar panoramas don't need a special viewer, unlike spherical panoramas. Hugin is pretty much automated and following a simple series of clicks will produce good results. The forum thread has details on using Hugin.

Spherical panoramas
If you want to make full spherical panorama take a look at this tutorial.
Field of View (FoV)

You can change this by pressing ⇧ Shift+X or X or using the Mouse-wheel in View-mode. The field of view is by default set to 55 (degrees).
Increasing the field you get wide angle up to 120 degrees. That's interesting as it covers a whole part of the scenery but also seems to make objects appear far away. Use it for showing large parts of sceneries, or long aircraft, etc. Another interesting feature of using a wide angle is that it exaggerates perspective. One effective use of this consists of using a wide angle lens combined with placing the camera near the object. This will make the object in question appear larger, more impressive than it really is. For an higher, wider angle make a panorama.
Decreasing the field you get a narrow angle and a zoom-effect. This means you can take far away objects virtually close to you. An interesting effect is, that it also makes the background more "dense". Another interesting side effect is distance foreshortening, meaning that the distance between various object is becoming compressed, suggesting less space between objects than there really is.
Lighting and Daytime

The most appealing photos in real life are made in the morning or evening. The light has a warm color and the shadows and ambient colors are soft and long which gives fantastic impressions. The noon gives hard shadows and strong contrasts, which are hard to deal with.
This applies to FlightGear as well. So play a bit with the time of day, especially Dawn/Morning/Afternoon and Dusk. Play with the seasons and locations as well. In the winter near the poles, the sun is low, while near the equator the sun is standing high in the sky. As an example, this gives nice effects with the water shaders.
Weather
Our weather has improved much with the addition of advanced weather - see the gallery. To enable it, you must open the Environment > Weather dialog, then check "Detailed Weather" and click "OK". With advanced weather enabled, clouds are placed while taking the terrain and wind patterns into account, making for much more realistic cloud and weather patterns. Advanced weather works best with atmospheric light scattering enabled as well.
.jpg)

.jpg)

.jpg)
This is an old 2012 article on how the advanced weather system works and is driven by terrain. It's definitely is worth reading.
The dialogue Environment > Weather > Detailed weather > Advanced settings has a lot of options that affect weather. The cloud shadows options is there. The ground haze and haze structure options simulate moisture. The smog slider should also be used for the organic smog of forests in areas such as the Blue Mountains of Australia, the Blue Ridge mountains of USA, and some forests in countries like France or Italy. Turning up convective conditions and turbulence will affect cloud shape as thermals get stronger and narrower.
The scale sliders in the Advanced options dialogue affect how quickly the weather changes over space. For instance it's easier to get a single storm cell with skies mostly clear elsewhere by making the scales smaller.
Remember to use Environment > Weather > Detailed weather > Advanced settings > Temperature offset with scenarios to simulate higher or lower temperatures. This is the only way to simulate winter, for example. Rainy scenarios produce snow-fall as as the temperature changes.
Use Environment > Environment settings for rain on the ground, or adjusting snow deposits - these are not set from the weather dialog as they depend on history of weather, not weather at any instant.
The advanced weather simulation is very sophisticated. There are many properties of atmosphere state that are currently not exposed by the GUI, or are not practical to expose. These properties are randomised each time AW is initialised. Live METAR reports are a vague, limited, rounded off, variable quality, hint at atmospheric state very close to an airfield given at varying intervals intended for airfield operation. Therefore, when using METARs to drive weather there are a lot of properties that unavoidably need to by randomly guessed by Advanced Weather. Pressing "Apply" in the Weather dialog for a given weather condition or a METAR will create a new random set of properties.
Environment
Nature is always changing, often in cycles. This article from 2015 details some ways in which Flightgear simulates this constant change. Since that article has been written things like Auroras have been added. The settings are in Menu > Environment > Environment settings. To control volcanic activity (March 2020), fly near a listed volcano and goto Environment > Volcanoes to see a list of volcanoes in the region.
The position of the sun, planets, and moon follow reality and are driven by Flightgear's accurate celestial simulation. The arc the sun describes will vary according to time of year and how far away from the equator you are. In winter the arc of the sun keeps lower the further you move towards the poles. Moon phases vary in a monthly cycle. Remember the moon is visible during the day too, and can create some striking views, especially when zoomed in a bit.
Earthview displays the Earth from high altitudes or orbit with cloud shadows and cheangeable atmospheric properties. There are high resolution texture maps available here. Try spacecraft like Vostok-1 or Space Shuttle, high altitude craft like the X-15, or fictitious craft like the UFO or a 3rd party craft.
Flightgear supports small scale detail with 3d structure (volumetric detail) on terrain with the use of overlays. Overlays can show detail down to individual grass blades on airport keep, and are therefore are GPU intensive. Try them out if you have a recent GPU with the Multi-sampling variety of transparency anti-aliasing enabled. Some regions will have performance to spare as they are less demanding on GPUs because they don't have trees or bushes like Iceland, which can help FPS on older GPUs while using overlays. Overlays are easy to toggle, and switching to a smaller resolution in windowed mode may help.
There is a 2nd type of grass that is currently turned on through XML as it looks bad without ALS renderer (March 2020). It's used in some sceneries like the Kansas/Midwest scenery to add smaller plant layers on top of grass. More examples and instructions in this forum thread.
Remember to experiment with the snowline and snow thickness. The snowline is set by default to the METAR weather at the moment. Snow can stay around for weeks. The actual thickness of snow and the snowline depends on the history of snowfall and weather over a period. It's impossible to know that from the METAR. See Environment settings > 'Set maximum snow level from METAR', 'snowline', and 'snow thickness'. The right sun angle can bring out detail in snow.
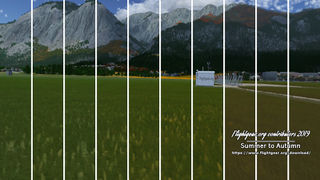
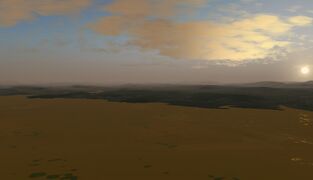
Transition of seasons from summer to autumn
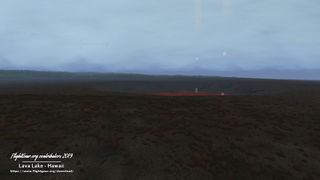
Lava lake showing 3d structure of cooled lava with overlays enabled at Kilauea, Hawaii
'Weeping wall' waterfalls at Mount Waialeale, Island of Kauai, Hawaii
The moon is visible at daytime. Changing date slightly changes phase
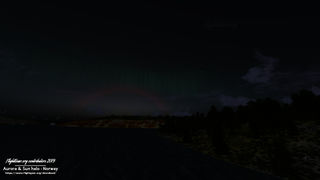
Aurora Borealis and Sun halo in northern Norway (sun below the horizon). The rays of the low sun are red, making the halo red
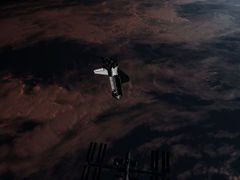
Earthview
Tidal flats at low tide. Tidal flats gradually transition from uncovered to fully covered by water. Tides change based on time of day.
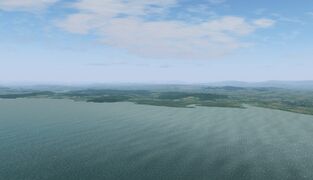
Tidal flats at high tide
Thin patchy snow
.jpg)
.jpg)

.jpg)
.jpg)

_01.jpg)
_02.jpg)
_in_Flightgear_2020_LTS_06.jpg)
Notable optical and lighting effects
Flightgear has a very sophisticated light simulation. This 2014 article describes just some of what was simulated at the time. Tip: Press 'Apply' in the weather dialog to get a new set of random values for unexposed atmosphere properties that create optical effects. Here are a few things to watch out for (March 2020):
- Ice halos from ice crystals (icy haze) in the atmosphere interacting with sunlight. Lower temperatures increase the chance. Use a negative temperature offset to lower temperatures.
- Sun halos: 22 degree ring around the sun. Halos occur frequently, upto a 100 days per year.
- Rainbows: in rain volumes forming a 40 degree ring around the point opposite the sun (anti-solar point). Heavier downpours with larger droplet sizes makes bows more intense.
- Aurora: A ring around both magnetic poles at all times of the year. Normally seen at latitudes above 60 degrees. Large disturbances in the magneto-sphere by solar activity can cause Auroras to be seen further towards the equator. Auroras have been seen as far away from poles as Austrian Alps/Germany(2015), Florida(1989), and even reportedly Honolulu (great solar storm of 1859).
- Clouds: Colour change of high (cirrus) clouds with angle because of the way ice crystals interact with light - try a low sun. The "silver lining" at edges of clouds.
- Water colour: the colour of water depends on the depth, suspended particles bouncing light back toward the camera, light from the overhead sky, and time of day. Suspended particles or depth changes the colour from region to region in Flight-gear. Green algae can make the water in the Colorado river different from the clear shallow blue-ish Caribbean sea, or the mouth of the Amazon river which is brownish from silt. An overcast sky will make the sea grey-ish.
- Ground and surfaces: Lighting of water, puddles, snow, and ice. Water includes rain splashes, fog, and ice on canopies. Snow can build up on flatter surfaces, including roofs. Experiment with the sun at low angles, snow thickness, and sunlight that is reddish or yellowish at sunrise/sunset. Experiment with wind-strength, direction to create waves.
- Earthview: Try increasing the dust levels. Try manipulating the clouds after temporarily un-ticking cloud shadows. Terrain relief is best seen with a low sun angle.
Colour change due to scattering by ice crystals
Reflection of light from the sun by puddles at lower sun angles
Thin clouds close to the sun show a peak in the intensity of light scattered in the forward direction. Snow is lit by the yellowish light from the low sun.
At low angles dust on glass surfaces can be seen on craft which support it like the Shuttle, A320, and EC145
Frost on windows
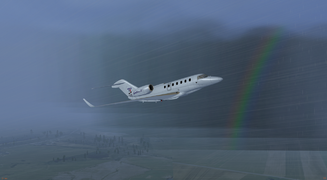
Rainbow
'Silver lining' in the fringes of clouds
Shallow clear waters of the Caribbean under a clear noon sky
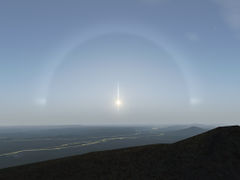
Sun halo (22 degree ring), Sun pillar (vertical line through the sun), and Sun dogs (left and right of the sun).

,_Austria_(Flightgear_2018.x).jpg)
_02.jpg)


.jpg)

.jpg)
Locations
The choice of the location depends a bit what you want to show. So what want you to show? Do you have already a theme in mind?
As an example for showing an aircraft just for presentation, use an "empty" background like the sky, sea or desert. If you want to show the aircraft during operation you could choose some of FlightGear's better airports like EHAM, LFPG as the background, or some of the more detailed custom sceneries.
Picking the right livery and aircraft configuration


The right colour scheme for the scene can make a huge difference. Liveries in FlightGear can often be changed mid flight. The first two shots of the c172p show the difference it makes. If the liveries were swapped in the two screenshots, the result would be less pleasing to the eye. The light from a low sun is yellowish or reddish. This can add to the colour of shinier surfaces or glass depending on angle. Things like afterburners or spotlights affect colour too.
Hoping to stumble upon the right shot versus changing what you can control to increase your chances of finding a good shot
Nature can create an almost infinite combinations of environment state, weather and lighting conditions. Flightgear's simulation follows nature. A particular combination can be rare indeed. A casual google will find many articles written about how long nature and landscape photographers using a physical camera have to wait! In a simulated environment like Flightgear there is a huge advantage when we can control the environment or even time itself.
This article and its' reference article are just the first search results, but they talk well about how people taking nature photos with a physical camera "brainstorm" about possible combinations of environment, weather, and lighting that go well together. People have to do all they can to try to increase their chances of being in right place at the right time to see something interesting. The article talks about waiting years to get foggy weather at a specific location or waiting 3 years to get a combination of ground haze/sunrise/tulips. One account is about returning year after year for the 1 week during which the sunsets exactly in the middle of the arch of a bridge while hoping for clouds that moved away from the camera. These photographers may never get the exact intensity or combination they seek, but they can hope for something interesting. Some events like unusual weather, huge geomagnetic storms, or volcanic eruptions may happen once or a few times in a lifetime. The chances of then finding a particular combination of weather or environment is almost zero.
Unlike taking photos with a physical camera, you don't have to hope you are in the right spot, looking in the right direction, with the right weather and lighting exactly right for that direction. We have god-like control over time, environment settings, weather, and lighting. The landscape is harder to control as relocating or approaching from another direction does take time.
If you are flying and find a particularly striking location or view suitable for a particularly good spot, it's always possible to imagine if it would be better with different approach direction, environment settings, weather and lighting. Experimenting with different settings can help. The previous weather can be restored when you resume your flight. The flight recorder lets you look through the historical flight path and change weather (some craft support this better than others).
_01.jpg)
The sim can be paused at any time. This lets you to easily switch view, tweak Field of View, change environment settings etc. There are two different clocks in Flightgear. The environmental clock controls things like the sun, moon and their lighting. The physics clock is used for the physics that can affect your craft. Weather is also part of physics. You can watch a sunrise while flying among mountains with 600x environmental time-acceleration without crashing. The sim must be unpaused for Advanced Weather to be re-initialised with new random properties and populate clouds. The sim must also be briefly unpaused to let change of environment time affect the scene lighting. Slowing physics time down can help you change weather without your craft going past the landscape. In fact if you slow down physics time, you can 'catch' lighting by pausing, and then take a screenshot.
Lighting in the atmosphere is all about angles. Time, sun position, moon phase, view direction relative to the sun. You can use this knowledge to make it more likely you see what you are looking for. For instance rainbows are light scattered back by a rain volume. Rainbows form a circle around the point opposite the sun. Using this, you can increases the odds of a good rainbow screenshot by flying when the sun is low, and approaching interesting scenery in a direction that places the scenery between the point opposite the sun and your camera. Of course, the point opposite the sun has to be in a rain volume too. Flying when the sun is low is simply a good way to spot rainbows. If you found an interesting scene you want to showcase like an airport, you can always try to put the sun in a good spot by changing time of day/year and re-initialise weather until you get a rain volume where you want!
Colors and whitebalance
As in real life, in FGFS the pictures often have to be corrected in colors and white balance. This can be done with almost any image editor. In GIMP this can be done through Layers > Colors > Brightness and contrast.
Conclusion
When keeping this all in mind, you can make some stunning pictures. Try and play with as much you can, look at real images to get hints or try to copy a real life image in FlightGear. All this will help you to take good pictures!
(Note: the screenshots used in the page may not be all examples of artistic shots. A few of them illustrate a particular aspect of FG with haze/smog turned down, or were what was available at hand. See the screenshots of the month category for better examples)
User experiences

.jpg)
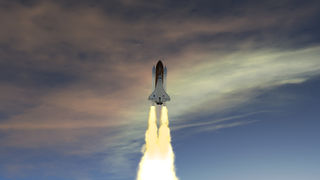
Thorsten Renk
| One of my favourite Shuttle shots: I took about an hour. I set up a good thirty different cloud configurations on the pad and then used the view offsets to anticipate how they'd look when I punch through the cloud deck. When I had one I liked, I played with time and environment settings to adjust the light. Then I launched and paused FG going through the cloud deck and used the view offsets for five minutes to find the one angle which I really liked. Then I repeated the whole exercise two more times and took the best shot out of those. — Thorsten Renk (Jan 26th, 2016). [FlightGear Forum] Re: FG Promotional Video.
(powered by Instant-Cquotes) |
Related content
Wiki
Forum
- Media subforum
 - Subforum with many great screenshots.
 - Search for Screenshot of the month (SOTM)