Photoscenery

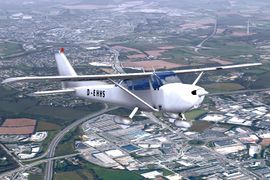
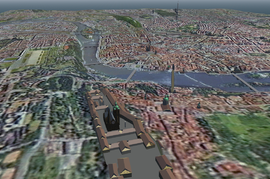
Photoscenery is scenery in which orthoimagery (aerial photographs) is placed over the terrain.
Why use photoscenery?
Advantages:
- Photoscenery shows the real world, it does not try to resemble it.
- Areas blend realistically, instead of a hard cut between urban and forest, or water and land for example.
- For VFR flight, more easy navigation in known locations because landmarks are more easily recognized
Disadvantages:
- One needs large (or many) textures for high resolution scenery. For low level (VFR) flying, 1 m/pixel is the absolute minimum.
- Orthoimagery is often hard to obtain, especially under an open license.
- The system running photoscenery has a higher memory (RAM) demand
Enabling photoscenery
Photoscenery can be enabled by navigating to the menubar: View, Rendering Options, and click on the Satellite Photoscenery checkbox.
This will load Photoscenery from your normal Scenery folders (subfolder "Orthophotos/").
Obtaining orthoimagery
- USGS, provides 3 m/pixel imagery for the entire United States of America, released in the public domain (and thus GNU GPL compatible).
The prefered way of downloading these images depends on the used method Please read how to create photoscenery, before starting.
| Note The most easy and quick way nowadays is to install Julia and use the Julia photoscenery generator. |
Preprocessing
- Since FlightGear adds haze to the scene, the textures should be "unhazed" to avoid double hazing.
- Shadows included in the images will conflict with shadows added by FlightGear. When creating small areas, shadows can be removed by hand from the textures, but this is usually undoable.
Creating photoscenery
There are several ways of creating photoscenery for FlightGear, of which some are discussed here.
| Feature | Texture overlays | Texture materials | 3D Model | osgEarth | Comment |
|---|---|---|---|---|---|
| Supported by stable FlightGear release (requires no patching) | No | No | Yes | No | |
| Toggle on run-time | Yes | No | Yes | Yes | With the current patch, the textures overlays are always loaded. |
| Water reflections, random buildings/trees | Yes | No | No | No | Depends on accuracy of underlying terrain (shapefiles) |
| Texture masks (not-so random objects) | No | Yes | No | No | |
| Requires no adapted scenery | Yes | No | No | No | |
| High resolution | ca. 4m/pixel | 1m/pixel or higher | Yes | ||
| Advanced weather support | Yes | No | No | No | Depends on accuracy of underlying terrain (shapefiles) |
| Requires no custom materials file | Yes | No | Yes | Yes | |
Texture overlays
This method places the photo texture on top of the normal scenery. It requires patches to be applied to the FGData and SimGear sources.
- Calculate the tile bounds.
- Cut the orthoimagery to the bounds of the tile and save it with the name of the tile (for example
3023737.png).- A 4096 x 4096 pixel texture gives roughly a 4 m/pixel resolution. Most graphics cards cannot handle larger textures, so when distributing the scenery this can be considered to be the limit. Tests on various machines showed that 16384 x 16384 pixel textures are possible (1 m/pixel).
- Mirror the texture upside down.
- Convert the texture to
.ddsvia NVidia's nvcompress (part of the NVidia Tools).- It was found that 16384 x 16384 pixel textures can not be processed by nvcompress. The DDS plugin for GIMP worked fine though.
- Place this texture next to the respective
.btg.gzfile.
Simply launch FlightGear with $FG_SCENERY set to your scenery directory. Disable all shaders in the Main Menu > View > Rendering Options dialog. Model and Water can be enabled, but all other shaders will disable the photoscenery.
| Note Step 1 to 5 can be done by the photoscenery perl script from the FGScenery tools, when the imagery is obtained via a Web Map Service (WMS). |
Texture materials
Another approach is to add each photo texture as a "material" in the materials.xml file.
- Calculate the tile bounds with the python scripts from http://fgphotoscenery.square7.ch/#howto.
- When creating low resolution scenery (4 m/pixel or lower), a single 4096 x 4096 pixel texture can cover one tile. Higher resolution scenery requires the tile to be cut into smaller pieces: we'll call those photo tiles.
- Repeat the following steps for each single photo tile.
- Mirror the texture upside down.
- Convert the texture to
.ddsvia NVidia's nvcompress (part of the NVidia Tools). - Create a shapefile with the size/location of the texture. Save the shapefile with an unique name (for example
302373_3_2.shp, where the3_2indicates the horizontal/vertical tile id. This is not needed when using just one texture per tile).
- Generate the scenery with TerraGear, using the shapefiles as input.
- Currently TerraGear does not create good UV maps, so some manual steps are needed:
- Import (one of) the
.btg.gzfile(s) in Blender via the Blender and BTG plugin.- Correct the uvmapping of each single sub-tile. The map should cover the texture exactly.
- Export the file again. Please note that you cannot re-import the file after exporting, so do not close Blender before verifying that the UV mapping is correct!
- Create a
materials.xmlfile for your project. For example$FG_ROOT/Photoscenery/materials-nl.xmlfor Dutch scenery. - Add a material definition for each single sub-tile, like:
<material><name>3023745_1_1</name><texture>NL/3023745/3023745.1.1.dds</texture></material>- The texture path is relative to
$FG_ROOT/Textures.
Now launch FlightGear with $FG_SCENERY set to the output directory of TerraGear and the command --materials-file=Photoscenery/materials-nl.xml (for example).
3D Model
Instead of using the normal terrain, one could replace it by a big 3D model.
- Create a 3D model of the terrain and texturize it with the orthoimagery.
- Place the model as any other 3D object in the scenery.
- Remove the corresponding
Terrain/.../... .stgfile to hide the normal scenery.
Extending the photoscenery support in FlightGear
| This section contains out-of-date information
Please help improve this article by updating it. There may be additional information on the talk page. |
For the earlier mentioned reasons, the texture overlay method seems to be the best and easiest for scenery developers. Nevertheless there are a few issues, stopping us from implementing it in the default FlightGear.
- It unconditionally uses texture unit 3 in the terrain fragment shader, even if no photo-realistic texture has been found.
- It seems to blend the photo textures with the default material textures using the alpha value of the photo texture, but that is not documented anywhere. The purpose of this is unclear (why would you want to blend something photo realistic with a material texture in the first place).
- It currently does not enable clamping, resulting in black tile borders.
Once there is basic support, a method should be found to split a single scenery tile into multiple texture tiles, so the resolution can be higher than 4 m/pixel.
Projects
Several example photoscenery projects. The text between brackets indicates what method is used.
- Brest, France (texture materials)
- Paris and surroundings, France (texture overlay)
- Prague, Czech Republic (3D Model)
- Selected places of the United States of America (texture overlay)
Related content
Wiki articles
Forum topics
- Photoscenery generator for Julia compiler topic on the forum
 (April 2021-) Programs to generate and manipulate photoscenery for FGFS
 - 16k Photoscenery topic on the forum
 (September 2020-)
 - Photoscenery? topic on the forum
 (August 2020-) Discussing a patch that simplifies adding photoscenery, that later was added to FlightGear
 - Re: DDS for textures Rotterdam post on the forum
 (February 2014)
 - A project to create a source of free geo-referenced instrument charts topic on the forum
 (April 2014-June 2014)
