osm2city.py textures
| Started in | 11/2013 |
|---|---|
| Description | Improved autogen support for FlightGear using OSM data |
| Contributor(s) | radi, vanosten, Soitanen, portreekid |
| Status | Under active development as of 02/2016 |
| Topic branches: | |
| $FG_SRC | https://gitlab.com/osm2city/osm2city/ |
| fgdata | https://gitlab.com/osm2city/osm2city-data/ |
| OpenStreetMap use in FlightGear |
|---|
This article describes how you can prepare and register your own textures for use with osm2city.py. It assumes you already have a texture image file. If not, see Howto:Create_textures_from_photos.
Introduction
To texture a facade or a roof, you need
- two image files: the texture itself and a lightmap
- the texture's dimensions in meters
- locations in pixels at which osm2city.py may cut the texture to fit it to a given facade geometry, e.g. to apply a photo of a 15-storey building to a 12 storey model without shrinking it.
- 'provides' and 'requires' tags, e.g., a texture could require a black roof, while providing a commercial facade.
Osm2city uses a texture atlas to improve performance. But that places some restrictions:
- textures can only wrap around in zero or one direction.
- textures that don't wrap around must come in 2^n sizes (32, 64, 128px ...)
- textures that wrap around in one direction will be resized to (currently hardcoded) 256 px in that direction
Conventions Used
The following lists some naming conventions, which you must follow when placing files into the directory structure, naming files etc. Some of these conventions are hard-coded in osm2city related programs.
Regions (actually here synonym for country):
- Use the ISO 3166 alpha 2 country codes. E.g. US for USA, DE for Germany, GB for United Kingdom (do not use UK).
- Only top-level directories should be called with 2-letter country codes.
- If you do not know the country, use a good guess. A good guess and maybe re-using already existing directories is in most situations better than using "generic".
- Currently there is no mechanism to distinguish textures within a country - e.g. in Switzerland low-lands vs. Italian speaking mountains.
File naming:
- A suffix "_LM" denotes a light-map for a texture (needs to have an otherwise exact same name)
- A suffix "_MA" can be used for a mask pre-processing a light-map. The file is not used in the texture atlas, but can be handy to keep.
- A prefix of "roof_" is used for textures of roofs.
Texture registrations:
- All roofs shall be registered in the default file "roofs_default.py" in the top level directory.
- Textures for facades can be registered in different files, but it is recommended to use fewer rather than many files - maybe just one file per region within the region specific directory.
Spelling (osm2city tries to convert automatically, but no guarantees):
- Use grey, not gray
- Use colour, not color
texGUI.py
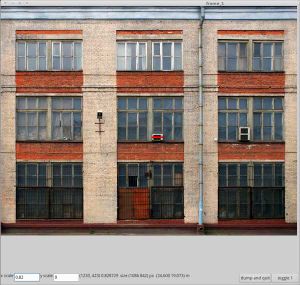
The script texGUI.py eases calibration and finding the cut locations. Run the GUI and supply your texture file:
texGUI.py facade.png
It is generally a good idea to use descriptive names, such as "facade_industrial_old_white.png", but for this example we simply use "facade.png".
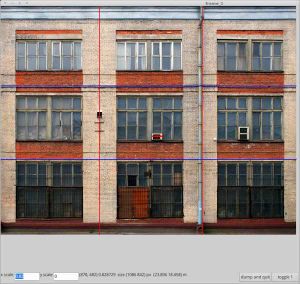
- Calibrate the image width/height. Find a feature in the image whose dimensions you know or can estimate. For example, simple windows are typically about 0.8 m wide. Here, we're using the aircon's width, estimated 0.82 m. Left drag to select that horizontal feature, then enter its length. Right drag for a vertical feature. You need only one of them. If both are given, both are used (e.g. if your image is stretched in one direction).
- Mark locations at which osm2city.py may cut the texture. Use left and right mouse buttons. Shift+click removes the last marker.
- Once you're satisfied, click "dump and quit". This writes calibration/cut data to a file "facade_24x19m.py". Note that texGUI added "_24x19m" to the texture file name (the original file is still in place), since you're likely to have more than one texture for an industrial facade.
Texture metadata
Now edit facade_24x19m.py:
facades.append(Texture('facade_24x19m.png',
    23.8, [364, 742, 1086], h_can_repeat=True,
    18.5, [295, 565, 842], v_can_repeat=False,
    v_align_bottom = True,
    requires=[],
    provides=[]))
Usually you need to change very little here.
- You can set the texture to wrap around in at most one direction using h_can_repeat or v_can_repeat
- If v_align_bottom is True, osm2city.py will align the bottom part of the texture with the ground and cut away the top part if neccessary. Otherwise, it will align the top part with the roof and cut away the bottom.
For reference, we now descibe the format in a bit more detail. You might want to skip to the next section.
First line is the path to our texture. Second line says the texture
- is 23.8m wide
- can be cut at u = 364, 742, and 1068 px, where u is the horizontal coordinate. The last value 1086 also gives the width in px. Note that the .ac file uses normalized coordinates (0 ... 1). Internally, osm2city.py divides all coordinates by the last value. Therefore, when preparing the textures, you can work with the highest resolution possible and register those numbers, then just downscale the texture for actual flightgear use. Once the next generation of graphics cards arrives you just replace the textures with higher resolution ones without touching the cut locations.
- the texture can repeat in horizontal direction.
The third line gives the same information for the vertical direction:
- 18.5m height
- can cut at 295, 565, 842 px,
- the texture cannot repeat in vertical direction
Texture compatibility
The fourth and fifth line state compatibility with other textures. TexGUI.py just creates an empty template here. A useful example could look like this:
    requires=['roof:color:black'],
    provides=['shape:industrial','age:old','compat:roof-flat','compat:roof-gable']))
This facade texture requires a black roof. It provides an old-aged, industrial facade, and is compatible with both flat and gable roofs. TODO: describe details on our requires/provides mechanism.
Lightmap
A lightmap has the same file name with a postfix "_LM". A lightmap is NOT required for each texture, but highly recommended to make the buildings visible during low light periods (e.g. night, bad weather).
So for our example this would be "facade_24x19m_LM.png". The file must be stored in the same directory as the texture file.
Osm2city uses
- the red channel for window lights
- the green channel for ambient street lights shining onto facade
- (the blue and alpha channels are unused)
Install texture and lightmap
- Copy texture and lightmap to tex.src/ - in most cases into a region specific sub-directory.
- Add the snippet generated by texGU.py and enhanced as described above (e.g. "facade_24x19m.py") to a *.py file in tex.src/
- If you're adding a roof, name your texture "roof_something.png" and append it uniquely to tex.src/roofs_default.py. By using "provides" / "requires" meta data you can still make sure that a very region specific roof (if that actually exists) is not used elsewhere.
Finally, run
textures/manager.py -a
to re-create the texture atlas. If there are no errors, your texture is registered and will be used next time you run osm2city.py. If your texture is GPL compatible, please consider sending it (along with the meta data) to one of the osm2city.py devs to have it included in the official distribution.

