Howto:Animate gear scissors
This HOWTO describes how to create an animation for landing gear scissors using an interpolation lookup table and no nasal code.
| Tip For FlightGear 2.11+ the tracking animation provides a more accurate and easier way of animating gear scissor. |
Required tools
- A tool to measure distances in 3D models like AC3D or Blender. The images shown in this HOWTO uses AC3D but any other application should be fine.
- The standalone version of the nasal interpreter. Get it here: http://www.plausible.org/nasal/
- A XML editor or a plain text editor. EDLIN should do but there are probably others...
- This little peace of nasal code. Copy and paste this code into a file called gearscissor.nas.
import("math");
var acos = func(x) { math.atan2(math.sqrt(math.abs(1-x*x)), x) }
var R2D = 180.0 / math.pi;

var scissor_dist = PUT SCISSOR_DIST HERE;
var scissor = PUT SCISSOR HERE;
var oleo = PUT OLEO HERE;

var theta0 = acos(scissor_dist/2/scissor) * R2D;
print( "<?xml version = '1.0' encoding = 'UTF-8' ?>\n" );
print( "<PropertyList>\n" );

for( var i = 0; i < 1.05; i += 0.05 ) {
  print( "<entry>\n" );
  var l = (1.0-i) * oleo/2;
  l += (scissor_dist-oleo)/2;
  print( "<ind>" ~ sprintf("%4.3f", i ) ~ "</ind>\n" );
  print( "<dep>" ~ sprintf("%4.3f", acos( l / scissor ) * R2D - theta0 ) ~ "</dep>\n" );
  print( "</entry>\n" );
}
print( "</PropertyList>\n" );
Let's go
First open the 3D model in AC3D and look for the gear to animate. The two scissor elements need to be named as individual objects. Let's call them A and B as an example. It is not within the scope of this document to describe how to create or name objects in the 3D model. Our first step is to create the interpolation table to be included in the animation xml file. Open your above created file gearscissor.nas in a text editor and look for the line
var scissor_dist = PUT SCISSOR_DIST HERE;
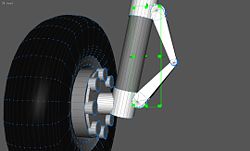
Measure the distance between the two vertices marking the two rotation axes of the two scissor elements. Check the image on the right, the two vertices are marked as green dots. Replace the text PUT SCISSOR_DIST HERE with this value.
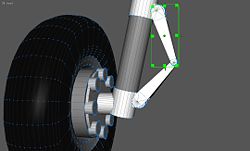
Next, measure the distance between the two rotation axes of one scissor arm. Check the image on the right as a visual reference. Put the value into the line
var scissor = PUT SCISSOR HERE
and replace the text PUT SCISSOR HERE with this value.
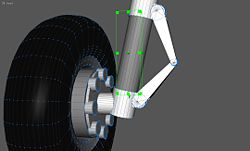
Finally you need the length of the oleo strut, the maximum compression length of the oleo strut. Measure the distance like in the examle image and place the value into the line
var oleo = PUT OLEO HERE;
Replace PUT OLEO HERE with the value.
Save the file, and run the file through the nasal interpreter by calling
nasal gearscissor.nas
This should produce a lot of output. This is the interpolation table that checks the compression of the gear strut and derives the angular deflection of the scissor arm. It should look like this:
 <?xml version = '1.0' encoding = 'UTF-8' ?>
 <PropertyList>
 <entry>
 <ind>0.000</ind>
 <dep>-0.074</dep>
 </entry>
 <entry>
 <ind>0.050</ind>
 <dep>3.816</dep>
 </entry>
 <entry>
 <ind>0.100</ind>
 <dep>7.345</dep>
 ...
 </PropertyList>
Your numbers will look different but the structure should be the same. Save this output into a file named GearScissorInterpolation.xml and save this file in the same folder where your 3D model lives. Note: in a console environment, you can usually save a program's output by forwarding it to a file using the > operator:
./nasal gearscissor.nas > GearScissorInterpolation.xml
The animation XML
Before you continue, locate the rotation points of the two scissor arms where they are connected to the main strut. These are the vertices that were marked to measure the scissor distance. Open the XML file that contains the animations for you model and add the following lines within the <PropertyList></PropertyList> elements:
 <animation>
    <type>rotate</type>
    <object-name>A</object-name>
    <property>gear/gear[1]/compression-norm</property>
    <axis>
      <x>-1</x>
    </axis>
    <center>
      <x-m>YOUR X LOCATION OF THE ROTATION POINT HERE</x-m>
      <y-m>YOUR Y LOCATION OF THE ROTATION POINT HERE</y-m>
      <z-m>YOUR Z LOCATION OF THE ROTATION POINT HERE</z-m>
    </center>
    <interpolation include="GearScissorInterpolation.xml"/>
 </animation>
Fill in your values for x-m, y-m and z-m for the location of the rotation vertices. Add another section for the second scissor arm, replace the object-name with B and set the axis to +1 instead of -1. If you see the scissors move in the opposite direction, exchange the sign in the axis definition.
Examples
Check out the HansaJet and the Seneca II. Both aircraft use the above technique for the animation.


