Cessna Citation X
 | |
|---|---|
 | |
| Type | Business jet |
| Manufacturer | Cessna |
| Author(s) | Syd Adams |
| FDM | YASim |
| --aircraft= | CitationX |
| Status | Early production |
| FDM |
|
| Systems |
|
| Cockpit |
|
| Model |
|
| Development | |
| Website |
|
| Repository |
|
| Download |
|
| Liveries |
|
| Forum |
|
| License | GPLv2+ |
|
| |
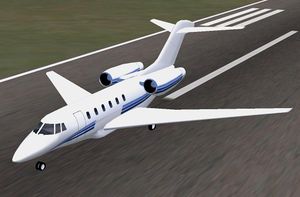
The Cessna Citation X (X as in the Roman numeral for ten, not the letter) is a long range medium business jet aircraft. The X is currently the fastest civilian jet in production with a top speed of Mach 0.92 (703 mph). This also makes it the fastest business jet in history. The Citation X is powered by two Rolls-Royce turbofan engines and is built by the Cessna Aircraft Company in Wichita, Kansas. The Citation brand of business jets encompasses six distinct "families" of aircraft. Although based on the earlier Citation III, VI and VII models the Citation X is a significantly different airplane. It utilizes a totally new wing design, engines, and features a glass cockpit.
Aircraft help
Startup
(following the procedure in the tutorial)
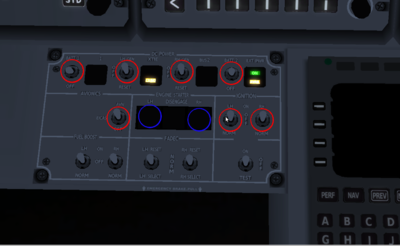
Power and Avionics panel in front of pilot:
- Battery L + R switches on
- Generator L + R switches on
- Avionics switch on
- Ignition L + R on
Lights:
- Gnd/Rec anticoll on (on lower central panel on co-pilot side)
- Taxi on (central console - copilot side, next to flaps)
Start Engines:
- Throttle: to idle
- Press Engine starter button L+R
- Throttle: spool up
Taxi
- Nav lights on
- Release parking: ⇧ Shift+B
- Max Taxiing speed 20 kts
Take Off
Preparation
- Landing lights on (central panel)
- Recog on
- Taxi light off
- Flaps 5 deg
Take Off
- Thrust: TO (take/off ~95%)
Note that you will lose tiller control at about 50 knots and no more control on yaw is possible; make sure you are aligned well before reaching this speed
- Vr=130 kts (pull hard on yoke such that front wheels leave ground)
- V2=140 kts (rear wheels leave ground)
- Retract landing gear as soon as you have left the ground G
- 1500 ft above ground: flaps up
Climb out
- Landing lights off
- 250 kts (do not exceed below 10000 ft)
- 280 kts (above 10000 ft)
- At Transition Altitude set altimeter to 29.92 (1013)
- Max speed 345 kts at FL240-280 (24000-28000 ft)
Approach and Landing
- Descent speed (280 kts to FL120, 250 kts below 10000 fts)
- Turn on landing lights
- Reduce speed (throttle to idle)
- 180 kts Flaps 5 deg
- 140 kts Flaps 15 deg
- 130 kts lower landing gear
At final stretch toward runway
- 125 kts Flaps 35 deg
- 120 kts Landing speed
After touchdown
- Lower nose wheel
- Deploy spoilers Ctrl-B
- Reverse thrust del
- at 60 knots: cancel reverse del
- Manual brakes
Taxi
- flaps up
- Landing lights off
- Recog light off
- Taxi light on
- max 20 kts
In order to effect the initial speed reduction, place the throttle in idle. As you deploy the larger flaps levels (15+) the aircraft can slow down quite quickly, and you will have to carefully use throttle and elevators to avoid a dramatic loss of airspeed and stall. Particularly for the full flaps extension it is very difficult to maintain sufficient airspeed to prevent fast descent so deploy these only when you are really close to the runway.
The autopilot
As of version 2.12, the autopilot appears to still have some stability issues, and using either the horizontal localiser or glideslope locking of an ILS signal caused the autopilot to put me into a highly unstable situation (extreme bank angle, upside down), although on the forum I have read of others who have not experienced these difficulties and apparently have carried out semi-automatic landings with the Citation X autopilot. If you encounter instability in any other autopilot mode you can try to turn off auto-coordination (i.e. do not use option --enable-auto-coordination option, which links rudder to aileron movements). Also you must only engage the autopilot from a stable situation, i.e. level or small bank and pitch angles. Please note that I have no knowledge of the internals of the autopilot, so some of the information below might be inaccurate
Before the flight you should set the route in the route manager. In the explanation it is assumed you are familiar with basic autopilot operation in the Cessna, although the Citation X autopilot differs in many aspects. This description is not an exhaustive description of the autopilot modes, but rather a summary that should be sufficient to get you started.
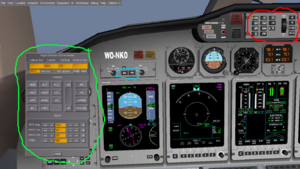
The autopilot can be controlled either from the unit at the top of the instrument panel (marked in red), or from the dedicated GUI menu F11 (marked in green). The keys in the cockpit will light up according to which autopilot mode you are in - no direct visual feedback is associated with key presses in the GUI window but the actual mode is shown in the top of the window. The current horizontal and vertical mode are shown in the top part of the GUI window as well as in the top of the primary flight display (PFD, the left glas panel on pilot side).
Basic mode
- AP: engages/disengages the autopilot - this switch works as a toggle switch. On first engaging the autopilot, it will reduce the bank angle to zero and keep the pitch direction. You can adjust the pitch with the 'nose' up/dn wheel on the autopilot unit, or equivalently the UP and DN buttons on the GUI. It is no longer possible to control the attitude or climb and sink rate directly with the elevator as the autopilot will adjust the elevator trim to counter any movement of the yoke.
(Note that this behaviour is slightly different to that described in [1])
- STBY: cancel all horizontal and vertical modes and revert to basic mode of pitch and roll control
Horizontal modes
- HDG: turn into the direction set by the heading bug and follow it. Although there is a cockput knob for adjusting this in the central console on both the pilot and co-pilot side, it is not practical to use unless you have multiple views enabled or use the autopilot GUI as you cannot at the same time operate the knob and look and its effect. So the best way is to use the GUI to set this. The current position of the heading bug is shown on the horizontal indicator in the centre bottom part of the PFD and as a number in the bottom left of the PFD.
- NAV: Navigation mode. Choosing the NAV source: For this you use the two buttons NAV and FMS in the unit above the PFD (marked blue) (or equivalent buttons in the GUI). NAV will select the VOR tracking mode (pressing it will toggle between tracking NAV1 and NAV2 receivers), and FMS will follow the flight plan defined through the route manager. Note that changing from FMS to NAV1 or NAV2 mode and vice versa will disengage all horizontal and vertical modes and put autopilot into standby mode. In the NAV mode the autopilot will intercept and then track the selected radial of the VOR station similar to a Cessna. The radial can be selected in the GUI, with the knob in the central panel or with the knob in the auxiliary HSI. Both HDG and NAV mode can be engaged at the same time - in this case the HDG bug will select the intercept direction. The HDG mode will automatically disengage when the autopilot turns to line up with the radial. In the FMS mode, the plane will fly from waypoint to waypoint, starting with the currently active one (the horizontal mode indicator then shows LNAV).
The NAV mode AP might not be stable when the NAV receiver is tuned to an ILS frequency
Vertical modes
- VS: set the vertical speed in ft/min. If the mode is engaged the target sink or climb rate is indicated as a light blue number above the vertical speed indicator in the PFD
- ALT: when this button is pressed the current altitude will be held. The target altitude can be adjusted in the GUI (ASEL) or (theoretically) with the ASEL knob on the co-pilot side of the central panel. The altitude is specified in terms of flight level (hundreds of feet), and the target altitude is also shown as purple number above the altitude indicator in the PFD
- FLC (Flight Level Change): In this mode a target airspeed is set (indicated as number above the air speed indicator in PFD), which the autopilot will match by lowering the nose if the plane is too slow, and raising it, when it is too fast. This mode will automatically disengage when reaching the target altitude. Conversely, if you are already flying at the pre-selected altitude (or have recently pressed ALT), then this mode does not even engage.
- VNAV This button can only be pressed if a route has been defined and the FMS mode has been selected. It will then follow the preset altitudes defined the route manager (again as flight level, i.e. in hundreds of feet). Watch out: if no altitude has been defined for a waypoint then a default altitude of 0 ft seems to be assumed. This might get you into serious trouble, of course.
Combined modes
- APP: Approach mode is supposed to first intercept and track localiser of ILS beacon, and then intercept and follow the glideslope. On my trials this resulted in unstable AP behaviour.
- BC: Back-course follows an ILS radial in the opposite direction (e.g. for landing from the opposite side). After I could not get APP to work properly I did not bother testing this mode.
Modifier switches
- BANK: (relevant for horizontal modes) Limit bank angle to 17° making for wider turns - generally good idea to have this depressed while cruising
The CO and YD buttons are active buttons in the cockpit but do not seem to have any effect.
Configuration speed limits [1]
| Flaps 5 deg | 250 kts |
| Flaps 15 deg | 210 kts |
| Flaps >15 deg | 180 kts |
| Gear down | 210 kts |
When and how fast to descend?
The following rules-of-thumb apply will give you a glide slope angle of 3 deg and are easily worked out using basic trigonometry.
- Altitude above airport ground (ft) should be about 318 times distance left to fly to runway head (nm)
Examples:
- You are flying at 20000 ft, and the airport is at 1000 ft. Your descent should start at about (20000-1000)/318 ≈ 60 nm left to fly
- You are 10 nm from the airport. Your altitude should be airport altitude plus 318*10 ~ 3200 ft
- Assuming you are at about the correct altitude your vertical descent speed (ft/min) should be 5.3 times your speed relative ground (kts, from GPS, NOT airspeed)
Example:
- You are flying at 200 kts rel. ground. Your vertical descent speed should be 200×5.3 = 1060 ft/min
References
Related content
- Click here for a review of the Cessna Citation X.
| ||||||||

