Ramp Marshall
A (ramp) marshaller is a person who guides aircraft using hand (and wand) signals at a parking ramp. This is a new feature that being worked on for a more generalized scale in FlightGear. Until this gets merged into the fgdata repository, you can get this from omega95's fgdata clone or the new Singapore Scenery development.
Currently, support can be added to airports with the UFO, but soon ramp marshallers will be added automatically if a parking spot's flag is set to enable it. This will integrate FlightGear parking positions, ramp marshallers and other features that might come up related to parking ramps or gates.
These are videos of the first prototype of the ramp marshaller.
Installation
How to install the ramp marshaller
NOTE: This work has been extended into a working addon called Ramp Marshall Addon. The addon is a continuation of this project and in no way meant to compete with this article. This is just a note for clarity that you can now just install the addon as you would any other addon and the functionality will be available. See: Announcing New Ramp Marshall Addon topic on the forum ![]() (November 11, 2024). This article still needs updating to match the requirements and use of the new addon work.
(November 11, 2024). This article still needs updating to match the requirements and use of the new addon work.
The new addon would not exist if not for the work of the developers mentioned throughout this article.
The following steps are no longer needed. For now they have been left for reference to the original author's code.
- Download this GitHub and unzip it.
- Download this ramp_marshall.nas
- Put the Ramp Folder (can be found under Models/Airports in the GitHub) in $FG-ROOT\Models\Airport
- Put the ramp_marshall.nas and the addon-main.nas (can be found unter the GitHub) in $FG-ROOT\Nasal
- Put every File and Folder wich is left now from the GitHub in your addons folder (see: how to install addons in FlightGear)
Using the ramp marshaller
To use the ramp marshaller with a compatible aircraft at a compatible airport (scroll down to see how you can make aircraft and/or airports compatible), simply taxi to the gate/ramp you want to park at and click on the marshaller waiting at the ramp. His hands should move from rest position (both wands down by his sides) to direct you to the ramp. It's recommended to taxi to the ramp on the taxiway lines as long as you can see them and once they go out of view, follow the marshaller's instructions. Make sure that you're not taxiing faster than 5 to 10 kts at the ramp.
Currently, the ramp marshaller knows the following signals -
- Move forward
- Turn left
- Turn right
- Slow down and stop
- Immediate stop
But we're teaching him new signals. If you want to teach him a signal, scroll down to find out how. To find out what the signals look like, take a look at the videos above.
Adding ramp marshalling support
Adding ramp marshalling compatibility to aircraft
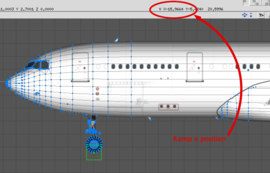
It's actually very simple to add ramp marshalling compatibility to an aircraft, the only file required to be edited is the aircraft's -set.xml file (or common xml file for aircraft groups). The user is still required to use some kind of 3D modeling program to get the position.
- Open the aircraft's model file (containing the gears) with a 3D modeling program and get the x position of the center of the nose gear. (Or the position you want to rest at the ramp)
- Add the following code within the
<sim> ... <model> ... </model></sim>tags in the aircraft's -set.xml file. (or common xml file for aircraft groups)
<ramp>
    <x-m type="float">-15.9664</x-m>
    <class type="string">2</class>
</ramp>
- The x position from the 3D model is in the
<x-m>tag and the aircraft class is in the<class>tag. With the current models, the aircraft classes are as follows -- 0 - 747s, 777-300s, A340s, A380s
- 1 - 777-300s, A330-300s, 787s
- 2 - A330-200s, 757s, 767s
- 3 - A320s (includes A318s, A319s and A321s), 737s and other aircraft in general. This works for CRJs, E-jets etc.
This should be all! The ramp marshaller should be able to recognize the aircraft and guide it to the right position at the ramp!
Adding ramp marshallers to an airport
NOTE - In the future, this will change because ramp marshall positions are going to be connected to an airport's groundnet.xml file.
- Start up FlightGear with the UFO at the airport you want to place ramp marshallers.
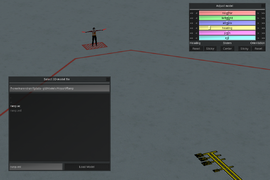
- Hit the L key on the keyboard to bring up the model selection dialog and select $FG_ROOT/Models/Airport/Ramp/ramp.xml. Using the ufo's scenery editing tools, place (and adjust) ramp marshallers everywhere you want. To make it simpler, click on the exact position you want the airplane to come to a stop. This will usually be at the end of a parking ramp's taxiway lines. Then, you will only have to change the heading.
- Once you've finished placing all the models, hit the D key to dump the stg lines onto the console. (Do not close FlightGear yet) Copy the stg lines into a blank file. (name does not matter) And save it somewhere on your PC ($FG-HOME is a good place for that).
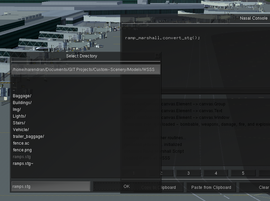
- Open up the Nasal console and execute the following function.
ramp_marshall.convert_stg();
- Choose the stg file you pasted the dumped stg lines in to convert the file into a readable xml ramp position file. If you get following error:
(unauthorized directory - authorization no longer follows symlinks; to authorize reading additional directories, pass them to --allow-nasal-read), type in Command line in the Launcher following phrase:--allow-nasal-read=/path/to/directory. The converted file can be found $FG_HOME/Export or under the Roaming folder in Windows. - Copy the exported file (it will be called ramps-export.xml) to $FG_ROOT/AI/Airports/<icao>/ramps.xml. For example, if you want these ramps at Singapore Changi Intl. Airport (WSSS), you'd put it in $FG_ROOT/AI/Airports/WSSS/ramps.xml. (you have to rename the ramps-export.xml into ramps.xml). If there is no folder for your Airport, just create a new one with the icao of your Airport.
Contributing to the module
Teach the ramp marshaller new signals
The marshaller's signal positions are stored in the ramp_marhsall.nas Nasal file in a hash. This is so that the signals can be accessed easily by other functions.
var pos = {
	rest: rmPos.new(lA_x:80, rA_x:-80),
	stop: rmPos.new(lA_x:-55, lAO_x:-70, rA_x:55, rAO_x:70),
	fwd_out: rmPos.new(lA_z:-50, lAO_x:-30,  rA_z:50, rAO_x:30),
	fwd_in:  rmPos.new(lA_z:-50, lAO_x:-120, rA_z:50, rAO_x:120),
	left_in:   rmPos.new(lAO_x:-120),
	left_out:  rmPos.new(lAO_x:-30),
	right_in:  rmPos.new(rAO_x:120),
	right_out: rmPos.new(rAO_x:30)
};
- lA_x - Left Arm (shoulder joint) x axis rotation
- lA_y - Left Arm (shoulder joint) y axis rotation
- lA_z - Left Arm (shoulder joint) z axis rotation
- lAO_x - Left Arm Outer (elbow joint) x axis rotation
- lH_x - Left Hand x axis rotation
- lH_y - Left Hand y axis rotation
- lH_z - Left Hand x axis rotation
- rA_x - Right Arm (shoulder joint) x axis rotation
- rA_y - Right Arm (shoulder joint) y axis rotation
- rA_z - Right Arm (shoulder joint) z axis rotation
- rAO_x - Right Arm Outer (elbow joint) x axis rotation
- rH_x - Right Hand x axis rotation
- rH_y - Right Hand y axis rotation
- rH_z - Right Hand x axis rotation
You can mess with the positions in a 3D modeling program or in FlightGear itself. Just look in the property tree under /airports/{icao}/ramps/ramp[n] (find the correct 'n' index for the person last clicked on by looking at the /airports/active-ramp property) and set the ramp marshaller's function to something random (so it isn't recognized) and change the values in the tree. Note: to get this to work properly, you first have to click on the nearest ramp marshaller, look up his index, and then click on a different marshaller so that the other marshaller's properties are not updated.
If you would like to add a new hand position (say both hands out stright), then you'd add this to the bottom of the pos hash.
hands_out_front: rmPos.new(lA_z:-90, rA_z:90)
Note that one only needs to specify the rotations that are non-zero using hash syntax (key:value) in the arguments to the rmPos.new function. Remember to put a comma after the line right before the new one you add, since each line needs to end with a comma.
Now, you can call this position as pos.hands_out_front to be used in the sequence function. Or if you'd like to get or set one of the position values.
To add the signal sequence, add a new if state at the end of the last if(me.function == "<function_name>" statement with the sequence. You can use me.phase to control the sequence phase/step.
Then, add the signal sequence.
HINT - To animate the marshaller to a position you specified and then to go to the next step when it's complete and be achieved like this:
if(me.phase == 0) {
    if(!check_pos(ramp_tree, pos.hands_out_front)) {
	full_animate(ramp_tree, pos.hands_out_front, 100);
    } else {
        me.phase = 1;
    }
}
The above code checks if the marshallers is not in the hands_out_front pos already and if he isn't, he'll move his hands to that position. In the full_animate function, you can specify the speed his hands should move at in degrees per second. In this case, he'll move his hands forward to the specified position at 100 degrees per second.
Useful internal functions
- rmPos.new(lA_x, lA_z, lAO_x, rA_x, rA_z, rAO_x) creates and returns a new instance of the rmPos hash. This hash is in the pos.<pos_name> format and can be used in the functions below.
- getDeviation(heading, target) returns the deviation to a target heading from your current heading. This is used by the marshaller to help guide you to the ramp.
- animate(property, target, rate) animates a property (slowly changes the property value) to a target value at the given rate. (Rate is in degrees per second)
- get_pos_values(ramp_tree) returns the current position of the marshaller's arms in a hash similar to that of the pos.<pos_name> hash.
- check_pos(ramp_tree, target) returns true if the marshaller is at a given position. target must be a hash similar to the pos.<pos_name> hash. It is best to simply send a position specified in the pos hash.
- full_animate(ramp_tree, pos_hash, rate) animates the ramp marshaller to the given position at the given rate.
- load_ramps(icao) loads all ramps (and marshallers) at the given airport.
NOTE - If any of the functions has ramp_tree as an argument and the function is being used within the main_loop, the variable ramp_tree must be passed as an argument.
Using different models or textures
Soon, new features will becoming available which lets the ramp marshaller model be specified in the position config file.
| Work in progress This article or section will be worked on in the upcoming hours or days. See history for the latest developments. |
Further development
Visual Docking Guidance System
Prototype for a Visual Docking Guidance System (VDGS), entirely written in xml
Related content
Wiki articles
Forum topics
- Nasal based Independant Ramp Marshall topic on the forum
 (August 2013-Mars 2018)
Source code
- Omega95's fgdata Gitorious archive archived from the original Mars 30, 2016.
- FG Singapore Scenery Gitorious archive archived from the original Mars 30, 2016.


