Radio navigation
Instead of relying on visual landmarks (such as roads, rivers, churches, and towns) for navigation under visual flight rules (VFR), radio navigation relies on radio beacons and is therefore a critical part of instrument flight rules (IFR). Radio beacons can be seen with the right equipment, from far away and independent of the weather. The position of radio beacons is clearly marked on navigation maps. Radio beacons are placed near airports, can be aligned with runways and can be placed in remote areas so to mark a route over them.
The time that a pilot had to fly with the yoke in their hands all the time has long been passed. Our aircraft have an autopilot and radio beacons are ideal for automated flight. With a non-directional beacon (NDB) station we use the heading bug, with a VHF omni-directional range (VOR) station we select the radial to use and the autopilot keeps us on that course.
Satellite navigation (GPS) is taking over parts of radio navigation but each pilot will base their primary course on radio beacons and then use the GPS. If the GPS fails the course is back on radio beacons. For approach and landing there is no replacement for radio beacons.
Basic techniques
Pitfalls
- Often there are radio beacons near each other that transmit on the same frequency. Our equipment will tune into the signal that is strongest. The strongest signal is not always the nearest. Always be sure to know the identity of a station before using it.
- Sometimes a VOR station does not operate as expected and will behave as a NDB. Always check if the VOR provides a radial before using it for automated flight.
Calculating headings
Headings are given in a 360° circle, counting upwards clockwise.
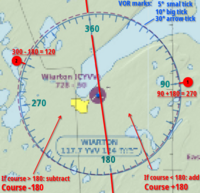
To calculate the backcourse of a given heading, we can apply a simple formula:
- Backcourse = Heading + 180 (if Heading < 180)
- Backcourse = Heading - 180 (if Heading > 180)
For example: 270 = 90 + 180 (backcourse of EAST). Or 120 = 300 - 180 (backcourse of southeast-ish)
"2 up / 2 down" rule
To make it easier to quickly compute in the head while flying, there is an easy to remember rule of thumb: 2 up, 2 down
Take the first digit of the heading and add 2. Take the second digit and subtract 2. (In case this will not work, because the first digit is to big and would yield 4: reverse the rule.)
- 140 = 1+2=3, 4-2=2. Result: 320.
- 320 = 3-2=1, 2+2=4. Result: 140.
- 090 = 0+2=2, 9-2=7. Result: 270.
Dead reckoning
Dead reckoning (DR) is a technique we use every day in many situations. If you know where you are and how fast you move you can predict where you will be after some time. If there is a good compass and the ground speed is known it is even possible to do some navigation with this method. Even with the navigational tools that are available today we rely on this method without knowing it. For long tracks without radio beacons nearby (and no GPS) it is the only way to navigate.
Position finding
We always start from an airport, we know where it is on the map. Going further on the way it is possible to get lost so it is important to figure out where we are if we get lost. Lucky most radio beacons tell their identity, in Morse code or in other ways. (in FlightGear the identity can be found in the property tree at /instrumentation/nav/nav-id) That identity gives a good clue where we are on the map but we have to pinpoint our position before we can navigate any further.
- We need tune in to just one VOR-DME to pinpoint our position. It gives the radial we are crossing and the distance to the station. From that we use the map, a compass rose and a ruler to pinpoint the position.
- With two VOR stations we receive two radials. With two NDB stations we have two bearings on the compass. On the map we draw the two radials from the stations to find our position at the cross point. The bearing of NDB stations can be inaccurate, it is advised to use at least three NDB bearings for position finding.
Frequency selection on the radio receivers on-board differ from the radio receiver we have at home. At home we turn a knob or press a button and the radio receiver finds the first station. On-board we begin with a known frequency and then tune in. For position finding we need to know what radio stations can be near so we can test the frequencies of the stations.
Go to
As soon as we pick up a signal from a radio beacon we can easy navigate towards it. With a NDB we set the heading bug, with a VOR we select the radial.
- A VOR radial will bring the aircraft with high accuracy in a straight line over the radio station.
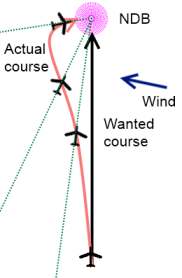
- Setting the heading bug on the bearing of the NDB once will not bring the aircraft over the radio station. The wind will blow the aircraft off course and the bearing of the NDB will drift slowly over the compass rose. Bringing the heading bug back each time the aircraft will have flown a long wide curve instead of a straight line. The heading bug should be set over the bearing of the NDB towards the wind direction so to compensate for the wind. It's a bit of a guess on how much that compensation should be.
Go from
Starting from a runway or passing over a radio station we know where we are and where we want to go. We set the radio beacon in our equipment.
- If we just passed a VOR station we enter the course as the new radial. The VOR radial will keep us on course for about 75 NM.
- If we just passed a NDB station we set the heading bug on the course. Add or subtract 180 from the course to identify the expected bearing of the NDB. We observe the bearing of the NDB station and correct for wind. This works for about 25 NM.
Both methods will display the inaccuracy of FROM navigation. Wind will drift us from course and even a radial of 1 degree is very inaccurate 100 NM away.
Go in between
For larger aircraft navigating fix to fix is not practical. In between navigation (for larger aircraft flying IFR) is only done for approach or to identify a place where to change course (to start an approach) since there are runways without beacons.
Airways
One can take the shortest route but it is often required to navigate over Airways. Since they are typically in controlled airspace, air traffic control (ATC) will provide sufficient separation between aircraft. Only the route to and from the airways has to be defined in the flightplan.
Catch me
Short distances over areas where there is no radio reception will not give big problems. The course is planned towards a new beacon where there is no reception yet. The typical range of radio beacons is 100 NM, meaning we can get 100&nbs;NM off-course and still be able to navigate further. However, if we are more as 100 NM off course we could get into an other area where there are no radio beacons.
If it is needed to cross a large area where there is no radio reception plan towards a place where there are several overlapping radio beacons (the cushions that will have to catch us). Once the area is crossed we can test the frequencies of the beacons and get back on course.
Planning
Know the requirements and limitations of the aircraft. Does it need tarmac, an ILS, how much runway? Etc. Not any airfield is suited for landing of just any aircraft. Examine the airfield before deciding to go there. What is the cruising altitude of the aircraft? Can it fly over mountains or should it fly around them? Can it cross areas where there are no radio beacons? What is the range of the aircraft, when does the fuel run out?
From the requirements and limitations we can plan our route.
To plan a route we begin with a map, a ruler and a compass rose. On the map we draw a straight line between take-off and landing. For longer routes a string and a globe is used. Correct the line for obstacles (mountains). The line is the shortest route.
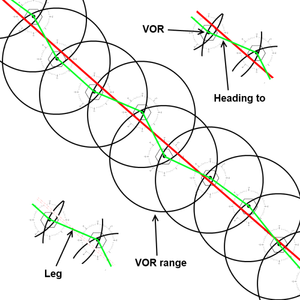
The route must be divided in legs, each leg begins on a radio beacon and ends on a radio beacon. With the legs we will walk over the map, our feet standing on the VOR stations.
Near the straight line identify the VOR stations. A typical VOR station has a range of about 100 NM at ground level. To prevent FROM navigation the legs should be less then 50 NM in length. To prevent continues tuning of the radio receiver and ever changing course the legs should be above 25 NM in length. If possible prevent NDB stations since they need continues attention. Prevent legs longer as 100 NM.
(The higher the altitude the longer the range of radio beacons. Learn the behaviour of the equipment of your aircraft to optimise your plan. I once had a reliable reception for 270 NM from a VOR station at an altitude of 41000 ft, after that the signal was no longer able to provide a radial for navigating however it was able to give bearing and distance till about 300 NM ))
Draw a line from station to station, each line is a leg of the route. Calculate the length of each leg. From the length of the leg and ground speed calculate the time for each leg. Use a compass rose to read the heading of each leg (True North or Magnetic North). Identify name, type, location and frequency of the stations.
The result should be a sheet listing the legs of the planned route.
| Name of station | Type | Latitude | Longitude | Frequency | Heading | Distance | Time |
The first line will be the airfield with a "0" heading and a "0" distance. The headings on the list will be the heading towards the identified station.
Calculate from the cruising altitude, the sink rate (feet per minute) and the average sink speed (ground speed during descend) the distance the aircraft needs to reach the altitude of the landing runway. Add this point as a separate leg.
- Or use Kelpie Flight Planner.
Outside FlightGear other factors would be required to create a true flight plan. Factors would include the required use of airways, the definition (calculation) of V speeds, emergency runways and many more.
Equipment
Radio rack
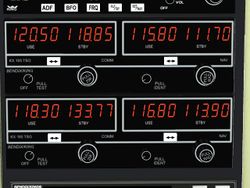
Typically in FlightGear we have two ATC receivers, two VOR receivers, one NDB receiver and one DME. The frequencies can be set either in the Equipment=>Radio (F12) window or using the radio rack (like the Kx165) in the 3d cockpit.
The 3d-rack and window look a bit like this:
| Type | Active frequency | <=Swap=> | Standby frequency | Radial | Input knob |
| Window | Window - 3d | Window - 3d | Window - 3d | Window | 3d |
- Type= COM1 and COM2 are the ATC stations
- Active frequency= this is the frequency the radio is tuned to
- Swap= make the input frequency the active frequency
- Standby frequency= this shows the frequency that is being set
- Radial= the selected radial for a VOR station or bearing of the NDB compass rose
- Input knob= turn the knob to select the input frequency, outer ring for big steps, inner ring for small steps
- Some "cells" are not available for each type of station. Some "cells" that appear are not functional for some aircraft models.
- The 3d cockpit can have volume control knobs and on/off switches.
- The ADF is a sensitive piece of equipment and on-ground often is retracted into the aircraft to protect it. If so it needs to be extended before it works.
- DME tuning often is automatic on NAV1 and NAV2.
- Some equipment allows NDB's as NAV1 and NAV2, the Radial will act as a directional arrow.
- TACAN station identification can be set in the Radio window.
- Operating the radio rack
- We turn the Input knob till the Standby frequency matches the station we want to use or we use the Standby frequency window.
- Press the Swap button to activate the Standby frequency (swapping with the Active frequency).
- For a VOR station we enter the Radial and press Activate or turn the knob on the HSI.
Radio indicators
The equipment that displays the received information from radio beacons varies from aircraft to aircraft.
The ADF that tunes to the NDB station is the most basic. Typically it's an arrow on a compass rose. Sometimes we can turn the compass rose so that it matches the compass. Sometimes the compass rose is combined with the compass (and the heading bug). Sometimes the ADF is combined with the VOR receiver. One way to display the NDB is the Radio Magnetic Indicator (RMI).
VOR stations are mostly used for automated flight so most, if not all, receiving equipment (on NAV1) can be linked with an autopilot. If there is a separate ILS receiver and a VOR indicator identify which one is NAV1 and NAV2 and which one can be used to control the autopilot.
Receiving the radial from the VOR station has many variations. The most basic is a compass rose and a vertical line, named the VOR indicator. This setup is often combined with an ILS giving also a horizontal line. Similar in setup but a bit more modern is the Course Deviation Indicator (CDI). More common these days is the Horizontal Situation Indicator (HSI) that is also described on Wikipedia. On more expensive aircraft, like jets, the information is combined together on a PFD.
Very modern receivers can estimate the distance towards a NDB or VOR-only beacon by the azimuth towards the station. The higher the altitude the more accurate the estimate.
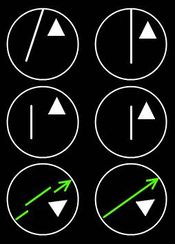
=>Image
- Three types of indicators on the left telling the same thing, the aircraft is to the right of the selected radial going towards the VOR station. The last indicator is also telling that the aircraft is flying on the right course to intercept the radial.
- The right indicators tell we are on the selected radial, the last one also telling us we will cross over it since the autopilot is not armed.
Radial determination
- With a knob the the compass rose can rotate or the arrow rotates in the compass rose. The knob is named a Course Select Knob or Omni Bearing Selector(OBS).
- The indicator should move. In 360 degrees rotation it should centre twice and give maximum deviation twice. If the indicator does not move there probably is no reception or the VOR station is broken and has defaulted to a NDB station. Most indicators show a warning flag if there is no signal.
- Rotate the knob till the indicator is centred.
- On most models a TO/FROM indicator is available. This indicator is most often a triangle.
- Reading the Radial differs from model and the indicator.
- If TO is showing (triangle up) the Radial can be read on top of the compass rose.
- If FROM is showing (arrow down) the Radial can be read at the bottom of the compass rose.
- If the indicator has an arrow and a TO/FROM indicator the Radial can be read in-line with the arrow with the TO/FROM indicator pointing to the side of the compass rose to read.
- If the indicator has an arrow but no TO/FROM indicator the Radial can be read in-line with the arrow and the bearing (a separate pointer) of the station will tell which side of the arrow should be read.
- With the Radial we know what course to fly to intercept the VOR station or draw a line on the map from the VOR station towards the position of the aircraft.
NDB
Use the heading bug to fly the planned course with the methods as described in Basic techniques. The bearing of the NDB station is a reference and check we are flying the right course. The course must be monitored frequently so to correct for wind. If a choice between Go to NDB or Go from VOR is possible consider Go from VOR since it will require less attention, use the NDB station as a reference and as moment to change course to the next station.
VOR Intercept
After take-off or while using the heading bug and expecting to have the next VOR station in sight.
- Fly towards the VOR station (use the heading bug).
- Tune radio 1 to the frequency of the VOR station.
- Enter the expected radial.
- Check the identity of the station.
- Listen to the Morse identification.
- Rotate the course select knob (or use the Autopilot window and click/change course of NAV1) and check if the radial is near to what is expected (and if the distance in case of a VOR-DME is what is expected).
- Rotate the course select knob to set it slightly off-course, just visible on the indicator (not as extreme as on the image).
- Disable the heading bug if it was enabled.
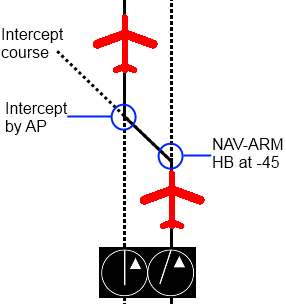
- Place the heading bug 45 degrees over the selected radial.
- Enable NAV on the autopilot.
- Activate the autopilot.
- The aircraft will fly a course as set on the heading bug. The Autopilot window will show NAV-ARM. The aircraft will fly over the radial and turn towards the VOR station after intercepting it. The Autopilot window will show NAV.
Tuning to next VOR station
Do this just before passing a VOR station.
- Tune radio 2 to the frequency of the VOR station.
- Enter the expected radial.
- Check the identity of the station.
- Listen to the Morse identification.
- Rotate the course select knob (or use the Autopilot window and click/change course of NAV2) and check if the radial is near to what is expected (and if the distance (of a VOR-DME) is what is expected). Make a note the selected Radial.
- Tune the standby frequency of radio 1 to the frequency of the VOR station.
- Enter the radial that was found in step 3.2 (Radio window) or rotate the course select knob to the found radial.
- Press the Swap button to enter the new frequency.
- Press Activate to activate the radial (Radio window)
- Check that the autopilot shows NAV. If the autopilot shows NAV-ARM start flying with the heading bug on the radial and intercept as described earlier.
- The autopilot of the aircraft will make a slight turn and will start flying the new leg.
If we would use NAV1 to test the signal the course of the aircraft would change as soon as the course select knob is rotated.
Go from VOR
Do this if when entering an area where there is no reception yet from the next VOR station, just after passing the previous VOR station and when the heading towards the new station is known.
- Rotate the course knob on the HSI of NAV1 until it is set on the departing radial, showing FROM. Or set the new Radial in the Radio window and press Activate.
- The aircraft will turn (as soon as the knob is rotated) and intercept the new radial.
- Tune NAV2 to the expected station and set the radial of NAV2.
- Continue flying till NAV2 is received, if the signal is lost (monitor for this) use the heading bug.
- If we are still flying on the radial (Autopilot shows NAV) do as described Tuning to next station. If we have lost the radial do a new Intercept.
Easy fix
VOR-DME
The radial and distance towards the fix must be known.
- Go to or Go from the VOR-DME beacon using NAV1 on the radial towards the fix.
- Monitor the distance towards the VOR-DME beacon.
- If the distance equals the planned distance we are on the fix.
VOR
Two radials towards the fix must be known.
- Go to or Go from one of the VOR beacons using NAV1 on the radial towards the fix.
- Tune NAV2 to the other beacon and enter the radial towards the fix.
- Monitor the indicator for NAV2 and when it is centred we are on the fix.
NDB
The bearings towards the two stations must be known.
- Go to or Go from one of the NDB beacons towards the fix.
- Verify we are on the correct course looking at the bearing to the first beacon.
- Tune the radio to the other NDB station.
- With Dead reckoning we stay on course.
- Monitor the indicator, when it is on the correct bearing we are on the fix.
RNAV
Area navigation is best explained here: http://en.wikipedia.org/wiki/RNAV
A small theoretical abstract since I have not tried it (and don't dare to fearing it won't work).
- Draw a straight line from take-off to landing.
- Mark 100 NM intervals on the map.
- At the mark make the following check
- If both are not true the route has to be redrawn so that each mark has at least one of the two criteria true.
- Make a sheet containing the marks. Note time, distance, bearings to VOR and/or NDB and/or distance to DME.
- During flight check at the specified time interval if the aircraft is where it is supposed to be.
- Correct course with the heading bug.
In theory this should work and should result in a straight line, but RNAV systems do this automatically and will send out a warning if there are deviations.
In FlightGear most similar to RNAV is the Route manager and the GPS.
Further reading
External articles
- http://en.wikipedia.org/wiki/Radio_navigation
- http://en.wikipedia.org/wiki/IFR
- http://en.wikipedia.org/wiki/VHF_omnidirectional_range#Using_a_VOR
- http://en.wikipedia.org/wiki/Radio_direction_finder
- http://en.wikipedia.org/wiki/Navigation
- Very extensive Tutorial: http://web.archive.org/web/20160120093742/http://www.navfltsm.addr.com/index.htm navfltsm.addr
- A web based IFR navigation simulator: https://www.fergonez.net/projects/ifrsimulator/
