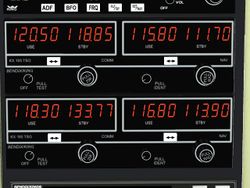
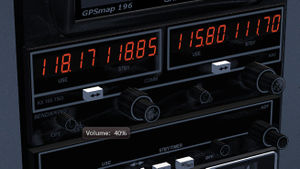
Kx165
The KX165 is a single unit, panel mounted VHF communication transceiver and VHF navigation receiver. It has a built in glideslope receiver and a VOR/LOC converter. It is commonly used in general aviation aircraft. It comes in slightly different flavours like KX155, KX165 and KX165A. This FlightGear version is the 25kHz version for the communication transceiver. Since a commit in fgdata on 20th of March 2013, it is compatible with Project Rembrandt.
Operation
The KX165 combines a communication transceiver and a navigation receiver in one box. The controls to operate the communication transceiver are located on the left half of the instrument, while the navigation receiver's controls can be found on the right half of the panel. All controls can be accessed with the mouse by clicking the panel hot spots. Hit Ctrl-C to see the active areas of the instrument. Linux users may also use the mouse wheel to turn the frequency and volume knobs while pointing at the active areas.
Power/Volume
The volume control of the communication transceiver (left half) also functions as the power switch of the device. Turning the knob fully counter clockwise sets the volume to zero and turns off the entire instrument. Turning the knob clockwise switches the device on and increases the volume of the communication audio. Pulling the volume knob (click with mouse button 1) disables the squelch to test the receiver and the audio level. The volume control of the navigation receiver (right half) can be used to adjust the audio level of received ident signals. This knob can also be pulled (mouse button 1) to disable the squelch.
Frequency Selection
Setting the frequency is the same for the communication and the navigation part. The only difference is, that the communication part tunes in steps of 25kHz and the navigation receiver uses a 50kHz raster.
Each KX165 has four frequency displays, two for the communication transceiver and two for the navigation receiver. The two displays on the left side show the communication tranceiver's frequency, the two display on the right side those of the navigation receiver. The left display of each half displays the active frequency while the right one indicates the standby frequency.
Twisting the frequency select knobs allways changes the standby frequency (right display) and does not affect the active frequency (left side). There are two coaxial knobs for frequency selection. The larger one selects the MHz part and the smaller one is for tuning the kHz part.
The frequency selection in the FlightGear implementation of the KX165 can be done by using the mouse. Clicking on the left half decreases the frequency while clicking on the right half increases the frequency. Hit Ctrl-C to check for the hot spots of the radio.
The left mouse button simulates the small frequency selection knob and changes the kHz part while the right mouse button acts as the large knob and changes the frequencies MHz. You can als use the mouse wheel if you are running linux. Holding the shift key and turing the mouse wheel sets frequency MHz, without the shift key the kHz part is changed.
The standby frequency and the active frequency are exchanged by hitting the white button labled with a double arrow between the two frequency displays. Hitting this button activates the standby frequency and puts the active frequency into standby.
The "direct entry" functionality of the real life KX165 is currently not implemented.
OBS display
This is not modeled in the current FlightGear version.
Aircraft integration
Custom texture
You can provide a custom texture using the shared KX165. As example, provide a texture file in Aircraft/YourAircraft/Models/Instruments/kx165-texture.png Now in your -set.xml add:
<sim>
  <instrumentation>
    <comm n="0">
      <texture-file>Aircraft/YourAircraft/Models/Instruments/kx165-texture.png</texture-file>
    </comm>
    <comm n="1">
      <texture-file>Aircraft/YourAircraft/Models/Instruments/kx165-texture.png</texture-file>
    </comm>
  </instrumentation>
</sim>
Now default texture has been replaced by your custom texture.
Dimming params
You can set the dimming params who control the light emission. As example, insert your KX165 as following
<model>
  <path>Aircraft/Instruments-3d/kx165/kx165-1.xml</path>
  <overlay>
    <params>
      <dimming>controls/instruments/comm-light</dimming>
    </params>
  </overlay>
  <offsets>
    <x-m> YourValue </x-m>
    <y-m> YourValue </y-m>
    <z-m> YourValue </z-m>
  </offsets>
</model>
Now controls/instruments/comm-light is control the light emission of the KX165.
More reading
External link
- Bendix/King KX 155/KX 165 Pilots Guide (pdf). Published by Honeywell. (2.9 MB)

