Howto:Make a trip in the Concorde
In order to familiarize yourself with the basic functions of the Concorde, we describe in the following a short supersonic flight from Amsterdam (EHAM) to Rom (LIRF).
The flight will take about 1.5 h (~30 min climbing/accelerating, ~10 min cruising at Mach 2.02 at 51.300 ft, and another 30 min descending). We will use the 2D-panel so that you can concentrate on the functions, without having to loose time by searching/switching between many panels. Please see the given flight-data just as a reference – your own data will deviate, because they will depend a lot on actual weather, time delays, different approach/arrival routes, and very certainly on the amount of fuel - For this kind of plane the payload (max 13.380 kg) is just about negligible compared to the fuel (max 95.680 kg).
| Tip Reading through the Concorde article will definitively be of help. |
Later you might want to test some original Concorde-flight-plans in the directory: FlightGear/Aircraft/Concorde/Doc/*.fp.
See also some short comments/instructions in chapter “Example” of: FlightGear/Aircraft/Concorde/ReadmeConcorde-jbsim.txt.
In the Appendix you find a table of all significant flight data of one of my test-flights – just in case you wonder about some unusual behavior of the Concorde, that you might discover during that flight – especially during the climb-out! Many of those I did not believe at first myself!
Preflight
- Runways: Check minimums: for Takeoff 11.200 ft (3.500 m), for Landing 7.300 ft (2.300 m)
- Fuel-level: Set via: Menu → Concorde → Fuel:
- if changed: Restart FGFS or goto “Engineering Panel” (Ctrl+E) and press the Reset (the small black button in the center, between “TOTAL FUEL REM” and “A/C WEIGHT”
- Altimeter: Set the actual QNH (Nautical Height) into (25). Set altimeter according to:
- as given by ATC/ATIS
- or to the airport height
- or look up the Hg-value in: Menu → Environment → Weather Conditions
- or check the metar data in MPmap
- Emergency return: Set VOR/ILS + Radials into NAV1 (19) & (21), in case something happens during Take-Off etc.
- INS-Target: Input Target(s) (e.g. just LIRF into "Menu → Autopilot → Rout Manager")
- COM's, VOR's, NDB's: Set as needed. For the target airport you have enough time to do so during descent!
- Altitude: Just preset the next needed “Altitude Acquired” (62) (e.g. the final AA=51.300)
- Nose 5°: set with (49)
If ATC is available you need approval prior doing the following:
- Start only engines 2+3 for taxiing (that is the official pilot-manual, I usually forget to switch off 1+4 when the model started up with all 4 engines running already!)
- Release “Parking Break”: Key “Alt b” and check instruments (34, 35, 36)
- Push back: key “Ctrl+B” and check the blue indicators in (40) (off = normal, blinking = in transit, blue = reverse). The “in transit” takes rather long compared to other planes (up to 10 sec)!
Taxi
- Taxi according to Tower instructions (or UNICOM-announcement)
- switch on all 4 engines at Hold-Position (e.g. by clicking onto the corresponding “HP VALVE” in the 2D Engineering panel (“Upper S”)
- Verify trimming (53)
- Verify Nose = 5 degrees (49)
- if tower has given a max altitude for departure preset AA = maxAlt (this would have priority above the already set max “Altitude Acquired”=51.300.
- max Speed: preset max Speed to 250 kt/h (62) for up to 10.000 feet
Takeoff
From Rolling to 10.000 ft it takes about 5 Min and brings you just about 3 mi closer to the target (if starting from runway 27 at EHAM, which is about at 90° to the target (INS ~170°) - as during my test-flights)!

- Main Landing Light on when “Cleared to Start” (see the 4 left switches on the panel above the windshield: 2 extender (1) + 2 lights (2)). Notice this panel also for later: When warnings have been set – you may spot and reset those on this panel by mouse-click onto the warning-light.
- Start timer
- AB on: Set Afterburner on (ctrl+F, verify CTY-indicator (13) blinking)
- Activate T/O (37)
- Release brakes: (alt+b) → “Rolling”:
- V1 165 kt/h (must Take-off)
- VR 195 kt/h (start rotating)
- Pitch 12.5 degrees at rotation (check Attitude Indicator in (17))
- Gear Up (g) at ~200 ft
- V2: 220 kt/h (minimum speed to hold)
- Climb out on Runway-Heading:
- AP on: activates also HH+PH ("Autopilot" activates "Heading Hold" and "Pitch-Hold") that will hold the current attitude until we have time to complete all the other settings. When flying with 3D-panels make sure you use the left or right AP, according to who is the "Pilot in Command"!
- FD on + AT on: Activate both FD's (Flight-Director) and and both AT's (Auto-Throttle) (in 2D panel only 1 each!)
- IA on: (Indicated Airspeed Acquire) restricts the speed to the preset 250 kt/h and then switches IH on (IAS Hold) and IA off (hold 250 till 10.000 ft)
- Nose Up 2 times “Alt-Gr + ]”
- AB off (Afterburner - Ctrl+F) verify CTY (13) off
- IA+IH off, VS on → ~ 4.000 FPM: If allowed by ATC use the maximum climb-rate while maintaining 250 kt/h max. Thus control the Speed by the "Rate of Climb" VS (Vertical Speed Hold) and adjust the “to be hold speed” by the vertical speed indicator (20) (hot-spots at the center of upper and lower ¼ border).
- Warning: With “IA off” the throttle must be manually moved completely off and on again, in order to ensure it is set in the max throttle position!
- After OK from Tower go onto Course to (first) target
- IN on (for Instrument Navigation System) or VL on (for VOR navigation) or TH on (for True Heading (manual)), or similar. This will switch HH off automatically. I had set ROM (LIRF) into the Rout-Manager, so I chose IN on.
Climb to Cruise Altitude
The climb from 10.000 ft to 51.300 ft and Mach 2.02 will take about 25 Min and 240 miles:
- Above 10.000
- Main Landing Light off above 10.000 ft (Panel above windshield, left corner)
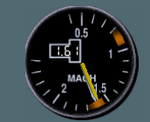
- Accelerate to max. allowed speed (yellow pointer in (8))
- AB on: Use the Afterburner to speed up
- FPM → 3.500: reduce the FPM (20) to increase the actual speed (white pointer in (8))
- AFT+ENGI on: Switch the fuel pumping to “AFT” as soon as the indicator in the C/MG (31) reaches about the center between allowed Min and Max (the sooner the better!). Directly after that switch on also "Engi" to continue pumping when Tank 11 is full. (compare chapter "Balancing by Fuel-Pumping")
- AB off: As soon as the “White Pointer” merges with the “Yellow Pointer” (in (8)) switch the Afterburner off again.
- MAX Speed == Actual Speed (FPM → 3.000 varying): After the actual speed is about equal to the maximum allowed CAS (8) (i.e. the white pointer is completely covered by the yellow pointer – but NOT above it!), begin holding the allowed maximum CAS by varying the FPM (with (20)). The closer you stay at the maximum speed the less altitude you gain and accordingly the better you control the M/CG!
- watch M/CG between marks in (31). Control this by the Mach-Meter (8b).
- If the Speed gets above the M/CG maximum, it generally means that you are too high for the actual speed or your balancing by fuel tanking does not work properly (compare chapter "Balancing by Fuel-Pumping"). In that case reduce the speed by throttle (not by increasing FPM – because you are too high already) – keep a minimum of 500 to 750 FPM. It may take quite some time to recover!
- watch for Warnings: Hi Frequency = Stall Warning, Clicking = Over Speed
- 18.000 ft: set altimeter to QNH = 29.92 (=1005 hPa) (Nautical Height = Flight-Levels)
- AA on for FL513: This ensures that you do not overshoot the allowed maximum of 51.300 ft!
- Mach 0.95 (~ FL280): AB ON again, FPM → ~ 4.000 reducing constantly to ~500. The support of the Afterburner will increase the speed drastically, so be prepared to increase the FPM accordingly - and then reduce it again slowly.

- activate Tank 10: Now is a good time to activate tank 10 - before it might get hectic! Goto Engineering Panel (Ctrl+E), switch the Tank 10 valves open and return again with (Ctrl+E). (compare chapter "Balancing by Fuel-Pumping")
- Mach 1.1 (~ FL 330), FPM → ~2.000: somewhere above Mach 1.1 drag reduces significantly – be prepared to increase the climb rate again drastically to about ~2.000, then again reducing to ~1.000
- Somewhere in this area it may become difficult to keep the speed inside the M/CG-markers (without reducing speed drastically!). Be sure that does not happen before Mach 1.5 – otherwise it may not be possible to correct it later in level flight, and thus you either never reach Mach 2.02 or at least the drag will result in significantly increased fuel consumption.

- Mach 1.3 (FL~360): Air-Intakes open automatically, providing more thrust. Be prepared to increase FPM ~2.500 again
- Mach 1.7 (~FL470): AB OFF again (Stop afterburner (ctrl+F))
- ensure 513 is preset in (62) and AA is active !!
- FL513: System will automatically switch from AA to AH
- MACH 2.02: MH on (Mach Hold) + both AT on (Auto-Throttle)
- continue Fuel-Pumping until M/CG is centered, otherwise you fly with much drag which will increase your fuel consumption
- check Target Airport, Weather, Runways, etc.
Supersonic descent
The descent from FL513 and Mach 2.02 will take about 30 Min and/or 250-270 miles:
- Between 270-250 miles to target: MH off + Throttle off, decelerate to 350 kt/h at FL513
- WARNING: make sure you move the throttle once completely forward and then to idle – otherwise it may stay engaged in the previous condition!
- AT might start blinking because the throttle is idle!
- watch M/CG: you may need fuel FORWard very soon! During the whole descent you may need to switch FORW on/off several times!
- at 350 kt/h --> VS on (AH off), start descent with FPM 2.000 (20)
- preset AA to FL410, then prime AA (Altitude Acquire)
- at FL410 hold Altitude and decelerate to Mach 0.95 with min. throttle
- at Mach 0.95 continue descending with 2000 FPM (VS on enforces AA off automatically)
- preset AA = 10.000, predefining your minimum altitude prior to approach. You may vary the FPM according to your needs
- below 18.000 ft set QFE in (25) (field elevation pressure), check ATIS (or ask ATC or check weather of the airport in MPmap). Be aware that this QFE might be very different to the one set at the beginning of the flight! And it should be correct, if you plan to land with Autopilot (support)!
Approach
- ~40 miles from threshold: prepare the approach to the expected Runway – or define a STAR-approach – or ...
- for a normal "straight in approach":
- Set VOR into NAV2 (64) & ILS into NAV1 (55), also set the radials according to the expected runway into (58), (59), (60), (61).
- Switch (56) to INS (Inertial Navigation System)
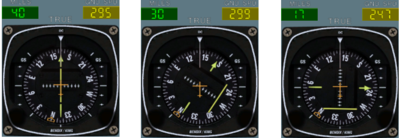
- Align your flightpath with runway: if e.g. you want to land on runway 25, but the direct INS-radial (yellow pointer) actually points to 25.8°, then you should start correcting the INS-radial to 25°:

- set True Heading (58) to e.g. 28.5° and activate TH.
- Watch it: The TH marker (now on “N”) does not follow because the instrument shows INS values! The actual TH values you would see only when you switch the INS-display to VOR with switch (56) – which we do not do, because we want to watch the INS-pointer!)
- While the TH of the plane moves slowly to the preset TH=28.5° (i.e. to the right), the INS-pointer moves slowly towards 25° (to the left). And the vertical deviation bar starts showing that the actual heading of the plane does not match the direct path to the INS-target.
- Continue with that TH heading until the INS-pointer points directly onto 25°, then IN on (forces TH off). The plane will turn and approach the target on that radial. The deviation bar will center
- (Of course you also could use a VOR if there is one midfield of the airport and if it reaches that far – the nice thing about INS is: It always is available (even 20.000 miles away and always is located in the center of the target.)
Max Speed for Visor down and/or Nose 5°: 325 kt/h (M 0.8) Max. Speed for “Nose Down” 12.5°: 270 kt/h AND below 20.000 ft Max Speed for Gear down & Landing-light: 270 kt/h (M 0.7)
- Below 10.000 ft → 250 kt/h maximum speed
- Main Landing Light on (over windshield at left)
- Nose down 5°
- contact ATC and follow advise, or:
- ~25 miles from threshold: descent to 2.000 ft and hold 220 kt/h
- Approach Radial: Make sure you are close to the radial of the active runway, either by above INS-settings or by standard VOR-procedures
- VL on (VOR1 Lock): Check (11) (The indications in (18) and (17) are not usable because they still show INS – not VOR!): Only after the yellow needle shows the ILS-localizer active switch VL on (forcing IN off).
- RAD/INS → RAD (56): That will display the VOR1 in (18) and (17) (of course also (4) must be switched to DEV1! Remember: Only DEV1 can be used for Radial flying!). There should be needed only minor corrections to center the localizer, and those are done now by the Autopilot!
- GL on (Glideslope): Watch (9) and/or (21) for a stable confirmation that the DME reading is stable and wait till the Glideslope indicator (in (17) and/or (18)) is centered, only then activate GL. 'Otherwise the plane might perform a very drastic climb or descent in order to acquire the Glideslope altitude!'
- ~10 mi from threshold: keep 200 kt/h (You may still have a gross-weight far above the maximum landing weight – so keep speed a little higher than usual!)
- Follow the ILS beam
Landing

- Watch "Altitude to Ground" in (23)
- Landing Gear (G) at about "Outer Marker" (32) blue
- Nose 12.5 degrees (full down)
- 750 ft AGL: switch AP off (Autopilot with Ctrl+D) and AT off (Auto-throttle)
- hold pitch at 10° - adjust descent-rate with speed/throttle
- VREF 162 kt/h for touchdown (rather stay a little faster!)
Taxiing
- Nose up to 5°
- Switch Off engines 2 + 3
- get clearance to taxi
Parking
- Switch off engines
- Nose and visor up, as weather seal.
Appendix
Recorded Flight Data EHAM --> LIRF
| +EHAM - LIRF, start at EHAM RW 18C with wind 290@4, 1008 hPa | |||||||||||
|---|---|---|---|---|---|---|---|---|---|---|---|
| Time | FL | FPM | T/CG | TAS | MaxMach | Mach | CAS | Miles | Fuel | remark | |
| Start | 00:00:00 | 0 | 0 >> 2000 | --- | --- | --- | --- | --- | 700 | 93,000 | AB on |
| 00:02:15 | 20 | 2000 >> 4000 | 0.9 | 260 | 0,55 | --- | 250 | 702 | 91,400 | AB off | |
| 00:04:53 | 100 | <3500> | 0.9 | 294 | 0,7 | 0.46 | 250 | 697 | 90,156 | AB on | |
| 00:06:00 | 140 | <3000> | 0.9 | 388 | 0,77 | 0.61 | 316 | 689 | 88,824 | AFT Pumps on | |
| 00:06:54 | 170 | 3000 >> 750 | 0.9 | 494 | 0.8 | 0.8 | 391 | 683 | 88,085 | AB off | |
| 00:09:55 | 240 | 4000 >> 400 | 1 | 569 | 0.95 | 0.95 | 406 | 656 | 86,291 | AB on | |
| 00:13:10 | 330 | 2000 >> 1000 | 1.12 | 637 | 1.12 | 1.12 | 405 | 624 | 83,617 | WATCH: Steep Speed Increase | |
| 00:16:00 | 360 | 2500 >> 2000 | 1.25 | 746 | 1.33 | 1.33 | 451 | 592 | 81,505 | WATCH: again increase to FPM 2500ppp | |
| 00:19:25 | 440 | 2000 | 1.4 | 992 | 1.7 | 1.7 | 525 | 543 | 78,451 | AB off | |
| 00:23:45 | 513 | 0 | 1.49 | 1160 | 2.02 | 2.02 | 524 | 464 | 75,925 | ||
| Descent | 00:00:00 | 513 | 0 | 1.2 | 1160 | 2.02 | 202 | 524 | 270 | 70,056 | |
| 00:04:23 | 513 | 2000 | 1.2 | 783 | --- | 1.37 | 350 | 200 | 69367 | ||
| 00:09:51 | 410 | 0 | 2.15-1.1 | 542 | --- | 0.95 | 266 | 138 | 68650 | ||
| 00:25:19 | 100 | 2000 | 0.7-1.12 | 245 | --- | --- | 250 | 32 | 67700 | ||
| Landed | 00:37:47 | 65257 | Landed –-> at terminal | ||||||||