Howto:Editing tile textures and materials
| Work in progress This article or section will be worked on in the upcoming hours or days. See history for the latest developments. |
The FlightGear scenery is displayed on the screen by rendering each of the triangles that makes up the surface with a texture, and placing random trees and objects on the surface. This Howto describes how to change the appearance of the scenery by modifying the texture, and configuring the objects that appear.
Each triangle has a defined "material", the landclass assigned to it by the scenery building process. The mapping of that material to a set of textures and objects is defined in the materials.xml file, found under the Materials/ directory. You can determine the material definition used within a triangle in-sim by using the ufo and Ctrl+Alt clicking on the ground. This will list the landclass used from the materials.xml file.
There are currently three different sets of materials you can use:
- The default set (Materials/default/materials.xml)
- A set that uses different definitions for different geographical regions, so that the farmland of Hawaii looks different from that of England (Materials/regions/materials.xml)
- A DDS set that takes advantage of pre-generated mipmaps of the dds texture format (defined in Materials/dds/materials.xml).
All of these make use of fragments of xml found under Materials/base/.
Basic configuration
Definitions of the various XML tags can be found in Docs/README.materials.
Creating a new material
Creating a material requires producing a series of square images (textures), typically of dimensions 1024x1024 pixels. These images are then processed to remove objects and to reduce tiling. The following sections describe one approach to doing this.
Image sources
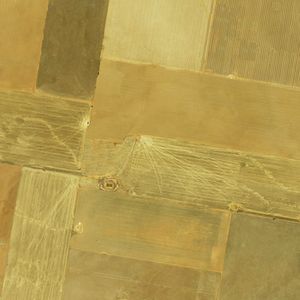
Texture images should reflect the way the land looks from above, so a typical starting source is an aerial photograph or orthophoto, such as those shown by OpenStreetMaps when editing. Note that very few areas license these images in a way that is compatible with FlightGear use; one exception is the NSW state government in Australia. A screenshot of an area of NSW taken directly from OSM is used in the following example - conveniently a scale is provided by OSM that is useful for working out how many pixels of the screenshot correspond to the desired distance on the ground.
In general two screenshots of overlapping areas will be necessary to form a full square of the required dimensions. Here are two used to create a "DryCrop" texture:
Creating the initial image
All steps are described using the GIMP software package. Similar tools are available in other image editors.
- Open one screenshot and enlarge the image size to some larger, square dimension bigger than the planned final size so that there is room for the second screenshot to be pasted in; to do this in GIMP you first expand the Canvas, and then expand the Layer to fit the image (i.e. canvas) size.
- Paste the second screenshot into place so that the images match up seamlessly
- Select a suitable region of the exact size in pixels (usually 1024 x 1024)
- Use the clone tool to erase unnecessary objects using other parts of the image
- Crop to the selection
The picture to the right shows the result of doing this on the two screenshots above. Note that the house, trees and roads are gone, but patterns of tracks in the paddocks remain.
Further manipulations
- The GIMP "make seamless" tool will create a tile that has no sharp edges at the cost of smearing parts of the tile internally. This is not needed for textures that use the "agriculture" effect. Because the seamless effect works by overlaying the image with itself after rotation, "seamless" tiles will be susceptible to tiling effects at shorter repeat distances than they otherwise might be.
- Adjusting the blue colour level down will remove the blue tinge that appears in photos taken at some height
- Adjusting all colour levels using a reference image (not necessarily an orthophoto) can remove various colour distortions
A set of texture images (basic + overlay + hires) prepared in this way will be ready for testing in FlightGear. The current shader assumes that the hires texture is 15 times higher resolution than the normal textures.
Advanced manipulations
If vegetation is sparse the ground colour variation for the vegetated areas (forest and scrub) can be matched with neighbouring grassland and vegetated areas as follows:
- Add a transparent ("alpha") layer to the vegetation image
- Select ground areas by colour and clear them. The GIMP checkerboard pattern will show through. Do this repeatedly until only vegetation remains.
- Add a non-vegetated image as a lower layer
- Output the merged images to create the vegetated tile
- Use the non-vegetated image for e.g. grassland or other neighbouring area
Because the position on the texture image is calculated identically for all textures, the variation in ground colour will remain smooth when moving across a landcover transition. This effect is best when vegetation is sparse, as less of the vegetated areas will be cut off at the borders.
Checking in FlightGear
Fly at 40,000 ft above land rendered with the new set of textures (basic + overlay + hires). If tiling is apparent, it might be reduced by finding areas of the texture that draw the eye (e.g. a dark area with a distinctive shape) and breaking them up using the clone tool.
Another useful technique is to substitute the "Unknown" texture for one of your textures, to see where it will be placed. The Unknown texture is at Terrain/unknown.png.
Creating Object Masks
Object masks allow you to define where on the surface of the material random vegetation and buildings should be placed, relative to the texture itself. The object mask works by using the 3 colors (red, blue and green) to define whether a tree or building may be placed at a given location, and the rotation of the building. The colors are used as follows:
- Red defines the Rotation of a building
- Blue defines whether a random building can be placed at the location
- Green defines whether random vegetation can be placed at the location.
The process to create an object mask and configure materials.xml to use it is straightforward.
- First, we need to identify the texture you want to edit.
- Open the materials.xml files using a text editor.
- Search for the material type you want to change by the <name> tag.
- Look for the <texture> tag to identify the textures used for the material. In complicated cases, there may be a <texture-set> defines for shader effects. In this case, look for the first <texture> listed inside that tag.
- Next we need to create the object mask itself.
- Open the texture for which you wish to create an object mask
- Resize the texture to 256x256. This is because the object mask doesn't need to be very large.
- Save the texture to a new file, so you don't risk over-writing your existing texture.
- Create a new Black layer on top of the texture, then adjust the opacity of the layer so you can see the texture underneath.
- Edit the green channel. This will mean you'll only paint green colour to add forests.
- Using a brush colour in all the areas where you want trees to be placed in green. It may be useful to have another copy of the original texture open so you can easily tell which areas need to be coloured in.
- Now edit the blue channel (for Buildings).
- Using a brush pain in all the places you want buildings to be placed.
- Finally edit the red channel (for building rotation)
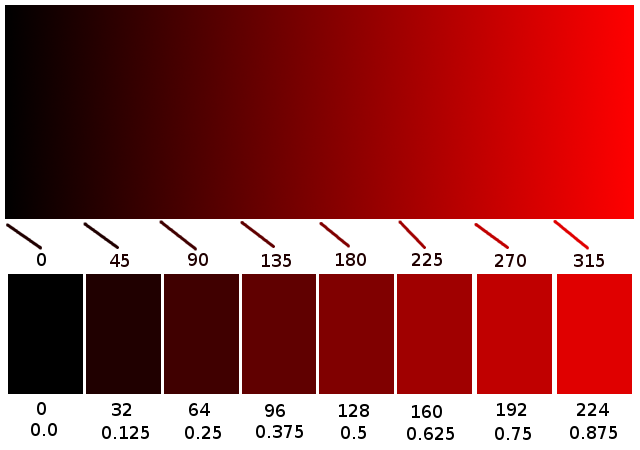
- Using different densities of red, colour over the buildings to indicate the rotation you want them to have (relative to North). This is the trickiest part, as you will need to work out the angle you want to have your buildings rotate by, for which having another copy of the original texture open helps enormously. The diagram below will help you convert from degrees to the appropriate red colour.
- Once you've finished, increase the opacity of the layer to 100%. The texture underneath should disappear, and all the areas that shouldn't have buildings or trees will turn black.
- Save the object mask as a png. The filename convention is <texture>.mask.png.
- Now we need to change materials.xml to use it.
- Edit your materials.xml in a text editor. You may want to create a copy of an existing one yourself.
- For each of the object masks you've created, add an <object-mask> tag containing the name of the object mask. This should be added underneath the material tag (rather than the <texture> or <texture-set> tag), and should be entered in the same order as the <texture-set> or <texture> entries if there is more than one.
- Now change the <heading> for any random objects to "mask". This will cause the random object generator to use the object mask to determine the heading of the object rather than using a random heading.
- You may want to increase the object density or random tree density by _reducing_ the <coverage-m2> or <wood-coverage> values.
- Save the file
- Start FG and enjoy!

