Howto:Add wingmen

Military aircraft are rarely seen singly: they usually operate nowadays in pairs or larger formations. The pair is the basic building-block, but historically the "vic" of 3 was also used, until it was realised that this was tactically inflexible, and the pair was adopted instead.[1]
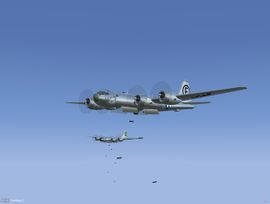
AI Wingman is the method in FlightGear whereby one or more aircraft can be added to the main model to build up formations. There is a significant framerate cost involved. However, formations of up to 12 aircraft have been tested, and with careful choice of options, and a fairly powerful computer, reasonable frame rates can be achieved, even at KSFO. Wingmen are not AI Aircraft. In the interest of framerate they are in fact a sub-class of slaved objects, with added sinusoidal noise and some simple AI rules. They can be released to act independently in a limited way: they can break and rejoin a formation. 12-Ship Formation video
The formation can be changed by the use of a Nasal script. There is no collision detection or avoidance, so you must avoid flying the wingmen into each other during a formation change. There is a significant framerate cost involved. The wingmen can be as simple or complicated as you wish. The ones currently implemented tend to be fully detailed, and can be "ridden". This is uneccesary, but gives a fun viewpoint of the formation.
This howto will explain how to add wingmen to your model
Step 1: creating the wingman
First, you need to create a file with the extension .xml containing at least one <entry> tag within a <scenario> tag. This file can have any name you like, but MUST go into the directory AI with all the existing scenarios. Here is an example taken from the $FG ROOT/AI/wingman_b29_demo.xml:
  <scenario>
    <entry>
      <name>Wingman-Port</name>
      <type>wingman</type>
      <model>AI/Aircraft/b29/Models/b29-wingman.xml</model>
      <x-offset>-500</x-offset>
      <y-offset>-500</y-offset>
      <z-offset>0</z-offset>
      <formate>true</formate>
      <submodels>
        <path type="string">/Aircraft/b29/b29-submodels.xml</path>
        <serviceable type="bool">true</serviceable>
      </submodels>
      <coefficients>
        <heading>5.0</heading>
        <pitch>4.0</pitch>
        <bank>4.0</bank>
        <speed>2.5</speed>
      </coefficients>
    </entry>
  </scenario>
Notes:
- Put the <PropertyList> tag before and </PropertyList> tag after the following document of course, as all our xml's carry this at the start and end! This file MUST go into the directory $FG ROOT/AI.
- All measurements are in Imperial Measure: Feet, Inches, Pounds. This is because the original author(s) were American. Please do not ask for this to be changed. There is simply too much work involved in doing so.
- Name can be anything you like, but MUST be unique if you want to parent another wingman to this one.
- Model path can be to any .xml file which defines a visual model. However, it is likely that the animations will be incorrect, and the model will be too detailed if you use the ones defined in $FG ROOT/Aircraft/some_aircraft/Models. For best effect you should place a model file in $FG ROOT/AI/Aircraft/your_aircraft/Models/.
- Yet another co-ordinate system is introduced; see below.
- Submodels can be defined for Wingmen see [Howto:_Add_submodels| Add Submodels]
- There is a short list of allowable tags. The allowed properties are:
     <name>         The name of the submodel.
     <model>        The path to the visual model. Any model in any location is allowed. All the normal
                    animations are available.
     <x-offset>     Submodel's initial fore/aft position relative to user aircraft.
                    Fore is positive. (ft)
     <y-offset>     Submodel's initial left/right position relative to user aircraft.
                    Right is positive. (ft)
     <z-offset>     Submodel's initial up/down position relative to user aircraft.
                    Up is positive. (ft)
     <formate>      If true, the model formates to the parent model in the position defined by x-offset,
                    y-offset, z-offset. If false, the wingman will either break away, or join as approriate.
     <parent>       The name of the parent AI Object. If this tag is not specified (as in the example above),
                    the Wingman will formate on the main model.
     <coefficients>
       <heading>5.0</heading>
       <pitch>4.0</pitch>
       <bank>4.0</bank>
       <speed>2.5</speed>
     </coefficients>
Step 2: adding the Wingman to your model
There are two methods of adding Wingmen to your model:
First, add these lines to your model ~-set.xml file within the <sim></sim> tag:
   <ai>
     <scenario n="100">wingman_b29_demo</scenario>
   </ai>
Where <scenario n="100"> contains the name of the file you created at Step 1 above.
Note: The file name has no extension, and must be in $FG ROOT/AI.
Second, add this command to your command line:
   --ai-scenario=wingman_b29_2_demo
   --ai-scenario=wingman_b29_3_demo
These methods can be combined, so wingman_b29_demo contains the basic formation, while wingman_b29_2_demo and wingman_b29_3_demo define additional formations of Wingmen.
Step 3: adding Formations to your model
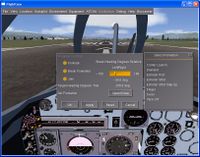
To activate the generic Formation Selector Gui add these lines to your model ~-set.xml file within the the <nasal></nasal> tag
   <formation>
     <file>Aircraft/Generic/formation.nas</file>
   </formation>
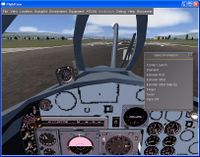
This will display the standard selection of formations accessed through the AIFormation menu
Optionally, you can add this key binding: Menu-Formation-Selector.jpg
   <key n="9">
     <name>Ctrl-I</name>
     <desc>Show configuration dialog</desc>
     <binding>
       <command>nasal</command>
       <script>formation.formation_dialog.toggle()</script>
     </binding>
   </key>
This will display only the selection menu

