AI Traffic
| The FlightGear forum has a subforum related to: AI Scripting |
| FlightGear AI |
|---|
|
|
Development & Issues |
AI Traffic (Artificial Intelligence), AI-Traffic, or Interactive Traffic was introduced with FlightGear version 0.9.5. The purpose of AI traffic is to automatically populate airports sceneries with animated aircraft models reflecting the actual daily movements at and between airports to enrich the flightgear experience and improve its realism. This page aims at providing the documentation needed to populate airports with AI traffic.
In essence, the AI controlled traffic system is comprised of four elements:
- AI Aircraft models: Are part of the base package under $DATA/AI/Aircraft and cannot be flown by end user like regular FDM models as they are dedicated and exclusive to AI systems.
- AI traffic schedules: Are part of the base package under $DATA/AI/Traffic and define where and when AI aircraft should fly. Files are unique per Operator's ICAO and split in sub-folders using the ICAO Initial. For example, traffic for United Airlines is stored under $FG ROOT/AI/Traffic/U/UAL.xml
- Groundnets: Are part of the scenery pack under terrasync/Airports and contain the information required to guide AI aircraft on the ground from gates to runways and vice versa, at each individual airport (one per airport). The parking stands defined in an airport groundnet can also be used as Starting Positions when flying an FDM aircraft. They are shown and can be selected in Flightgear's "Location" startup tab.
- Runway Use Configurations (RWYUSE): Are part of the scenery pack under terrasync/Airports and condition which runway(s) are for AI take off and landings based on the time of the day and wind conditions.
Traffic Schedules
Traffic pattern describe the relationship between two separate entities: Aircraft and Flights.
In real life, Flight Scheduling aims at maximizing the number of flights operated with the fleet of aircraft available, taking in account each aircraft’s initial location, the length of each flight, the required turnaround time at each airport and of course the routes operated. In practice an aircraft will fly different routes of different length on different day/time and not all aircraft will return to their home base the same day, especially in the case of long haul routes. The list of flights an aircraft will operate during a set period of time is the Aircraft Schedule. AI aircraft provide some extra benefits: They do not need maintenance (or crew replacement) and so can be scheduled for use 24h00 per day; they are also never late nor cancelled hence they will perform 100% of their assigned flights on time.
To minimize the amount of data handled, a frequency is attached to each flight as either daily or weekly; For example an aircraft based at EHAM can fly daily in the morning to EGLL (and back) but then to different destinations in the afternoon depending on the day of the week (LFPG on Monday, EDDF on Tuesday etc). In this scenario the EGLL flights are operated daily and the LFPG and EDDF ones, weekly as it will take another full week before they are operated again.
Like in real life, the flights assigned to an aircraft must follow a logical routing sequence and the arrival city of one flight must be the departure city of the next (AI aircraft do not time travel no teleport). Flightgear schedules are set for a full week and repeat indefinitely until the traffic file is updated. As a result, the routing sequence described above must be consistent with the schedule weekly reset: If the last flight in an aircraft schedule (Sunday night) take it to KSFO then the first flight in the schedule (Monday morning) must depart from KSFO. From the above. The Home Base of an aircraft is always the departure city of its first flight in the schedule ie the airport it will be departing from for its first flight on Monday morning.
It is recommended the traffic schedules follow as much as possible reality and so they should include turnaround time at each airport even if an AI aircraft does not require cleaning and refuelling.
To facilitate scheduling, a new database format was introduced in FlightGear 1.9.0 and flights are no longer directly and rigidly assigned to a specific aircraft (Unique registration). Instead, a more generic description of a fleet is given, along with a series of flights that need to be carried out. The routing is then taken care of by FlightGear itself.
An example of a traffic file
Below is a complete and working example of a Traffic Manager II file, as it can be used with FlightGear 1.9.0 and later:
 <?xml version="1.0"?>
 <trafficlist>
    <aircraft>
        <model>Aircraft/MD11/Models/KLMmd11.xml</model>
        <livery>KLM</livery>
        <airline>KLM</airline>
        <home-port>EHAM</home-port>
        <required-aircraft>MD11KLM</required-aircraft>
        <actype>MD11/P</actype>
        <offset>25</offset>
        <radius>39</radius>
        <flighttype>gate</flighttype>
        <performance-class>jet_transport</performance-class>
        <registration>PH-KCA</registration>
        <heavy>true</heavy>
    </aircraft>
    <aircraft>
        <model>Aircraft/MD11/Models/KLMmd11.xml</model>
        <livery>KLM</livery>
        <airline>KLM</airline>
        <home-port>EHAM</home-port>
        <required-aircraft>MD11KLM</required-aircraft>
        <actype>MD11/P</actype>
        <offset>25</offset>
        <radius>39</radius>
        <flighttype>gate</flighttype>
        <performance-class>jet_transport</performance-class>
        <registration>PH-KCB</registration>
        <heavy>true</heavy>
    </aircraft>

    <flight>
        <callsign>KLM0765</callsign>
        <required-aircraft>MD11KLM</required-aircraft>
        <fltrules>IFR</fltrules>
        <departure>
            <port>EHAM</port>
            <time>0/12:35:00</time>
        </departure>
        <cruise-alt>330</cruise-alt>
        <arrival>
            <port>TNCM</port>
            <time>0/21:15:00</time>
        </arrival>
        <repeat>WEEK</repeat>
    </flight>

    <flight>
        <callsign>KLM0769</callsign>
        <required-aircraft>MD11KLM</required-aircraft>
        <fltrules>IFR</fltrules>
        <departure>
            <port>TNCM</port>
            <time>3/01:25:00</time>
        </departure>
        <cruise-alt>330</cruise-alt>
        <arrival>
            <port>EHAM</port>
            <time>3/10:50:00</time>
        </arrival>
        <repeat>WEEK</repeat>
    </flight>
 </trafficlist>
Dissecting the traffic file
Here I will discuss the general structure of a traffic file in more detail. As discussed, the traffic patterns are centered around aircraft and flights. Therefore, a minimal traffic file will consist of two sections: the aircraft definition and the flights section. In the next two sections, I will discuss each of these sections.
General layout
The general layout of each file should look like the above example.
 <?xml version="1.0"?>
 <trafficlist>

 </trafficlist>
The general layout of each file should look like the above example. The first line contains a generic xml header, which is followed on the second line with a <trafficlist> statement. Also, the last line in the file should close off the trafficlist section using the </trafficlist> statement. As will be illustrated below, between these two statements can be one or more aircraft definitions.
Defining the aircraft
 <?xml version="1.0"?>
 <trafficlist>
     <aircraft>
         <model>Aircraft/MD11/Models/KLMmd11.xml</model>
         <livery>KLM</livery>
         <airline>KLM</airline>
         <home-port>EHAM</home-port>
         <required-aircraft>MD11KLM</required-aircraft>
         <actype>MD11/P</actype>
         <offset>25</offset>
         <radius>39</radius>
         <flighttype>gate</flighttype>
         <performance-class>jet_transport</performance-class>
         <registration>PH-KCA</registration>
         <heavy>true</heavy>
     </aircraft>
     <aircraft>
     ...
     </aircraft>
 </trafficlist>
The first lines inside the <aircraft> definition specify some of the aircraft's performance characteristics.
- <model> Here is a path specified to the 3D model that should be used in FlightGear.
- <livery> This line is currently unused, and will likely remain unused. The original idea was to combine this with the <model> line (see above) to load a specific combination of aircraft type (<actype>) and paint scheme, but I abandoned that idea, because it didn't turn out to be very compatible with the existing FlightGear model loading code.
- <airline> This line refers to the airline operating the aircraft. This information is currently used by FlightGear to handle gate/parking assignments. Use the official 3-letter ICAO airline code here, in case of commercial traffic. This keyword is unlikely to be used for general aviation and military traffic.
- <home-port> Each FlightGear aircraft is assigned to a home airport. Internally, this is used to ensure that routes are setup that will eventually lead back to the home airport. This is done to maintain some sensibility in the routing algorithm. [New for Traffic Manager II]
- <required-aircraft> This value is a key that binds aircraft and flights together. In case of this example, the key MD11KLM. Indicates that this aircraft will only carry out flights containing the same key. Usually, a combination of aircraft type, and airline will suffice for this key. In some cases, in particular, when specific aircraft / airlines are distributed across multiple hubs (i.e. home ports), it may be necessary to specify a key containing the home airport as well. For example, Delta Airlines operates 767's out of Atlanta, as well as out of New York. To separate between these two cases, it would be advisable to use two keys; one for KATL (e.g. 767DALKATL), and one for KJFK (e.g., 767DALKJFK). [NEW for Traffic Manager II]
- <actype> A description of the aircraft type reserved for future use in ATC.
- <offset> Ground offset of the 3D model. Not all aircraft 3D models are built using the same convention. Use this parameter to align the wheels with the ground. Notice that this parameter will probably become obsolete in the near future, because model view point references can also be done in the XML file that the <model> keyword refers to.
- <radius> An estimate of the aircraft's size. This is mainly used at airports for gate assignments.
- <flighttype> In the near future, this keyword will be used for runway assignments, so that general aviation, commercial, and military traffic will use different runways if that is part of the airport's operational procedures. This line is also used for gate assignments and should be one of the following:
- ga (general aviation),
- cargo (cargo)
- gate (commercial passenger traffic)
- mil-fighter (military fighter)
- mil-cargo (military transport)
- <performance-class> This line is used to determine the performance characteristics of AI aircraft. This should match one of the performance classes that are predefined in FlightGear. Currently, the following performance classes are supported:
- light_aircraft (General aviation prop driven single or twin),
- turboprop_transport (Commercial Turboprop),
- jet_transport (Commercial jet)
- heavy_jet (Commercial jet w/ MTOW > 136tons)
- ww2_fighter (world war two fighter),
- jet_fighter (modern fighter aircraft)
- tanker (tanker aircraft), or.
- ufo (allows extreme accel/decel capabilities).
- <registration> The aircraft's tail number. Future versions of FlightGear will use this registration in ATC for general aviation traffic. For commercial traffic the registration number will likely remain unused.
- <heavy> Can be true or false. Reserved for future use by ATC, to determine whether the postfix "Heavy" should be appended to the aircraft's callsign.
Defining a flight
The Traffic Manager II file formats contains separate sections for both aircraft and flights information, with the common denominator being a shared key that links aircraft and flight information together. In other words, the general layout of a Traffic Manager II file looks something like this:
 <aircraft>
     ...
     <required-aircraft>MD11KLM</required-aircraft>
     ...
 </aircraft>

 <flight>
     ...
     <required-aircraft>MD11KLM</required-aircraft>
     ...
 </flight>
Each flight is defined between the <flight> and </flight> statements. For example, let's have a look at a randomly selected flight from our KLM.xml example.
 <flight>
     <callsign>KLM0769</callsign>
     <required-aircraft>MD11KLM</required-aircraft>
     <fltrules>IFR</fltrules>
     <departure>
         <port>EHAM</port>
         <time>2/12:35:00</time>
     </departure>
     <cruise-alt>330</cruise-alt>
     <arrival>
         <port>TNCB</port>
         <time>2/22:15:00</time>
     </arrival>
     <repeat>WEEK</repeat>
 </flight>
The <flight> section is slightly more complex than the aircraft definition itself, because it has a few nested levels, however, these should mostly be self-explanatory. The following keywords should be specified:
- <flight> All the relevant parameter should be specified between the <flight></flight> keywords.
- <callsign> The airline callsign used for ATC. If this is an airline flight it should be combination of the airline callsign (e.g. KLM for KLM, or Springbok for South African Airways), and the flight number (e.g. KLM0605, or Springbok0033).
- <required-aircraft> The key that links this flight to a particular aircraft. The see explanation in the aircraft section.
- <fltrules> Can be IFR or VFR. This is required for use in ATC, but currently not used. This is likely to change, however.
- <departure> Definition of the departure airport. This section should contain the <port> and <time> keywords.
- <cruise-alt> Cruising altitude for this flight. This is a bit of a simplification from the real world, where aircraft usually don't stay at the same cruise altitude throughout the flight. This behavior will probably also change in future versions. Values are in flightlevels
- <arrival> Same as <departure>, but now defining the <port> and <time> of arrival.
- <repeat> Repeat period. This can be either the keyword WEEK, or a number followed by Hr. WEEK means that the whole schedule repeats itself on a weekly basis. Hr means that the whole schedule repeats after the number of hours specified directly before it (e.g. 24Hr means that the schedule repeats after 24 hours). With Traffic Manager II, it is generally recommended not to mix schedules that rotate on different frequencies. In general, the best results are obtained when using only weekly rotating flights. For flights that are in reality operated on a daily basis, it is recommended to just specify multiple entries, i.e. one separate flight for every weekday.
- <port> This should be the international ICAO airport code. This keyword should be specified only within the <departure> or <arrival> sections. As far as I know, here it should still be in upper case, although the FlightGear command line currently also supports lower case ICAO codes.
- <time> Used to specify the <departure> or <arrival> time. The format of this string is hour:minute:second. Notice that departure day is optional and is specifically intended to be used in combination with a weekly repeating schedule. When used in combination with other schedules, results may be unpredictable. Times should be in UTC. Weekdays start on Sunday (0) and end on Saturday (6).
Putting it all together: Including a traffic file
Traffic files are found under $FG_ROOT/AI/Traffic. The actual traffic files should be stored in a subdirectory one level below /AI/Traffic. All traffic is organized by Operator ICAO code, and stored in a single letter directory. For example, KLM traffic can be found in $FG_ROOT/AI/Traffic/K/KLM.xml, and United Airlines traffic is stored in $FG_ROOT/AI/Traffic/U/UAL.xml.
The name of the file is the ICAO of the operator (aircraft owner) which is normally the same that the one found in the <airline> tag in the file itself but not alway. For example Compass Airlines in Minneapolis, has the ICAO code CPZ but operates flights for both American Airlines (AAL) and Delta Airlines (DAL). In this scenario the traffic file will be stored as $FG_ROOT/AI/Traffic/C/CPZ.xml and will contain a series of aircraft with airlines tags AAL and another series with tag DAL. Similarly, certain flights in the file will be numbered AAxxxx or DLxxxx.
Ground networks
Using the traffic files information above, the AI Traffic Manager knows which AI aircraft should land at (and take off from) each airport and when. It will automatically place the relevant aircraft models in the scenery and animate them so they navigate from the runways to the gates and vice versa, according to their individual schedule.
Although the physical layout of each airport is stored in FlightGear's APT.DAT master file, the information is not accurate enough to determine which specific routes AI models can use; Instead, Traffic manager will rely on a dedicated file containing a simple wireframe/network of taxiways and gates AI aircraft can follow whilst on the ground ie a GroundNet. A groundnet is made of 3 different elements: Parking Positions, Nodes and Segments (to join nodes and Parking together).
This routing information is aggregated, per airport, in a XML, stored and distributed by Terrasync as /Terrasync/Airports/[I]/[C]/[A]/[ICAO].groundnet.xml where ICAO stands for the 4 letter ICAO code of the relevant airport.
Similarly to Terrain and Objects, Terrasync groundnets can be overridden by placing a personalized version in your custom scenery folder, using the same path structure: /Custom Scenery/Airports/[I]/[C]/[A]/[ICAO].groundnet.xml.
Groundnets are not mandatory but, in absence of this routing information, AI Aircraft cannot park anywhere; they will still try to stick to their schedule, appearing magically at the centre of the airport and taxiing directly to the runways’ thresholds, over grass, buildings and static objects, on time.
Groundnets rely on the runway threshold information stored in /Terrasync/Airports/[I]/[C]/[A]/[ICAO].threshold.xml to determine where runways are (the space between each pair of thresholds in the file) and their heading. This data is used to determine an aircraft has reached the runway and can initiate take off. Similarly it is used to select where an arriving AI aircraft can touch down and start braking.
A technical perspective
A ground network xml file consists of four tables:
- <frequencies> The Airport’s radio frequencies (Optional). As of v1.9.0, FlightGear uses these to display some ATC messages like start-up approval requests. You can "hear" them by tuning to the first ground frequency listed in the section.
- <parkingList> The details of each parking/gate at the airport and the characteristics of which AI aircraft can use them.
- <TaxiNodes> The list of all the nodes in the ground network.
- <TaxiWaySegments> A list of all links/segments (or "arcs" as David Luff called them initially) existing between all nodes and Parking Positions.
Each Parking and Node element in the groundnet has a unique index number, allowing routes be formed (from one ID to the next via a segment/arc) between parking positions and runways
Parking Positions Parameters:
- index Unique ID, internal to the file structure
- lat latitude in decimal minutes format, for example
N50 56.988) - lon longitude in decimal minutes format, for example
W01 21.756) - name & number (gate identification as found on airport charts, for example
D23orC1). - type: The type of aircraft which can use this space. Matched to the <flighttype> parameter found in traffic files:
- ga (general aviation),
- cargo (cargo/freighter)
- gate (commercial passenger traffic)
- mil-fighter (military fighter)
- mil-cargo (military transport)
- heading: The heading at which the aircraft parks in this space.
- radius: The size of the parking spot. Matched to the aircraft <radius> parameter in traffic files to determine if a given AI Aircraft model will fit the position. See aircraft radii
- airlineCodes: a comma-separated list of ICAO airline codes allowed to park at this gate. Matched to the aircraft <airline> parameter of traffic files. Leave blank for all airline to be able to use the gate.
- pushBackRoute: The ID of the next node in the network along a pushback route. In a correctly configured network, the AI aircraft will taxi to this node in reverse, thus simulating being pushed back. See the documentation for the PushBack hold point type below.
Nodes parameters:
- isOnRunway' A logical value that is 1 when the node is on the runway, 0 otherwise. Aircraft waiting to take off will line up behind the last node marked “not on runway” (“0”) until the runway is clear
- holdPointType can have the following values:
- None Not a holding point (normal taxi-through node)
- PushBack The node marks the end of a pushback route, where the aircraft stops rolling backward and start rolling forward upon clearance. A pushback Holding Point can be part of more than one pushback route. See Pushback below.
- Normal (Not yet supported): a regular taxiway holding point.
- CAT II/III (Not yet supported): a special holding point for IFR conditions.
segments parameters:
- begin The id of the parking space or AINode where this segment starts
- end The id of the parking space or AINode where this segment ends
- IsPushBackRoute a logical value. Should be 1 if the current segment is part of a route connecting a gate to a push back hold point, or 0 otherwise.
- name Name of the taxiway.
Tools & Source Material
Groundnets can be built using either FG Airports (v0.032 or later) or Taxidraw (legacy)
FGAirports is the current tool of choice. Its philosophy is airport centered rather than file specific and allows you to visualize at a glance all of the existing groundnets as well as editing them and submitting them to Terrasync. It leverages Open Street Map data, APT.DAT and scenery xmls to provide a visual representation of the airport layout as well as thresholds and tower positions.
FGA automatically checks the validity of groundnet files before submission and assess their adequacy by comparing the number of gates set against the volume of AI traffic at a particular airport.
TaxiDraw pre dates WED and allowed the creation of airport layouts from basic geometrical shapes. Its ground network module is somewhat separate from the rest of the airport project code but allows the creation and local export of simple groundnets.
See the TaxiDraw and FGAirports articles for instructions on how to obtain the tools and operating instructions.
Most Civil Aviation authorities make electronic versions of their Aeronautical Information Publication available on the web (Lookup 'eAIP' or go to https://www.eurocontrol.int/articles/ais-online). AIPs contain precise Airport Charts but also lists of parking stands with their exact Latitude/Longitude as well as usage (Cargo, Gate) and the category (radii) of aircraft they can accommodate.
Gates Numbers and Airlines operating them can often be found on Airports website. Most flight tracking sites/apps will also allow you to monitor a flight all to the way to its gate to identify who parks where.
In essence, all the information you need can be compiled from multiple sources, including Wikipedia, airport diagrams published on the net, in flight airline magazines, etc. etc. In other words, be creative!
Ground traffic rendering
19th November 2021.
Performance
- CPU: Currently having a lot of nodes in the OSG scene-graph will rapidly make FlightGear CPU bound. A lot of separately animated ground traffic objects mean a lot of nodes. Static objects (i.e. non-animated objects) can be put into one mesh - meaning one scenegraph node with the current system.
- GPU: Having fewer draw calls is fast. Having fewer state changes is fast.
- The fast path for both CPU and GPU is creating a way to combine multiple animated objects in one mesh - this is how modern 3d applications do lots of objects with animations fast.
The fast way to do moving objects is to let the vertex shader look at information in buffers and position each object
- Have all the different path segments stored in one buffer that can be read by the vertex shader. This buffer can be generated at runtime for each airport, maybe using NASAL scripts, and not updated.It's also possible to store the 1st buffer in TerraSync.
- Have a second buffer store all per-object data in an array. The array is indexed by the object ID. This includes things like vehicle animation state, which path segment each object is on, the starting time, and a speed scaling factor. The second buffer is updated regularly by the CPU.
- Two approaches to packing different types of objects in a 1 or few meshes
- a). Every type of object is combined in one vertex buffer and rendered with the same shaders, texture atlas or array. Every vehicle is packed one after the other in the vertex buffers. Multiple types of vehicles are contained in the same mesh. Multiple instances of the same vehicle take up extra space.
- All material parameters or uniform values that change between objects, or within objects, like specularity are added as vertex attributes or textures. A vertex shader that can handle all object animations is used.
- The entire set of objects takes up one scene graph node, and is rendered in one draw call. It's possible to do ground vehicles and AI aircraft as two meshes.
- The object ID (an integer) can be added to each vertex as an vertex attribute. This is used to lookup per-object info in the 2nd buffer, including the paths from the first buffer.
- b). Each different type of object (different ground vehicle) is instanced and takes up one scene-graph node. This can allow different shaders and textures per object type. There is less vertex data taking up RAM and VRAM. There are more scenegraph nodes, and draw calls.
- The object ID (an integer) can be added as a per-instance vertex attribute.
- a). Every type of object is combined in one vertex buffer and rendered with the same shaders, texture atlas or array. Every vehicle is packed one after the other in the vertex buffers. Multiple types of vehicles are contained in the same mesh. Multiple instances of the same vehicle take up extra space.
- The vertex shader can trivially look at the object ID, then find the path segment, the starting time, speed scaling factor, and current time to position each object. If the current time is past the end of the current path, the object will stay at the end position.
- The buffers can be a uniform array (minimum of points in each path segment and more smoothing), Uniform Buffer Object (UBO - not available until Vulkan due to Macs not supporting it), a Texture Buffer Object (TBO - Mac support unknown), or a texture looked up in a vertex shader (maybe slower).
- Data format: Each path segment is x,y,z position at regular times - a time-series of positions - e.g. [10m, 20m, 0m elevation] at t = 1s. [20m, 25m, 0m] at t=2s . [30m, 30m, 0m] at t= 3s. 16 bit integers are enough, but 32 but floats can also be used at the cost of 2x the occupancy. 16 bit implementation: If a texture is used it can be 16bit RGB - R=x, G=y, B=z. 2 consecutive 8 bit values can also be read from a texture.16 bit integers can cover an ground traffic area of ~65km with a spacing of 1m. 16bits can give a ~13km ground traffic area with an accuracy of 20cm. The accuracy of the positions doesn't matter too much - the vertex shader can look at 2-3+ path positions and create a smooth interpolation (a smooth curve joining the points). The time steps can also be large.
- If a path has a slowly moving segment, it will take up more points. If a path segment takes a short amount of time, it can have a special xyz numner to indicate path has ended - otherwise the path start/end time information can be stored as uniforms or in a UBO. Vehicles that move faster can have a higher speed scaling. There can be different path segment variations, for example if vehicles have a different acceleration pattern - e.g. speeding up and braking hard, or sharper turns, in an emergency.
- Both ground vehicles, and taxiing aircraft can be done this way. It's possible to replace a conventional AI aircraft model, with a fast rendering ground traffic model once an aircraft starts taxiing.
- If models use animations, they should ideally use a vertex shader that can handle all these animations - so having multiple draw calls per model and CPU-side animation is avoided.
- It's possible to split of different parts of craft into separate meshes for parts that are very dissimilar - at the cost of more scenegraph nodes and draw calls. For example, a separate mesh for lights of various types - these lights will follow the same paths as the vechiles and position themselves correctly.
The way animation is handled (animation meaning moving objects, and parts of moving objects) in modern 3d application is to store the animation data in arrays/buffers on the GPU side and render multiple objects in one draw call.
From a quick google search - a 2010 blog about whether UBOs or TBOs are more suited for different tasks:
"Personally I use them [UBOs] for instanced rendering by storing the model-view matrix and related information of each and every instance in a common uniform buffer and use the instance id as an index to this combined data structure. This usage performs very well on my system.
Also uniform buffers can be used to store the matrices of bones and use them for implementing skeletal animation, however, I personally prefer using normal 2D textures for this purpose to take advantage of the free interpolation thanks to the dedicated texture fetching units but that’s another story.
[..] Personally I use texture buffers for different geometry deformation techniques, to resolve batching issues when the size limitation of uniform buffers is a blocking factor, and for some inverse kinematics effects." - Rastergrid blog, 2010 [1][2]
This is from a 2010 blog - this general approach has been the way to do lots of animated objects for a long time.
Even really complicated animations like moving bodies and cloth physics are handled by moving animation data into buffers - this approach would be needed if FlightGear ever did a simulation of crowds at an airport - not just for boarding one plane which probably won't be too cripplingly slow. But for crowds boarding lots of planes, and moving about large airports. For animating humans, there are will be standard animation formats compatible with output of tools in blender or make human[3]. This approach may also be worth while for rendering lots of seated passengers with really simple movements - and a few walking about with a simple walk cycle. It may also be justified for large amounts of ground personnel at big airports (not just a few relevant for the users plane).
Warnings and Limitations
The complexity of building a fully functional groundnet (and the time spent on it) grows exponentially with the size of the airport but very small airports, on Pacific Islands for example, pose even larger challenges. An ideal project to start with is a Metropolitan airport with one or two runways, and two dozen of parking positions.
FG Scenery and Traffic manager have their limitations and dependencies which create specific challenges of their own. For example:
- TM does not space landing aircraft. You will most likely see packs of landing aircraft hitting your runways at once, sometimes from both ends. Departures are spaced properly though
- TM does not yet use Regular/Cat III Holding points data and so you cannot force an AI aircraft to pause/hold on a route.
- TM does not support the conditional use of gates (Do not use A if B is occupied); Always assume all the Parking position you set will be occupied.
- AI Aircraft cannot "pivot" on their parking positions. The last segment on a route leading to or exiting a parking position must have the same heading than the parking position itself (Park Straight)
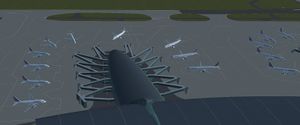
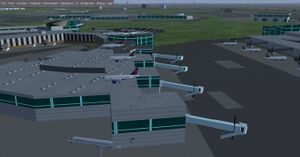
- Groundnets, terrain and scenery objects are independent. If you see your AI aircraft rolling on grass or sitting on buildings and for as long as your groundnet lat.lon data is correct, consider that the airport terrain/layout may be outdated or misplaced. Similarly, Building/Object may have been placed at certain Lat/Lon but since demolished (example of JFK Terminal 3 on the right) to make space for a new taxiway as airports expand and change layout regularly.
Make sure you have verified the data in your ICAO.threshold.xml before starting building your groundnet. If the data is incorrect, locate the correct one on the web and post a request for adjustment in the FlightGear AI forum with a link to the correct data source.
Your candidate groundnet will need to be tested thoroughly by running it in FG, at different time of the day as wind conditions and traffic patterns will impact which runways are used and how many AI aircraft are handled. You should have log/debug enabled as traffic manager will create :ai entries, allowing easier troubleshooting.
On the bright side, both Taxidraw and FG Airports contain a validation tool which will allow you to detect any structural problem with your groundnet. You will also find a lot of resources and tips in the AI section of the Flightgear forums.
Finally, the approach to creating a groudnet is described below as three separate phases, each one including its own specific testing which will hopefully simplify your journey.
Creating the base network
Objective:
- You have enough gates for all AI aircraft using the airport
- Each gate has a valid incoming and outgoing link (route) to the rest of the groundnet
- Each Runway(s) threshold has a unique link to the rest of the groundnet
- Departing Aircraft can reach any threshold, from any parking position
- Arriving Aircraft can reach any suitable parking position from any threshold
Step 1 : Place and configure the Parking Positions
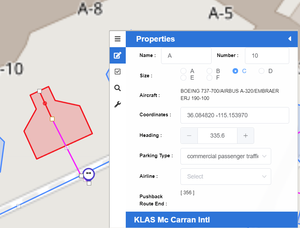
Place a parking position at each location an aircraft is allowed to park. Use your AIP Lat/Lon data and/or the FGA OSM background for extra precision.
AI Aircraft will be positioned so their centre of rotation (main gear and/or X=0 in .ac model file) sits at the Lat/Lon defined for the parking position.
Set a type for each off your gates: GATE if the stand is used by commercial traffic or CARGO if used by freighters. Military and General Aviation can also be used if you are running personalized traffic files on your machine.
Adjust the heading and radius for each of your gates according to the maximum wingspan the stand can accommodate. See aircraft radii. Set a unique name for the gate. Leave the AIRLINE field empty at this point.
Step 2 : Place and configure the Runway accesses
AI aircraft need an access route to each threshold of each runway you want them to use for take off or landing. Your groundnet will need at least one route to one threshold for validation.
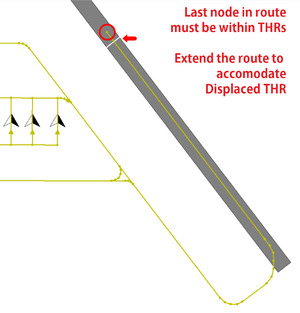
At this stage, place only two access route per runway, one at each end, do not create routes starting/ending hallway (to vacate the runway at midpoint). Your access routes will be used to ‘guide’ the aircraft all the way to a final node at which point it will be ‘handed over’ to the tower, start accelerating and take off. This final node of each access route (Take Off Point) must sit within the runway thresholds. If not, departing aircraft will simply stop and queue at the entrance of the runway. This is crucial when dealing with displaced thresholds. As a rule of thumb, your access route should end up on the white marking indicating the runway number/identification.
Backtracking: Certain airports do not have taxiways along the runway and aircraft will 'backtrack' on the runway itself to reach the threshold (often circling on a turnaround area to align for take off). In this scenario, you still need a route to guide your aircraft all the way to the take off node by placing nodes and segments on the runway and the the turnaround loop area. Make sure your loop starts (exits the runway) ahead of passing the final take off node: see an example HERE.
Your access routes (all routes at this stage in fact) must be bi directional so they can also be used for aircraft to vacate the runway if they taxi all the way to the threshold.
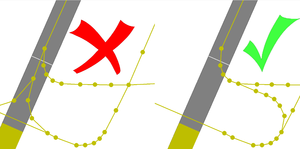
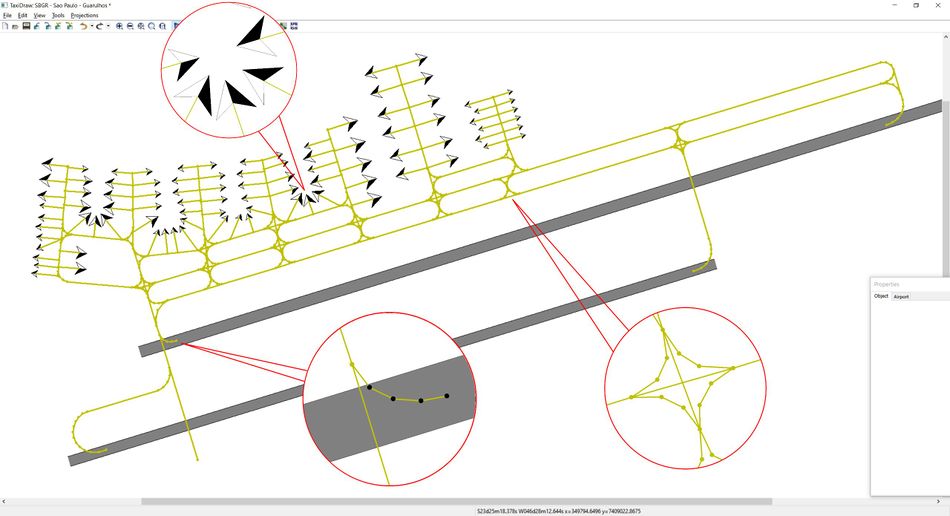
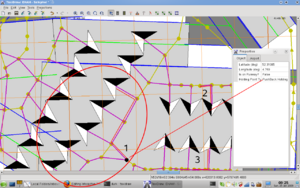
Your access route must be unique: Traffic manager does not handle intersections (nodes with 4 routes) very well. Your take off points should not be connected to more than one route (case of taxiways on both sides of the runway feeding a single take off point from both sides as shown on the right.
Select each of the nodes placed on the physical runway (not the ones leading to it) and mark them "On Runway" with the toggle in their properties panel
Step 3 : Connect ParPos and Runway Access routes to form the groundnet.
Link each of your parking positions and runway access routes by marking the taxiways with segments, avoiding sharp 90 degrees angles by breaking curves into 2 or 3 segments. Keep the network as unconstrained as possible; Make all segments bi-directional, do not include any holding points (Pushback, Regular or Cat III) and do not mark any segment as pushback; At this stage, the idea is to give AI aircraft as many routing options as possible.
Nodes should be placed only at points where the aircraft will change heading so they should be none in the middle of straight routes and definitely none at taxiway crossings.
Segments starting (or ending) at a parking position must have the same heading than the parking stand. AI aircraft park straight and leave their parking straight (rolling forward or pushing back).
Your groundnet does not need to cover 100% of the airport taxiways; certain areas (like De Icing stations or Engine Test Areas) will not be used by AI aircraft. In essence draw just enough routes so that all gates and runways are connected.
Step 4 : Visual Check Once your base groundnet complete, Check visually that your parking positions do not overlap, that nodes placed on physical runways are marked as such and that intersections are formed properly (no node unless the aircraft can turn here)
Step 5 : Structural Check and Test
Run the verification tool (available in both Taxidraw and FGAirports). Both programs will ensure at this stage that routes are valid and that nodes on runway are marked as such. Taxidraw does not check the routes structures individually but rather that a route solution exist: If an aircraft can use different path/routes to go from its ParkPos to a given runway threshold and even if one of these routes is "broken" (unconnected segments) no error will be reported, because the aircraft could use another (unbroken) route to get to the threshold and hence still has a routing solution.
FGAirports will do the same routing check but will also signal any unconnected node (broken routes). Correct the errors found and re run the verification tools until no more problems are found.
Time to test with 'real' traffic. Save your groundnet and export it to a custom scenery folder (NOT to the Terrasync Folder), usually something like F:\My Sceneries\Airports\S\B\SBGR.groundnet.xml. Startup Flightgear and add your custom scenery folder path (the parent of \Airports) to your extra sceneries list in the Add On screen. Select your Airport as Startup Location. Run
What to expect (normal behaviour with base groundnet, if FG has AI traffic at the airport):
- Parked aircraft will start appearing on the parking stands you have set. Departing aircraft will light up (red/green nav lights on wing tips, flashing beacon on top)
- Upon ATC clearance (automatic) Departing aircraft will roll forward into the terminal buildings then dance around a bit then join a taxiway and head for a threshold. The route they will use may not be the shortest nor the one you expected but it will be a route you have set.
- Departing Aircraft will queue up at the threshold. The first in line will enter the runway, accelerate (strobes lights activate) and take off. Aircraft will climb in a straight line and after +/- 10 seconds, change heading. At this point, the next aircraft in line will enter the runway and initiate its take off
- Arriving aircraft will start landing. The touchdown position will depend on the type of aircraft. Arrivals are not spaced out and you can see more than one aircraft landing at once on a single runway. After slowing down, they will taxi all the way to the end of the runway, exit via the access route you have set then head for an available parking position. Again the route they will use may not be the shortest or the one you expected and they may not park where you wanted. Once parked, Nav Lights will turn off
- At any given intersection (4 or more segments sharing a node) and at any time during the test, one aircraft will get stuck. Aircraft following it will start queueing. The intersection will remain clogged and AI taxiing stuck until you decide to shut down Flightgear.
- Aircraft will taxi from both directions on single taxiways, eventually passing through each other
- On larger airports where AI aircraft can use more than one route to go from one point to another and/or can park at multiple aprons they will show a geographical preference (normally North West) so parking and routes in this area will be busier.
What to look for (abnormal behaviour with base groundnet, if FG has AI traffic at the airport):
- Aircraft appearing in the middle of the airport and not following taxiways (not enough Parking Positions or not suitable in size or type CARGO/GATE)
- No aircraft (no AI traffic at this airport or not activated in FG options)
- Aircraft queue up at runway but do not take off (Misplaced Threshold in ICAO.threshold.xml)
Refining the network: Routing Flow & Baggage Carousels Belts
Objective:
- All Objectives in the "Creating the base Network" section
- No clogging at intersections
- No Head on crashes of aircraft sharing a single taxiway
The traffic manager code is not fully documented nor maintained so only repeated testing (and discussions on the FG AI Forum) will allow you to form and understanding of the way AI aircraft will behave based on the type of groundnet data you feed them. This is an interesting but potentially frustrating exercise.
You will eventually realize that AI traffic has a “mind of its own” which fluctuates between two extremes:
- AI traffic cannot make decisions: Typically, where presented with multiple routing options (an X intersection with 4 or more valid routes), AI traffic will consistently freeze/clog after some time if not immediately.
- AI traffic does not stand bullying: If presented with no alternative at all (too many unidirectional routes) AI traffic will move away from your groundnet taxiways and start mowing the lawns.
Keeping these two constraints in mind, the clogging and head on collisions noted in your previous tests can be addressed by setting up a ‘Routing Flow’. The purpose of said routing is to guide each aircraft to their final destination (Parking or Threshold), by ensuring it uses a single route and never crosses any other aircraft path. To achieve this we only have and need two tools: The ability to force the direction of traffic on any given segment (by making it “unidirectional”) and the ability of Traffic manager to handle priorities and queues formation at routes merging points (Y shaped intersections).
The complexity of Routing Flow will increase exponentially with the number of gates, thresholds and traffic files handled: A single groundnet flow must accommodate indifferently a cargo flight arriving on RWY 1 in the evening or a commuter departing from RWY 2 in the morning.
To better understand how efficient routing is achieved, draw on your experience at an airport Baggage carousel (or at a ‘Sushi Train' restaurant) where all bags arrive from one or two tunnels onto a moving belt and are then distributed to passengers waiting around the carousel. That is all bags (Aircraft) arrive from a limited number of tunnels (Thresholds) and can reach any standing passenger (ParkPos) using a single belt (routing flow). It does not matter where the passenger stands nor what order the bags arrives in; if you wait long enough all bags will meet their owner, (unless you are at Heathrow).
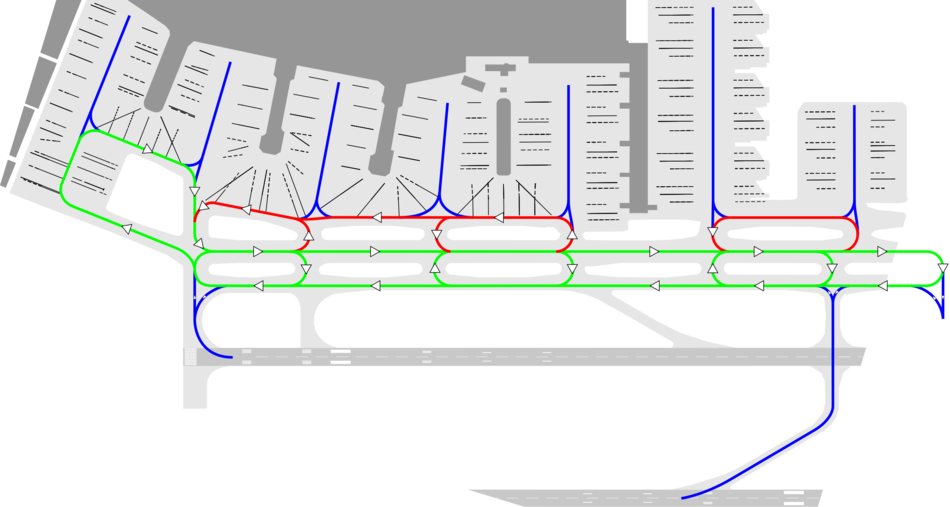
An advantage AI aircraft have over bags is that they can ‘transfer’ from one belt to another if a segment belongs to more than one belt/route. Putting it visually, a typical routing flow will resemble something like the image on the right : ‘Belts’ in green rotate clockwise, red ones rotate counter clockwise, segments in blue provide access in and out of the belts. The main belt along the northern runway includes bypasses allowing an aircraft to quickly reach the other side of the belt without having to travel its full length.
Using the diagram, you can pick any combination of one runway access (threshold or intermediate vacating point) and one parking position and realize you can always find a unique route from A to B and another unique route from B to A without ever coming across an intersection, always using "Y" shaped merging lanes.
An additional benefit of the technique is visible when comparing the routing flow diagram and the base network image in the previous section: A groundnet with proper routing uses less nodes and segments than a full network, saving you time during the building phase. In fact, as you get more familiar with the technique you will realize it is a good idea to map your routing flow before building your groundnet so you create just enough nodes and segments. It is also important to know that you do NOT need to mark each and every segment as "unidirectional" but only the ones forming your Y shaped intersections.
The belt technique can easily be adjusted to the specific shape of different airports: All of KJFK’s traffic is routed with only 2 belts set as concentric rings running in opposite directions. The inner ring connects all the aprons in an infinite loop; the external ring connects all the runways in a similar loop. A small number of “transfer belts” allow aircraft to move from one belt to the other.
You can have a look at existing groundnets’ routing to better understand how this technique can be applied to your project. VVNB has the most basic version; LEMD and LFPG have very elaborate ones.
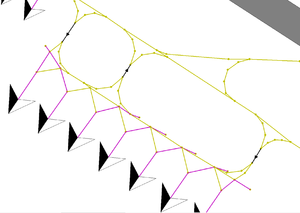
Certain smaller airports do not have enough taxiways to allow the formation of a proper global belt but the technique can be used on individual aprons to ensure proper flow in and out of parking areas and simplify the design of pushback routes (next section) as shown on the image on the left, at Bahrein Intl.
Testing : Once your routing flows in place you should re-test you groundnet. The expected behaviour is the same then the one described in the “Base Network, Step 5” section, with the exception of head on collisions and clogged intersections which should no longer exist
Refining the network: Pushback routes
THIS SECTION IS WIP With the above-mentioned refinements, the ground network should be fully working with one notable exception. Aircraft will be driving forward when leaving the gate, making a sharp turn (while probably destroying themselves and the terminal building in the process). To prevent this, a push back route should be created. A push back route consists of at least one or more taxiway segments that have the "PushBack Route" property set to true. The last of these segments should be terminated by a PushBack HoldPoint network node. Pushback routes are optional (if you like the terminal crashing scenario described above).
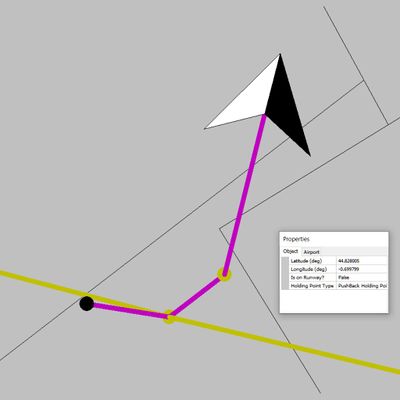
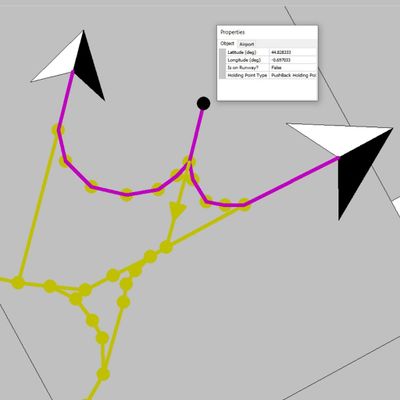
Examples of simple valid pushback routes (Left: If the taxiway is bidirectional | Centre: If the taxiway is not bidirectional | Right: With shared Pushback Holding point)
Pushback Holding Points must be unique per Parking Position
Each Parking space (ParkPos) can't have more than one push back route and one pushback holding point at the end of the route. Nevertheless, multiple Parkpos can share part of their pushback routes and a single Pushback Holding Point.
The formal criteria for a valid push back route is that each gate should have a maximum of one push back holding point associated with it, which can be reached using one route only. From an editing point of view, mark all segments between your parking position and its final holding point as "push back", do not forget to mark the ending node as Pushback Holding Point.
The AI code does not handle sharp angles
Add nodes to smoothen your routes so that no consecutive segments form an angle of less than 90 degrees. This rule applies to both pushback and roll forward / taxiways routes
The Inbound route and the outbound routes are parallel
The last segment of the pushback route will condition the aircraft heading:
1. During its travel along the pushback route
2. At the Pushback Holding point (whilst waiting for clearance)
3. On departing the pushback holding point, rolling forward to the runway.
You can not control/force an AI aircraft to leave a Pushback Holding point at a different angle/heading than the one it came onto its final holding node at, whatever the number of routes you add.
As a result, the last segment of the pushback route must align with the segment you expect the aircraft to use when starting to roll forward after clearance. The simpler set up is to have this final pushback segment overlapping the first segment of the roll forward route.
Alternatively, the last segment of the pushback route can -itself- be the first segment of the roll forward route but this means Traffic Manager will consider this segment 'reserved' whilst the aircraft is pushing back and no other aircraft will be able to use the taxiway.
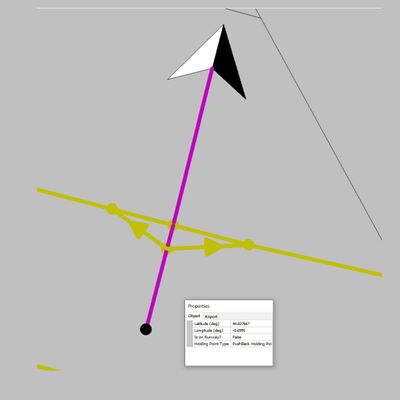
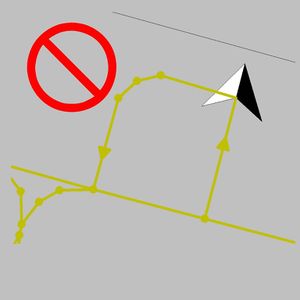
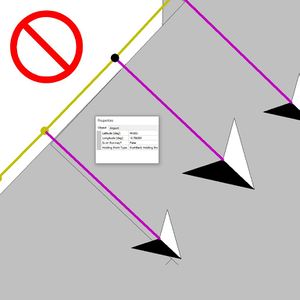
For the same reason the Pushback Holding point should NOT be directly placed on the taxiway as shown in the image on the right 'On Taxiway Pushback Holding Point in Taxidraw'. Using this particular configuration, once the aircraft 'cleared for taxi', it will ignore the taxiway segments on its left and right and keep its heading, rolling forward towards the original parking position, then 'get lost' and start spinning around, looking for a node to re-anchor to.
The "Roll Forward on my current heading" rules also applies to Parking position with no pushback route. These are often used for smaller propeller aircraft which "pivot" on their parking position before rolling forward. You cannot currently replicate this pivot behaviour in Flightgear AI
It is important to note that the Taxidraw "Verify Ground network" process should be run in order to get a correctly working push back system, because this function runs some internal consistency checks. Push back routes can be very simple, from just one route segment, to fairly complex, as illustrated below with all aircraft from one side of the E terminal are being linked to one shared push back point.
Given the current push back system allows for fairly complicated behavior it is advisable to test extensively your groundnet and play with various configurations before sharing it to the community.
Taxidraw note: TaxiDraw versions prior to February 5, 2009 did export the pushBackRoute attribute correctly.
Verifying the network
Finally, with a network complete, it is important to verify it! The verification function not only detects obvious problems with the network, it also updates some internal states that FlightGear relies on. Presumably, an automatic verification process will be added to the export function, but until that is the case, make sure to do this manually. The verify network function can be found in the "Tools" menu.
Notice that TaxiDraw does not automatically fix problems. It is left to the user to fix the problems manually. TaxiDraw does select the offending node(s) / segments(s) for easier identification. Also note that TaxiDraw stops verifying at the first problem encountered, so it is worthwhile to continue checking until no further errors are found. Currently, the following checks are performed.
- On runway points Added on January 24, 2009, this check is most likely not yet available in any distributed version. This is currently just a very lame check to see if any point in the network has been marked as such. This check is not exhaustive, but simply meant as a reminder to the editor that the OnRunway points should still be marked. Ultimately, this check should be replaced by the aforementioned automatic geometry function.
- Duplicate Taxiway Segments It's easy to connect two network nodes twice. While this doesn't really hurt, it does add dead weight, so checking for duplicates is not a bad thing.
- Routing One of the most persistent headache causing problems is that of a disconnected parking space in the network. FlightGear will happily place an aircraft there, but bail out when that aircraft cannot reach the runway. The routing check attempts to prevent this. Notice that it is of utmost importance that the OnRunway points are set correctly, because TaxiDraw relies on these points for it's route finding algorithm. Because the route finding algorithm is rather computationally intensive, some progress information is currently written to the console (a proper progress bar would be nice). When a disconnected parking space is found, TaxiDraw selects both the parking and the runway node. It is still left to the user to trace a route between these two points and find where the two pieces are disconnected.
- Check and set pushback nodes this function verifies whether any specified pushback nodes adhere to the above specifications and updates some internal consistency.
Copying the ground network into FlightGear's scenery directory
Finally, once you have finished creating a groundnet project, you can test it in FlightGear. Create a directory in your $FG_SCENERY/Airports/[I]/[C]/[A]/ directory, with the three first letters of the ICAO code of your airport. For example $FG_SCENERY/Airports/E/H/A/.
In Taxidraw menu select File, Export AI Network and save the file in the above folde as ICAO.groundnet.xml. Please note that the File / Save project menu applies only to the airport layout and does NOT save your groundnet.
Testing the network
Startup FlightGear at the airport for which you have just created the network, and make sure you have traffic for that aircraft. FlightGear will check the network and report errors on the console. Aircraft that can't be placed at one of the parking locations will be placed at a default location.
If the FlightGear AI system can't find a valid route between startup location and runway, it will list which nodes are not connected and exit.
Airports with ground networks
Collision Detection
Version 2024.1.X and all version prior use an avoidance strategy based on the ground network. This means there are lots of Dijkstra calls to determine the possible route to the runway. Another implication is that the designer of the ground network must ensure the separation. This is of course not possible in pushback or even with the user aircraft. The next version will get real detection of nearness and integration with ATC. This is based on a Quadtree and just reacts on the current snapshot and not on "future" plans of an aircraft.
Nearness rose
This diagram shows some possible angles of approach with the aircraft pointing away.
- In this case all aircraft within the arc from -89° to +89° are considered blocking aircraft.
- Speed must be adjusted to the speed of the other aircraft if it's positive
Moving forward.
- In this case all aircraft within the arc from -89° to +89° are considered blocking aircraft.
- Aircraft must stop
Moving in reverse
- Speed must be adjusted to the speed of the other aircraft if it's negative
Braking
When following aircraft must brake in a plausible way.
Runway Usage Configuration
ICAO.rwyuse.xml dictates which runway(s) should be used for AI take off and which ones accept AI landings. These instructions are organised in multiple sets (or configurations) and ordered by preference of use.
Schedules can be defined so different runway configurations can be used at different time of the day. Different Sets can also be applied to the General Aviation and Commercial traffic.
Each set of runway configuration is tested against the wind conditions and applies only if the crosswind and tailwind are within tolerance. If not, the next set in the order of preference, will be picked.
Examples below taken from the Amsterdam Schiphol EHAM.rwyuse.xml file.
Wind conditions are stored at the beginning of the file and indicate the maximum values of Crosswind and Tailwind acceptable to authorize take off and landing at the airport.
    <wind tail="7"
          cross="20" />
As well as aircraft, airports have operational crosswind and tailwind limits. [] The values vary but crosswind limits are normally 15-25 kts and tailwinds are normally no more than 10 kts.
—ICAO, AMOFSG/10-SN No. 14
The < time > table defines the hours of activation for a particular Schedule. Each schedule contains a 'Pattern' ie a fixed number of runways allocated to either take off or landing).
For instance, at EHAM, the commercial "inbound" schedule is active from 06:20 to 08:30 UTC, at a time where there is more inbound than outbound traffic and the airport needs to allocate more runways to landing than to take off.
    <time start = "06:20"
          end   = "08:30"
          schedule = "inbound"/>
In most cases, a single schedule can apply 24h every day.
    <time start = "00:00"
          end   = "24:00"
          schedule = "Day"/>
The different sets of runways allocation are listed in each < schedule > table by order of preference and can be read/deciphered vertically as ”columns” delimited by commas.
When wind conditions do not allow the use of a set, the next one will apply (next “column”).
Still using the EHAM.rwyuse.xml file as example, from 06:20 to 08:30 UTC, when the Inbound schedule applies; AI traffic will preferably use runway 36L for take-offs, and both 06 and 36R for landings (first “column” of data).
<schedule name="inbound">
    <takeoff>36L, 24,  18L, 36L, 24,  24,  18L, 09</takeoff>
    <landing>06,  18R, 18R, 36R, 27,  18R, 18R, 06</landing>
    <landing>36R, 18C, 18C, 36C, 18R, 22,  22,  09</landing>
</schedule>
Shall wind conditions prevent the use of this configuration (Tailwind or Crosswind values exceeding the ones defined in <wind> above), the next set (or “column”) will apply ie 24 for take-offs, and 18R + 18C for landings.
Again, if wind conditions prevent this configuration use, the next set will be used (18L for take-offs, 18R and 18C for landing).
This test of runway sets against wind values will continue with the rest of the sets in the schedule until a valid one is found and applied.
It is necessary for each of the <takeoff> and <landing> entries to have an equal number of runway values, per schedule, so each set contains the same number of runways.
Source from Durk post in Devel
Model Animation
To assist with creating realistic aircraft behaviour, some properties are set by the Traffic Manager during particular flight phases as follows
| Property | Description | Type | At Gate | Taxiing | Take-off | Cruise | Approach and Landing |
|---|---|---|---|---|---|---|---|
| gear/gear[0..5]/position-norm | Gear Position | double (interpolated over 10 seconds | 1.0 | 1.0 | 0.0 (above 400ft) | 0.0 | 1.0 (below 2000ft) |
| surface-positions/flap-pos-norm | Flaps position | double (interpolated over 20 seconds | 0.0 | 0.0 | 0.5 (below 2000ft) | 0.0 | 1.0 ( below 2000ft) |
| surface-positions/spoiler-pos-norm | Spoiler position | double | 0.0 | 0.0 | 0.0 | 0.0 | 1.0 (on runway) |
| surface-positions/speedbrake-pos-norm | Speedbrake position | double | 0.0 | 0.0 | 0.0 | 0.0 | 1.0 (below 2000ft) |
| controls/lighting/beacon | Beacon | bool | false | true | true | true | true |
| controls/lighting/cabin-lights | Cabin lights | bool | true | true | true | false | false |
| controls/lighting/landing-lights | Landing lights | bool | false | false | false | true | true |
| controls/lighting/nav-lights | Navigation lights | bool | false | true | true | true | true |
| controls/lighting/strobe | Strobes | bool | false | false | true | true | true |
| controls/lighting/taxi-lights | Taxi lights | bool | false | true | false | false | false |
SIDs / STARs
SID is an acronym for Standard Instrument Departure. Likewise, STAR is an acronym for Standard Terminal Arrival Route. Directly after takeoff, in particular at busy airports, aircraft follow a standard flight path, that will keep them safely separated from arriving traffic, avoid ground obstructions, and also keeps traffic away from populated areas as much as possible. Currently, steps are in progress to allow FlightGear traffic to follow SIDs. Ultimately, the plan is to provide SID and STAR data in a format that can also be used by the user controlled Aircraft's Flight Management Computer. Currently, some sample data exist in the form of a PropertyList formatted XML file that contains a list of way points.
This section of the AI Traffic documentation is meant as a stub that keeps track of the current development. At the moment of writing, some proof-of-concept data for EHAM SIDs will be committed to the World Scenery Repository, along with some experimental code in FlightGear to make use of this data. Note that this data is meant to be just that; a proof-of-concept. User contributions will be accepted as soon as the format has stabilized.
Appendix: Special Notes
Performance
With recent versions of FlightGear, we have much better performance than before so realistic density of traffic is currently possible even for slower computers. For those who are still afraid, there is an, as of yet, unpublished feature: set a new property "/sim/traffic-manager/proportion" to any value between 0 and 1 in your preferences.xml. During program start up, the traffic manager draws a random number (between 0 and 1) for each aircraft, and if that random number is smaller than the value specified in /sim/traffic-manager/proportion, the aircraft is added, otherwise it is discarded. In essence, only the specified proportion of aircraft will be loaded.
Unfortunately you can't change this at runtime yet, so you need a little bit trial and error! However, it should allow the combination of slower computers and dense traffic files.
Related content
- Airports with ground networks
- FGAirports - A groundnet editor
- Flightplan XML formats
- Status of AI in FlightGear
