Using Saitek Pro Flight Yoke Mode Switch
| This article or section contains out-of-date information
Please help improve this article by updating it. There may be additional information on the talk page. |
Before you start
To use the Mode Switch you need to install the Smart Technology software that came on the CD with your yoke. Install it after installing the drivers.
Running the Profile Editor
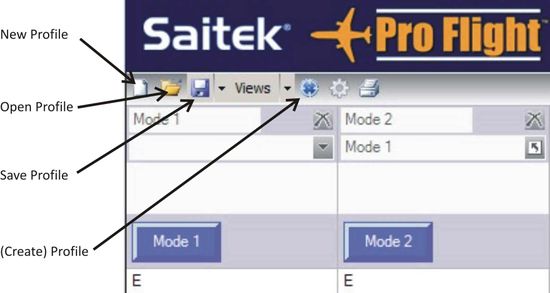
If the Profile Editor does not run after installation, you can run it from the Start Menu - Start - All Programs - Smart Technology (folder) - Profile Editor. If you have the rudder pedals as well as the yoke you will have to select the yoke in the first dialog box that appears. At the top right is Product Programming Support. Click on 'Programming'. Here is the top left corner of the page that appears:
Creating a blank safety profile
The first thing to do is create a profile that does nothing, i.e. does not interfere in any way with the current working of the yoke. This is your "safety" backup. Click on (Create) Profile. This generates the file that will be saved and opens the Save as dialog. Give the profile a suitable name (such as Blank) and save it.
What the software does
It simulates keystrokes. You can assign different keystrokes to specific yoke buttons for each mode. Then, when you select a mode and press a button, that/those keystroke(s) are sent to Flightgear. Just as if you had typed them at the keyboard. But this does have the limitation of only being able to use commands that exist on keyboard.xml and multikey.xml. And that also means no 'repeatable' actions, such as 'Trim' Elevator'. So we will not discuss it.
Mod-Key style of use
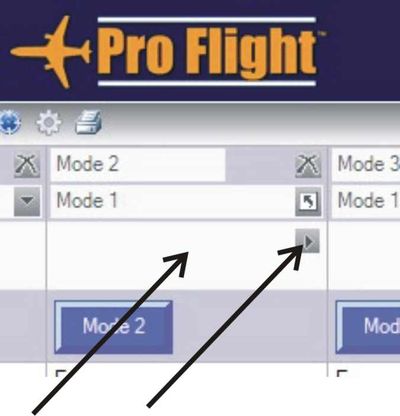
What we are going to do is make the Mode Switch act as if we are pressing the Shift, Ctrl or Alt keys while pressing a yoke button - emulating <mod-shift>, <mod-ctrl> and <mod-alt>. Mode 1 is none of the above pressed. Choose which 2 of the 3 mod conditions you want to use. In this article we will use Shift in Mode 2 and Ctrl in Mode 3. It really doesn't matter unless you already have your yoke programmed with mods. To make Mode 2 emulate pressing the Shift key, hold your mouse pointer in the large blank rectangle under Mode 2, and then click on the little arrow that appears.
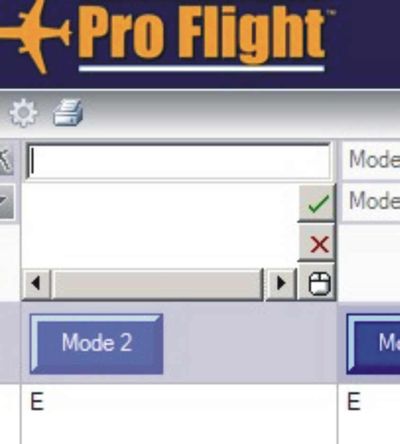
A popup menu appears. Click on "New Key Presses...". You now see this:
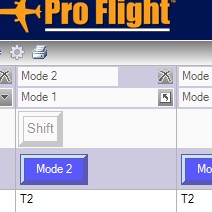
Ignore where the cursor is (this is just for a name) and click in the bigger rectangle. Then give the Shift key a tap. An icon of the Shift key will appear in the rectangle. Click on the little green tick mark. (If you got it wrong, click on the little red cross and try again. You will have this, if you got it right:
If it doesn't look like that, click on one of the incorrect key icons. You will be taken back to the point before you clicked the green tick. You can then right-click on any incorrect keys and select Cut. And redo tapping the Shift key if needed.
Now go to the column for Mode 3, and repeat all the ablove actions, except using the Ctrl key, instead of Shift. Now you need to create the profile. Click on (Create) Profile. The profile will be created and the Save As dialog will open. Choose a suitable name for the profile and save it. You will now need to edit your joysticks's xml file. There is plenty of information on that. You will of course need to program <mod-shift> and <mod-ctrl> sections for the buttons.
Very Important
- If you assign Shift to Mode 2, and the yoke switch is in Mode 2, then everything you do will be treated as if the shift key is pressed while you do it. This includes the mouse. To use a modded button, flick the switch to Mode 2 or Mode 3, do what you have to do, and then flick straight back to Mode 1.
- The profile you have defined is not automatically assigned at system boot-up. You have to go to the system area, right-click on the yoke-icon and select your profile. The icon will then have a green box around it to show that it has been assigned a profile.


