Superbuild on Windows
| This article has been nominated for deletion since 05 September 2024. To discuss it, please visit the talk page.
Do not remove this tag until the discussion is closed. Reason for the nomination: The information in this article is out-of-date enough that it would only serve to confuse (particularly new) readers and developers. Because the information in this article is old enough that it can no longer be followed, it has minimal historic value and therefore little reason to be kept. It should be superseded by the multitude of other articles on the wiki about Building FlightGear. |
| This article or section contains out-of-date information
Please help improve this article by updating it. The information in this article should not be used. |
Using Visual Studio / msbuild:
Status
| Note Current work is being done to support MSVC2015. http://sourceforge.net/p/flightgear/mailman/message/35020034/ |
MSVC 2010, 2012, and 2013 are supported.
Boost 1.55 requires a patch for MSVC2013 patch or a newer version of Boost. See #Requirements
Requirements
- CMake (version ≥ 2.6.4) for Windows
- Boost see here
- SVN client (e.g. Win32SVN, TortoiseSVN ; see here)
- GIT client (e.g. msysgit ; see here )
- Visual Studio 2010 (most widely used), 2012 (recent support)
- Optional: Microsoft Windows SDK (only required for 64-bit builds)
- If you get an error during the installation of the SDK, try uninstalling MSVC redist packages first, then installing the SDK without compilers and then finally re-installing MSVC.
- Optional: Visual Studio 2010 SP1 (recommend you install this if you use the 2010 version; overcomes various issues users have had according to the forums.)
Cloning the repositories
First of all, open your git shell client or the windows command prompt (cmd.exe), and change your working directory. If the location you want is on another disk or partition, before you must with cmd.exe type the mount point (e.g. C: ; D: ; ...). Example:
 C:\Users\Saggah>D:
 D:\>cd Projets/
 D:\Projets>
It is recommended the location of the local repository on your computer contains neither spaces or special characters. Then recursively clone the repository:
D:\Projets>git clone --recursive git://gitlab.com fgmeta
If you have forgotten to specify --recursive, you will not get flightgear, simgear, fgdata, fgrun, and windows-3rd-party folders.
If you want to build the developer versions, you must switch to the next branch of all the git submodules:
D:\Projets\fgmeta>git submodule foreach git checkout next --force
Note that the --force flag is sometimes required due to capitalisation issues.
Caution Due to a capitalisation issue with the version/2016.2.0 branch of FGData, you may need to switch to next or another stable branch using the --force flag
|
Creating the solution
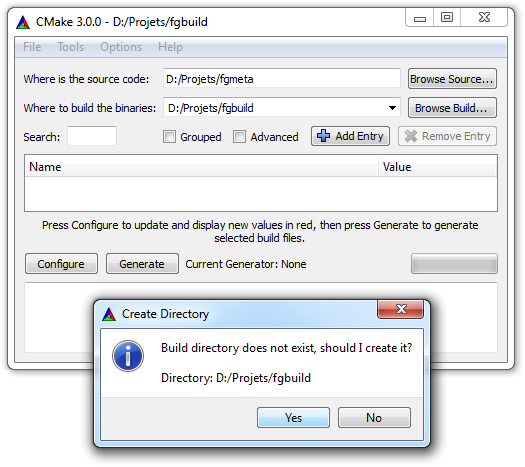
Open CMake GUI and specify the location of your local repository including fgmeta. In the tutorial configuration, it is D:\Projets\fgmeta. Then, specify where you want to create the solution file. It's more conveniant to create it in another folder such as D:\Projets\fgbuild. Click on Configure and Yes if fgbuild folder was not created.
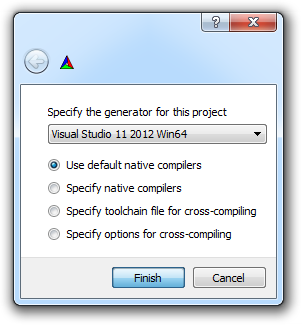
Select your Visual Studio version. If you want to build a 32 bits version on an installation of VS x64, select the other.
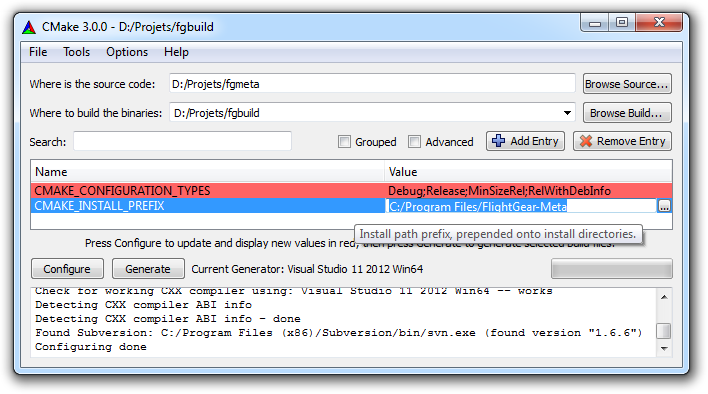
You should get two lines or more specifically two variables. The which one we interested in is the following CMAKE_INSTALL_PREFIX. This is where your binaries, when built, will be installed (e.g. D:\Projets\fginstall).
Press Generate and you can now exit CMake.
Building the solution
Go in the build directory and open FlightGear-Meta.sln.
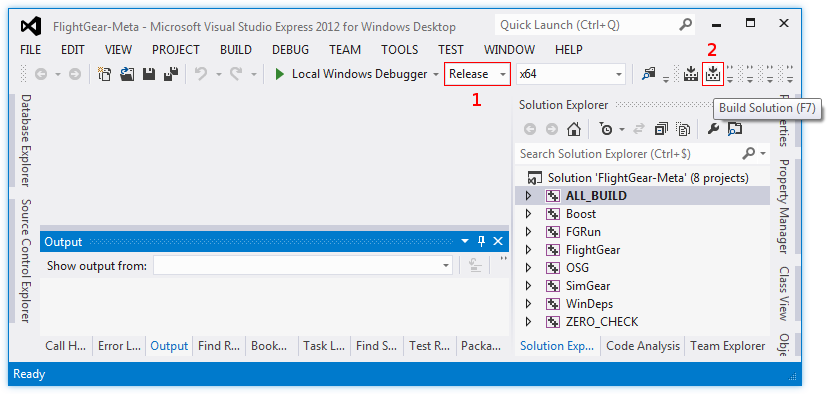
If you are interested by debugging for example, you must build fgrun, flightgear and simgear with the RelWithDebInfo config except for OSG (Release config required). To do that, select the configuration desired where the number 1 is and right-click on OSG in the Solution Explorer window and then Build. Once OSG is built, do the same with Simgear, Flightgear and FGRun (with the RelWithDebInfo config).
If you don't care of debugging, whether what you just want is to play to FlightGear, you can directly select the Release config (first step on the figure) and directly build the solution (second step on the figure).
Note: The first build is very long so be patient. The meta solution should automatically install the binaries at the location specified in CMake. The FlightGear project of the meta solution does not contain the source code, so you should edit it by openning the FlightGear solution instead (e.g. D:\Projets\fgbuild\fgbuild\FlightGear.sln). And to be able to run the last built version, you must build the INSTALL project.
Run fgfs
To run FG with a debugger or not, it is recommended to execute it from the installation folder.
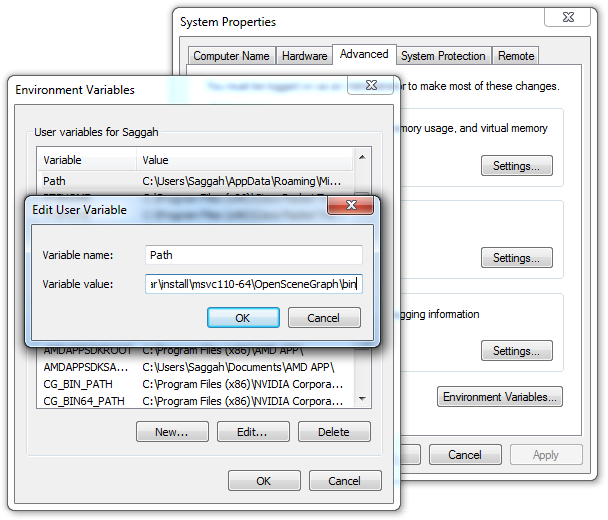
First of all, I suggest you to add the folder "bin" of the OSG installation folder (e.g. D:\Projets\fginstall\msvc110-64\OpenSceneGraph\bin) and a 3rd party installation folder (e.g. D:\Projets\fgbuild\3rdParty.x64\bin) to the PATH environment variable. To do that open the Windows Control Panel, open the Advanced System Properties, go the Advanced tab, click on the Environment Variables button. Then search among the user variables "Path" and add the path in this variable (each paths must be separed by a semicolon, ";"). Then, press OK on all the opened windows.
Now, you should be able to run FG with FGRun.
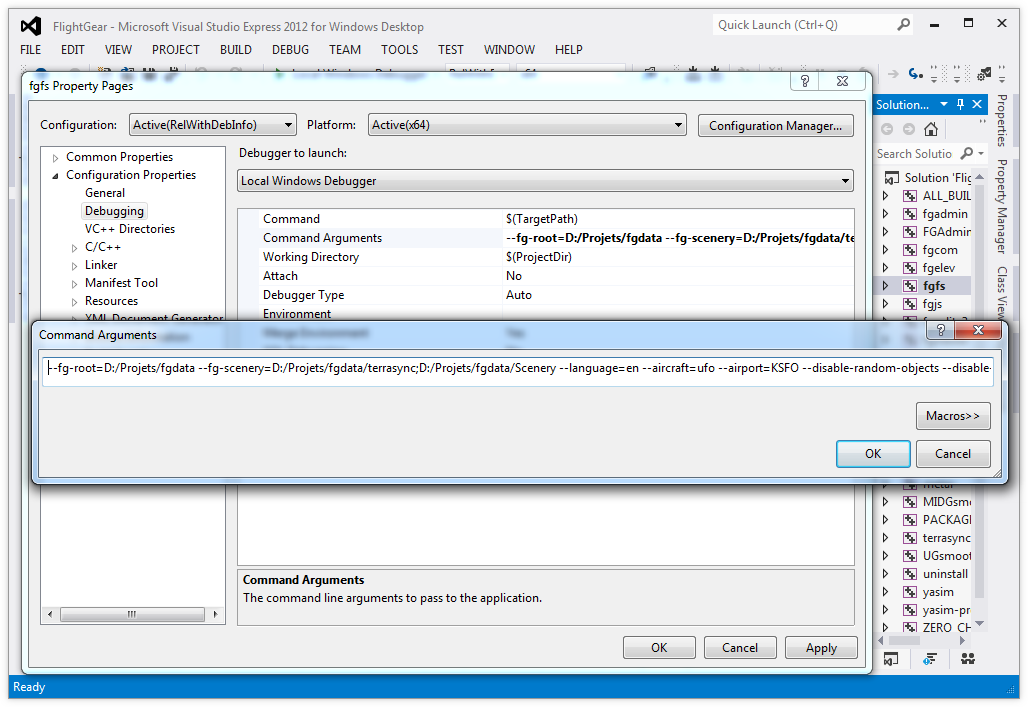
To run the debugger on fgfs I also suggest you to open the FlightGear solution, set the fgfs as startup project (right-click on fgfs in the Solution Explorer window), then you must specify parameters such as the fgdata path. So again right-click on fgfs, Properties, Configuration Properties -> Debugging, and set the line Command Arguments. Personally I use:
--fg-root=D:/Projets/fgdata --fg-scenery=D:/Projets/fgdata/terrasync;D:/Projets/fgdata/Scenery --language=en --aircraft=ufo --airport=KSFO --disable-random-objects --disable-panel --disable-hud-3d --disable-ai-models --disable-ai-traffic --disable-real-weather-fetch --prop:/sim/rendering/texture-compression=off --prop:/sim/rendering/quality-level=0 --prop:/sim/rendering/shaders/quality-level=0 --prop:/sim/rendering/random-vegetation=0 --prop:/sim/rendering/random-buildings=0 --prop:/sim/ai/enabled=0 --disable-fgcom --disable-specular-highlight --disable-clouds --disable-clouds3d --prop:/sim/rendering/particles=0
When you launch fgfs with the debugger, you will get a very low framerate, this is why it's important to disable most of the features and use settings for low-end computers.
Build last commits
If the code of the remote repository has changed you can build the last commits by a git pull in your cloned repository:
git submodule foreach git pull
Then, build again with Visual Studio.
Troubleshootings
- Some people experience problem with CMake >= 3.0, so if you get the following error when the solution is building, switch to CMake 2.8.12[1]:
error MSB6006: "cmd.exe" exited with code 1
- It is possible you get an error such as "Failed to open font file" although the font exist at the location specified. In this case, this is due to the missing OSG plugin osgdb_freetype.dll in D:\Projets\fginstall\msvc110-64\OpenSceneGraph\bin for example. Personally, I did dot start thinking about the problem. Sorry...
- If Visual Studio 2010 Express is upgraded with SP1, then the x64-based compilers, IA-64-based compilers, and any associated Visual C++ library files are removed, therefore CMake will be unable to find the needed compilers when attempting a x64-based build, producing the errors:
-- The C compiler identification is unknown
-- The CXX compiler identification is unknown
CMake Error at CMakeLists.txt:47 (PROJECT):
  No CMAKE_C_COMPILER could be found.

CMake Error at CMakeLists.txt:47 (PROJECT):
  No CMAKE_CXX_COMPILER could be found.

-- Configuring incomplete, errors occurred!
to resolve this, apply the following patch from the Microsoft Download Center.[2]
For any other problems you are facing, please report in on the board.
References
- ↑ A post in the compiling support forum
- ↑ https://support.microsoft.com/en-us/kb/2519277 FIX: Visual C++ compilers are removed when you upgrade Visual Studio 2010 Professional or Visual Studio 2010 Express to Visual Studio 2010 SP1 if Windows SDK v7.1 is installed
