Howto:Build a yoke in 5 minutes
Jump to navigation
Jump to search
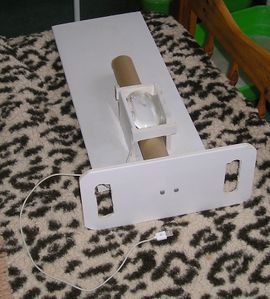
Using some every-day equipment and an optical mouse, you can build a (basic) yoke in just five minutes! The yoke can be directly used in FlightGear.
Original version
Required components
- The right sized cardboard box
- 1 empty paper towel/gladwrap/foil roll
- 1 piece of packing foam that loosely resembles a yoke
- 1 optical mouse
- 1 roll of sticky tape
- 1 pencil
- A pairing knife
Instructions
- Using your roll (now referred to as the control column) as a guide, mark and cut a hole in the front and rear of the box for the control column to slide through.
- Mark out the centre of your foam yoke, but cut the hole slightly smaller and force the yoke on to the control column. There should be enough friction for it to not need glue.
- Place the mouse on top of the box, with the mouse backwards to how you'd normally use it (so that the buttons are facing you), mark its outline on the box, and cut a hole.
- Insert the control column/yoke assembly through the holes you made, place the mouse into the cut out you made for it and tape it in, taping around the edge of the mouse so that it won't rock sideways.
- The final step in construction is to limit the control throw. (This is not pictured in the photo. It is not technically necessary, but without it, you must be careful not to exceed the limit of control throw in FlightGear.) Use your knife to drill two small holes in the top and bottom of the end of the control column that is protruding from the back of the box. Insert a pencil through them so that most of the pencil is in the air, and just the tip is pointing downwards. This will stop the control column from coming out with too much up elevator, and will also limit the aileron when the pencil hits the desk. Full aileron will be just over 90 degrees, which is the same as a Cessna, so it'll be pretty realistic.
- You'll also need to reduce your mouse (control mode) sensitivity in FG so that it can never reach full aileron or elevator. This is very important, because if you don't it'll go out of alignment as soon as you reach it.
- It will also go out of alignment after a while, especially if you make very fast control inputs on a slow computer, so configure a mouse button to centre the controls. When it goes out of alignment, just centre your yoke and tap the mouse button.
- Make sure your yoke is centred when you start the sim.
KJ7RRV's version
I made a yoke based on this design, but with a few changes.
Required components
- 1-inch or larger wooden dowel rod, as straight as possible (exact diameter is not important)
- Cardboard box large enough to run the dowel through while leaving at least an inch or so on each side
- Something to use as a yoke (a piece of cardboard works but is not ideal)
- An optical mouse that you're willing to take apart (it won't work as a mouse when you're done)
- A pencil
- A knife to cut the box
- Hot glue
Instructions
- Cut circular holes with the same diameter as the dowel rod centered in the front and back of the box. Choose one side to be the back, and cut a small notch at the bottom of the hole in the back.
- Cut a hole the size of the dowel rod in the center of your yoke. Unless your yoke is made of foam or a similar material, you will probably need to use glue.
- Disassemble the mouse and take the circuit board out, leaving the cable connected. If there are optics left in the case, cut down the mouse case to just the part needed to hold the optics and circuit board together. Use some tape to hold the board to the case if needed.
- Put the mouse board in the box and run the cable out the back.
- Insert the control column/yoke assembly through the holes you made in the box. Make sure the mouse cord goes in the notch in the back hole.
- Use hot glue to hold the mouse board to the side of the box with it touching the control column. Make sure the buttons are facing toward the yoke, and that the board is straight.
- The same issues with centering apply to this design. I have not yet limited the control throw in this design.
Mach's Sidestick
Component: 1 spare mouse (source anywhere, wired recommended as to not die randomly) , 2 sided tape or preferred adhesive, 1 used & cleaned Toilet paper roll / cylinder shaped item, , (Optional) paint/coloring.
Steps:
- Apply glue in a circle on top of the mouse
 OR
 stick a piece of circular cardboard and a filler object to make a flat surface atop your mouse
- Attach toilet roll to cardboard/mouse
- connect mouse to device of choice
