Extra EA-500/IFD
Integrated Flight Display System
The system assist a single pilot to manage an IFR-operated flight. The design is clearly oriented to provide quick access to the requested information and to handle the data as quickly as possible. The goal is to relieve the pilot and reduce the pilot's workload.
The Integrated Avionics System in the Extra500 consists of two IFD-s in the front and one Keypad in the center console.
Display
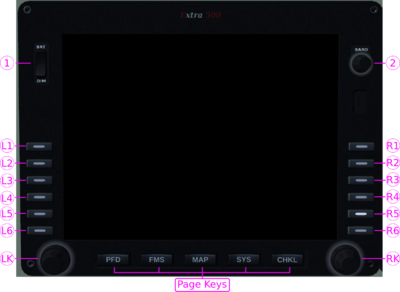
Each IFD has five page-select keys at the bottom. With these keys the active page can be selected. Once on the active page, the appropriate page-select key will navigate through the associated tabs. On the left- and right hand side, there are multi- function keys, so called "Line Select Key"(LSK). Each tab serves a function on the LSK. If it has a function, this is indicated with a light on the key (green at day, white at night). The intended function name of the LSK is displayed next to it on the display. On the left and right bottom corners, there are two rotary knobs. The intended function is displayed in the left/right corners of the tab indication.
- 1. Dimming knob for the display brightness mouse left
- 2. Baro knob to adjust the altimeter setting wheel up for +, wheel down for - and wheel press set 1013 (standard)
- L1-6 and R1-6 "Line Select Key"(LSK) is a rocker switch and can have two functions left/right indicated in the display
- LK and RK rotary knob usable with wheel up, wheel down and wheel press and +⇧ Shift decreases the amount
- Page Select Key is a rocker switch first mouse left select the page then mouse left navigate through the tabs left/right
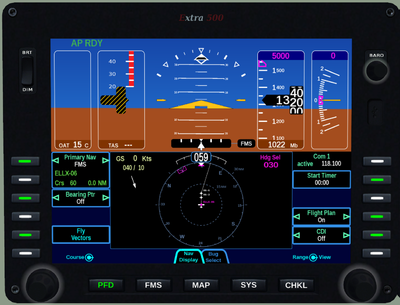
PFD : Primary Flight Display
Primary Flight instruments, controls and indicators.
- Autopilot Annunciations
- Airspeed indicator
- Attitude Indicator
- Marker Beacon
- Slip/Skid
- Flight Director Command Bars
- Altimeter
- Vertical Speed Indicator
- Wind Indicator
- Ground Speed Indicator
- Heading Indicator
- Heading Bug Indicator
- Active Com Frequency
- L1 : Primary Nav select Nav1, Nav2, FMS
- L3 : Bearing Pointer select Off, Nav1, Nav2, FMS
- L5 : "Hook" into FMS. Fly Vectors
- R2 : Timer
- LK : Course
- R4 : Flightplan visible On/Off
- R5 : CDI visible On/Off
- RK : Range/View of the map
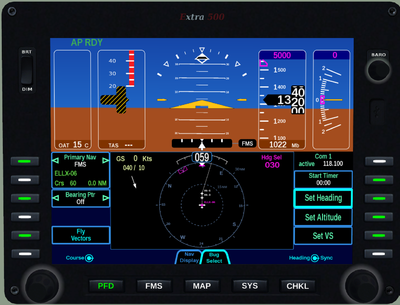
PFD - Bug Select
- R3 : Set Heading
- R4 : Set Altitude
- R5 : Set VS
- RK : adjusts the selected bug, default Heading
Enables you 3 sources [Nav1|Nav2|FMS] to drive the autopilot.
Nav1 Nav2
Autopilot in NAV mode will follow the radio navigation aids VOR, LOC or ILS. With the rotary knob LK you can select the course and sync by pushing the wheel. VOR sync bearing. LOC sync course line.
FMS
Autopilot in NAV/GPSS mode will follow the flightplan as filed. With the rotary knob LK you can adjust the course to a waypoint. The FMS will switch in OBS mode and use the course as a radial for the given waypoint.
L3 : Bearing Ptr
Enables you to display a bearing to the selected navigation source [Nav1|Nav2|FMS]. The pointer is only visible if the source is in range.
L5 : Fly Vectors
This is your hook to the FMS. IF you flying FMS you can leave the route by pressing the L5 and follow the HDG bug. The flightplan is still active and by crossing the route again the FMS will intercept the LEG to continue the route.
R2 : Timer
Press R2 to start the timer then you can reset the running timer or stop it. Reset a stopped timer will set it back to zero.
Bug Selection
Select the "Bug Select" Tab by pressing the PFD page rocker switch to the right. With the LSK R3 R4 R5 you can select the corresponding bug for input. The rotary knob RK will adjust the selected bug. By pressing the knob you can sync the bug. After 10sec of no input it will switch back to the HDG bug selection.
FMS : Flight Management System
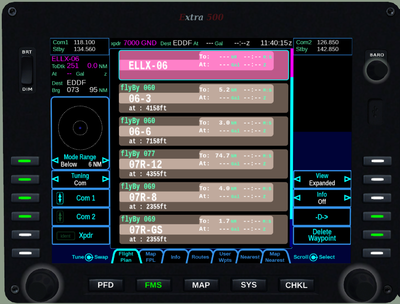
FMS - Flightplan
The Flight Plan tab enables you to view and edit a flight plan.
|
|
|
|
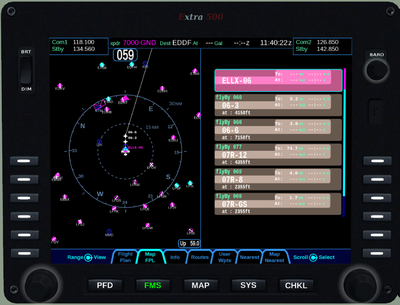
FMS - Map FPL
Is a split screen with the moving map and the flightplan. There are no LSK keys use the bezel or keypad to interact with the map and flightplan
|
|
|
|
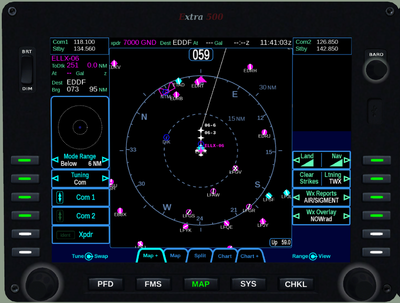
Map : Moving Map
Map - Map+
|
|
|
|
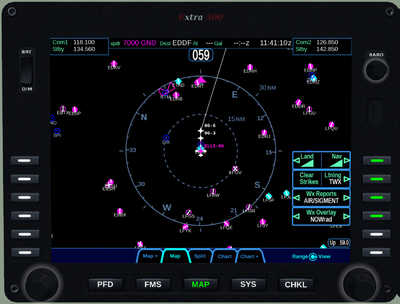
Map - Map
|
|
|
|
SYS : System Pages
CHKL: Electronic Checklist
Keypad
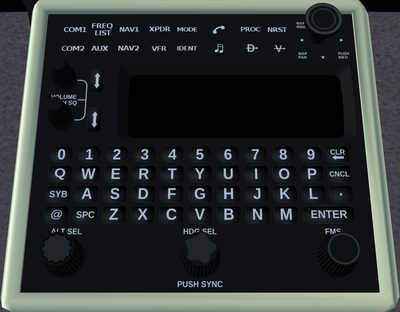
The keypad has a QWERTY layout with a few special function buttons along the outer edges and a row of number keys along the top of the keypad.
The display has two areas : a semi-permanent screen for com and nav frequencies on the left. On the right half there are the relevant data displayed according to the performed operation on the keypad (e.g. transponder code input, autopilot settings, FMS data entry, etc).
All edits are "live edits" in that they are immediately applied.
COM : Communication Frequencies
Communication tuning on the keyboard. Selecting the Com1 or Com2 with the top left short-keys activates the standby frequency for input.
With the number keys 0-9 you can enter the new frequency the leading 1__.__ must not typed in. With the CLR Key the input is cleared, CNCL cancels the input and ↵ Enter or the Swap Key on the left display side confirm the frequency. Also a time out will confirm the input.
After input time out the left screen will display the via audiopanel selected com radio transceiver and wait for input.
Navigation tuning on the keyboard. Selecting the Nav1 or Nav2 with the top left short-keys activates the standby frequency for input.
Input handling is the same like Communication Frequencies.
XPDR : Transponder
Transponder setting on the keyboard. Selecting the XPDR Key will show the transponder screen on the right. With the keyboard you can enter the new code. Pressing Mode will switch through the transponder modes [GND, ON, ALT ,OFF, SBY, TST]. The VFR Key sets the transponder code to the default VFR code 7000. IDENT sets the transponder in ident mode.
AUX : DME
The keypad is used to tune the DME receiver to Nav1, Nav2, Nav1 Hold or Nav2 Hold. Pressing the Aux button shows a list of the two active nav frequencies. With the bottom right FMS knob the frequency can be selected and tune the DME receiver. If the active frequency is changed, the DME will be tuned to the new frequency. This behavior can be suppressed by selecting the "HOLD" frequency.
FREQ LIST : Frequency List
The FREQ LIST will show a list of the most logical frequencies for your geographic position and flight phase. with the FMS knob you can select it into the standby frequency of the active com radio transceiver
Special Keys
- PROC : a shortcut to the published arrival or approach procedure
- NRST : selects the FMS-Nearest Page and can toggle [Nearest Airports, Nearest Airports to destination, VORs, NDBs, Intersections, ARTCCs, FSS]
- -D-> : DirectTo the selected waypoint in the active flightplan
- -V-> : FlyVectors an override of the active flightplan, the aircraft will follow the HDG bug.
Altitude knob
The altitude knob(bottom left) changes the altitude bug of the autopilot. When turned, the selected altitude is shown on the keypad screen. By pushing, the altitude bug is synced with the current altitude of the aircraft (rounded to 100ft).
Heading knob
The heading knob(bottom center) changes the heading bug of the autopilot. When turned, the selected heading is shown on the keypad screen. By pushing, the heading bug is synced with the current heading of the aircraft.
FMS knob
The FMS knob(bottom right) has several functions depending on the performed operation in the keypad and IFD. In most cases it will scroll through selectable objects.
