Bombardier CRJ900: Difference between revisions
m (11/21/2010 release) |
m (Robot: Cosmetic changes) |
||
| Line 15: | Line 15: | ||
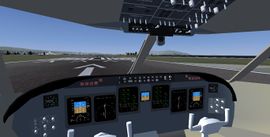
[[File:CRJ-900-cockpit.jpg|thumb|270px|The 3D [[cockpit]] of the CRJ900]] | [[File:CRJ-900-cockpit.jpg|thumb|270px|The 3D [[cockpit]] of the CRJ900]] | ||
==Aircraft help== | == Aircraft help == | ||
The knobs on the [[autopilot]] control panel can be adjusted by clicking the sides to increase and middle-clicking to decrease. You can also use the scroll wheel if your mouse includes one. Click the face on the front of a knob to perform its function. | The knobs on the [[autopilot]] control panel can be adjusted by clicking the sides to increase and middle-clicking to decrease. You can also use the scroll wheel if your mouse includes one. Click the face on the front of a knob to perform its function. | ||
You can open the front two doors by clicking on them. | You can open the front two doors by clicking on them. | ||
===Key commands=== | === Key commands === | ||
{| class="wikitable" | {| class="wikitable" | ||
|- | |- | ||
| Line 58: | Line 58: | ||
You can find a full list of autopilot key commands in the documentation included with [[FlightGear]]. | You can find a full list of autopilot key commands in the documentation included with [[FlightGear]]. | ||
===Autopilot operating notes=== | === Autopilot operating notes === | ||
* Heading and pitch/altitude control modes will only take effect when the Master Arm switch is turned on | * Heading and pitch/altitude control modes will only take effect when the Master Arm switch is turned on | ||
* The autothrottle/speed control mode is operated independently of the Master Arm switch | * The autothrottle/speed control mode is operated independently of the Master Arm switch | ||
===Quickstart tutorial=== | === Quickstart tutorial === | ||
'''Disclaimer:''' This is based on some general assumptions about commercial airliners and does not reflect the real procedures of the CRJ900. | '''Disclaimer:''' This is based on some general assumptions about commercial airliners and does not reflect the real procedures of the CRJ900. | ||
====Startup==== | ==== Startup ==== | ||
# Under the [[menu]], click "Bombardier CRJ900" and then click "Autostart." | # Under the [[menu]], click "Bombardier CRJ900" and then click "Autostart." | ||
# Wait for the engines to spool up to 55% N1. | # Wait for the engines to spool up to 55% N1. | ||
| Line 80: | Line 80: | ||
# Click the APU fuel pump and generator switches to shut down the APU. | # Click the APU fuel pump and generator switches to shut down the APU. | ||
====Taking off==== | ==== Taking off ==== | ||
# Extend flaps to 8 degrees (2 notches). | # Extend flaps to 8 degrees (2 notches). | ||
# Set the autobrakes to RTO (press <tt>tab</tt>). | # Set the autobrakes to RTO (press <tt>tab</tt>). | ||
| Line 90: | Line 90: | ||
# Disarm the autobrake (press <tt>tab</tt> until you get to the disarm setting). | # Disarm the autobrake (press <tt>tab</tt> until you get to the disarm setting). | ||
====Landing==== | ==== Landing ==== | ||
# Slow down to 140-150 KIAS for the approach and deploy full flaps. | # Slow down to 140-150 KIAS for the approach and deploy full flaps. | ||
# Set the autobrakes to your desired braking setting (cycle through the settings using <tt>tab</tt>). This can be either 1, 2, 3, or maximum. | # Set the autobrakes to your desired braking setting (cycle through the settings using <tt>tab</tt>). This can be either 1, 2, 3, or maximum. | ||
| Line 98: | Line 98: | ||
# Exit the runway. | # Exit the runway. | ||
==Development status== | == Development status == | ||
===A note on the metal reflection shader=== | === A note on the metal reflection shader === | ||
The [[Howto: | The [[Howto: Aircraft Reflection Shader|metal reflection shader]] present on this model will work perfectly for [[Git]] users, but [[FlightGear 2.0.0|2.0.0]] users will see strange lighting effects and absence of transparency in the model. To disable the shader, comment or remove the following lines at the end of <tt>[[$FG ROOT]]/Aircraft/CRJ-900/Models/CRJ-900.xml</tt>. | ||
<effect> | <effect> | ||
| Line 155: | Line 155: | ||
</effect> | </effect> | ||
===Completed=== | === Completed === | ||
* Animations | * Animations | ||
* Custom instruments | * Custom instruments | ||
| Line 168: | Line 168: | ||
* [[Howto: Animated jetways|Animated jetway]] definition | * [[Howto: Animated jetways|Animated jetway]] definition | ||
===To-do=== | === To-do === | ||
* FDM tweaking (as always) | * FDM tweaking (as always) | ||
==External link== | == External link == | ||
* [http://www.flightgear.org/forums/viewtopic.php?t=9274 Development thread] | * [http://www.flightgear.org/forums/viewtopic.php?t=9274 Development thread] | ||
Revision as of 21:02, 30 November 2010
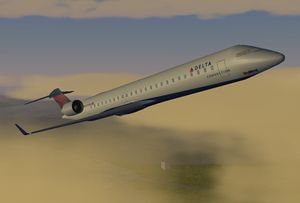
 The CRJ900 in the Delta Connection/SkyWest livery | |
| Type | Regional Airliner |
|---|---|
| Author(s) | Skyop |
| FDM | YASim |
| --aircraft= | CRJ-900 |
| Status | Beta (early production) |
| Download |
|
The Bombardier CRJ900 is a stretched 76-90 seat version of the CRJ700. The aircraft features the GE CF34-8C5 engines, 13,360 lbf (59,400 N) thrust with APR, and added leading edge slats. Max GTOW is 84,500 pounds. The airplane is loosely based on the CRJ200 series with a few major improvements. In typical service the CRJ900 can cruise 8-10,000 ft higher with a slightly higher fuel burn and an average true airspeed of 450-500 knots, a significant improvement over its predecessor. The FAA Type Certificate designation of the CRJ900 is the CL-600-2D24.

Aircraft help
The knobs on the autopilot control panel can be adjusted by clicking the sides to increase and middle-clicking to decrease. You can also use the scroll wheel if your mouse includes one. Click the face on the front of a knob to perform its function.
You can open the front two doors by clicking on them.
Key commands
| Delete | activate reverse thrust |
|---|---|
| Ctrl-b | cycle speedbrake setting |
| Ctrl-k | arm/disarm speedbrakes |
| Tab | cycle autobrake setting |
| Ctrl-z | toggle autopilot Master Arm switch |
| Ctrl-y | toggle autopilot Mach speed hold |
| Ctrl-o | toggle autothrottle TO/GA setting |
| Walk controls | |
| w | walk forward toward view |
| W | run forward toward view |
| s | walk backward from view |
You can find a full list of autopilot key commands in the documentation included with FlightGear.
Autopilot operating notes
- Heading and pitch/altitude control modes will only take effect when the Master Arm switch is turned on
- The autothrottle/speed control mode is operated independently of the Master Arm switch
Quickstart tutorial
Disclaimer: This is based on some general assumptions about commercial airliners and does not reflect the real procedures of the CRJ900.
Startup
- Under the menu, click "Bombardier CRJ900" and then click "Autostart."
- Wait for the engines to spool up to 55% N1.
-OR-
- On the top of the overhead panel, click the Master Battery switch.
- On the middle of the overhead panel, click the APU fuel pump and generator switches.
- Wait for the APU to spool up to 99% RPM.
- On the throttle quadrant, click the throttle levers to switch the engine cutoffs to RUN.
- On the middle of the overhead panel, click the engine start buttons.
- Wait for the engines to spool up to 55% N1.
- Click the APU fuel pump and generator switches to shut down the APU.
Taking off
- Extend flaps to 8 degrees (2 notches).
- Set the autobrakes to RTO (press tab).
- Advance the throttles to full power.
- If you wish to abort your takeoff, you may do so by reducing the throttle to idle. The speedbrakes will automatically deploy and the brakes will be applied at full force.
- Once you reach 150 KIAS, slowly pull back on the stick.
- As the aircraft begins climbing, raise the landing gear.
- Retract the flaps to 0 degrees.
- Disarm the autobrake (press tab until you get to the disarm setting).
Landing
- Slow down to 140-150 KIAS for the approach and deploy full flaps.
- Set the autobrakes to your desired braking setting (cycle through the settings using tab). This can be either 1, 2, 3, or maximum.
- Arm the speedbrakes to deploy on touchdown (press Ctrl-k).
- On touchdown, immediately retract the flaps to 0 degrees and activate reverse thrust (press del). Advance the throttles about 1/3-1/2 of the way.
- At 60 KIAS, retract the speedbrakes (press Ctrl-b) and deactivate reverse thrust. Brake manually (joystick button or b key) to disengage the autobrakes.
- Exit the runway.
Development status
A note on the metal reflection shader
The metal reflection shader present on this model will work perfectly for Git users, but 2.0.0 users will see strange lighting effects and absence of transparency in the model. To disable the shader, comment or remove the following lines at the end of $FG ROOT/Aircraft/CRJ-900/Models/CRJ-900.xml.
       <effect>
           <inherits-from>Aircraft/Generic/Effects/Fuselagereflect</inherits-from>
           <object-name>Fuselage</object-name>
           <object-name>Belly</object-name>
           <object-name>Wingbox</object-name>
           <object-name>GearNDoorL</object-name>
           <object-name>GearNDoorR</object-name>
           <object-name>GearNDoorC</object-name>
           <object-name>GearLDoor</object-name>
           <object-name>GearRDoor</object-name>
           <object-name>WingL1</object-name>
           <object-name>WingL2</object-name>
           <object-name>WingL3</object-name>
           <object-name>FlapL1</object-name>
           <object-name>FlapL2</object-name>
           <object-name>FlapL3</object-name>
           <object-name>SlatL1</object-name>
           <object-name>SlatL2</object-name>
           <object-name>SlatL3</object-name>
           <object-name>WingR1</object-name>
           <object-name>WingR2</object-name>
           <object-name>WingR3</object-name>
           <object-name>FlapR1</object-name>
           <object-name>FlapR2</object-name>
           <object-name>FlapR3</object-name>
           <object-name>SlatR1</object-name>
           <object-name>SlatR2</object-name>
           <object-name>SlatR3</object-name>
           <object-name>Engine1</object-name>
           <object-name>Engine1Nacelle</object-name>
           <object-name>Engine1Reverser</object-name>
           <object-name>Engine1Fan</object-name>
           <object-name>EngineMountL</object-name>
           <object-name>Engine2</object-name>
           <object-name>Engine2Nacelle</object-name>
           <object-name>Engine2Reverser</object-name>
           <object-name>Engine2Fan</object-name>
           <object-name>EngineMountR</object-name>
           <object-name>Tail</object-name>
           <object-name>Rudder</object-name>
           <object-name>HstabL</object-name>
           <object-name>ElevatorL</object-name>
           <object-name>HstabR</object-name>
           <object-name>ElevatorR</object-name>
           <object-name>Windows</object-name>
           <object-name>DoorL1</object-name>
           <object-name>DoorL2</object-name>
           <object-name>DoorL3</object-name>
           <object-name>DoorR1</object-name>
           <object-name>DoorR2</object-name>
           <object-name>DoorR3</object-name>
       </effect>
Completed
- Animations
- Custom instruments
- Autobrake/speedbrake systems
- Autostart system
- APU system
- Livery select
- Tire smoke
- Contrails
- Pushback
- Engine fire system
- Animated jetway definition
To-do
- FDM tweaking (as always)
External link
| |||||