XFLR5
Polishing FDM with XFLR5
My next attempt to make aerodynamics of Su-15 model realistic more was with XFLR5. That Open Source program is included at most of Linux distributions, to install it is not so big deal, and some of developers used it already. Again, let's go calculation process step by step to figure out what it can do.
First step: Defining profiles
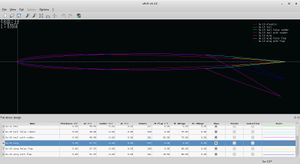
Most easy way is to define profiles of surefaces manually, at "File/Direct Foil Design".
First clone it from default one, then name it, then adjust common thickness by "Scale Camber and Thickness" dropdown menu. Then look at points of profile at "Edit Foil Coordinates". Don't edit these manually, but compare thickness of profile at 0.1 of chord at XFLR5 and Blender, or where You have it, and then use "Set L.E. Radius" to adjust thickness of beginning of wing.
At now program does not allow to import profile points, it can export it only. Anyway, by experience, to achieve needed result is question of minutes. Note that if You mean some flaps or rudder calculations then You need to create profile with turned flap also here, and then to make additional one, with false flap, beginning at same place, but rotated at zero angle - that one will be used for better exactness of calculations later.
At my Fedora with Cinnamon, latest XFLR5 sometimes stops to react at mouse with additional popup windows. So, maybe, knowing of some Tab/Shift-Tab and Space/Esc keyboard magic would be useful to You.
Second step: Defining surfaces
Save project and switch to "Wing and Plane Design". You would want to set metrics at "Options/Units" to feets and lbs prior, as JSBSim uses these - I did not do that, since my initial model was at meters, but preferred to recalculate output later at Libre Office Calc.
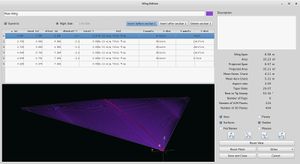
So, use "Plane/Define New Plane". Here You go to "Main Wing/Define".
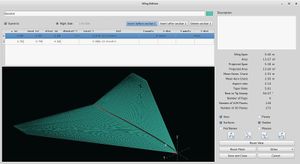
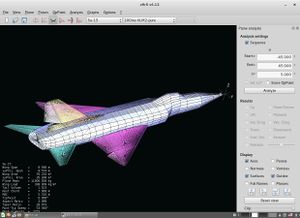
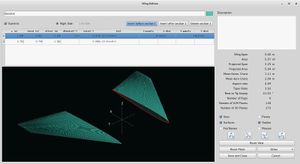
Look at presented screen to figure out what to do. You may notice next things, actually taken ideologically from program manual:
- Wing starts at zero point.
- It has six parts, two for root with false flap, two for aileron, with flap, and two for tip, with false flap. Second ones at all cases have 1 panel at Y - that way program comprehends structure and can calculate effects of flap-nonflap surfaces joint.
- Each part is defined by things as chord at X, distance from zero axle at Y, offset and so.
- Number of panels is not so big, 8x8 at greater case - by experience I do know that greater takes much more time but don't affect results much.
Save anything and then set wing offsets at main edit window.
Then You do define elevator.
Note that same distributions are set at that screen and previous one, length and number of panels at Y axis are just same for root part of thing and for elevator. That is highly recommended by manual; if length of elevator at Your model is not that same as distance to aileron of wing at Y, and with other similar cases, divide both wing and elevator accordingly, to make it fit panel to panel at Y axis.
Save result, set offsets, then set tail at fin edit window.
Step third: Defining body
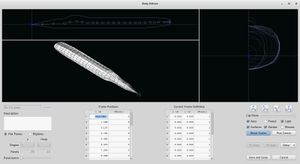
You can use XFLR5 as primitive 3D editor and define body spline by spline. As I had other one already, I preferred other way, and made a Blender exporter plugin. So, make body as half of cylinder at Blender, with 0..positive y's, divided up to ~30 cuts at Y and Z, starting with cone and ending with cone, export it from Blender and import it with "Other/Import Body Definition from text file" at body edition window. Quite easy.
Step fourth: Defining plane inertia
Just a bit tricky, and You can omit that step, defining weight and Center of Gravity position at analysis window directly instead - if You do know it. I did, anyway, that option was tested.
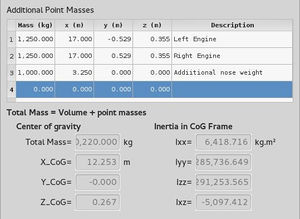
I knew more or less exact weights of wing, tail, elevator and empty body from documentation, and set these at "Plane Inertia" window. Then I set additional weights to body - two engines at its positions, as I did knew exact weight of engine also.
And then, since I knew point where CG got to be, I took one tonne from weight of body and defined additional mass there, then shifted it to nose until CG went to needed position - seems to be that Su have really heavy radar there. At Your case You could do same, knowing that CG could not be after main gears, and should be at ~third of median chord of wing.
That's it. If You need some Ixx or so then You can take it from here and, if Your XFLR5 model was made at ft/lbs units, put these values directly at needed place of JSBSim FDM xml model file; at case it was made in meters and kilograms, multiply it with 0.453592 prior.
Also, I would add, better to make such calculations with plane defined a bit other way, with surfaces starts not at zero point inside fuselage, but a bit off it, as at one of examples presented with pack below. Then inertia moments are correct more.
Step fifth: Calculation
OK, everything is set.
Open "Analysis/Define an Analysis", choose "Type 1 (Fixed Speed)", with speed of 100m/s at first panel, "Ring Vortex (VLM2)" without other options at second - again, some Ctrl-Tab magic could be useful. Do not use "Viscous" and "Tilt. Geom" options - as I can remember, one of these produces wrong values, while other is error making.
Set name for analysis, press OK, then select it above main window. At side panel set alpha angles, from -45deg to 45 for example, with step of 5deg, and press "Analyze" button. At my old PC it calculated such case for some minutes - two maybe, not more than five for sure.
Step sixth: Data mining
Go to "Polars/Current Polar/Export" and export results to text file. Open it at gedit and change multiply spaces to one by Ctrl-H, " " to " ". Then copy text and paste it to Calc.
First of all, if You calculated at m/kg units, multiply lift coefficient, CL, to
0.453592/(0.3048^2)
to convert it to feet/lbs; same with drag, CD. As of pitch, CM, since it multiplies at chord in calculations, and goes with inversion, conversion coefficient is
-0.453592/0.3048
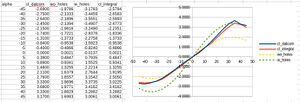
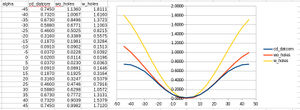
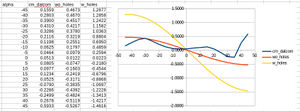
Then look at presented graphs. Since it was said at manual that effects of both wing going trough body and wing starting a bit offside it are unknown, I made two models - one with wing going trough, and one with wing starting offside, then compared results of these two with Datcom results.
Seems to be that lift coefficient is better with wing going trough at smaller absolute alphas values; angles near to critical angle of attack is better with wing starting offside. With negative critical angle it's some median between two variants. Resulting integral CL, combining two initial variants that way, is quite near to Datcom results.
For both CD and CM, drag and moment, variant without holes is better. Drag at zero alpha is too small anyway, set it to half of CD at 5deg manually.
Step seventh: Higher Machs
Unfortunately, current version of XFLR5 seems to not care about speed at all. It produces quite same results at VLM2 method for 100m/s and 200m/s. Panel method, which You could set at "Define Analysis (Advance Users)" - don't forget to switch default "Viscous" option off, as it makes errors instead of values - seems to produce a bit different results, but, again, these are not changing with velocity.
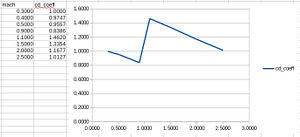
So I made next rough approximation, taken from Datcom data analysis: up to 1Mach CL is more or less same, then it starts to drop, and goes to half of initial values at 2.5Mach. Same with CM. As of drag, it drops to 0.9 to 0.9Mach, jumps to 1.5 at 1.1Mach, and drops to 1 to 2.5Mach.
It's quite rough; anyway, just to add additional tables to functions of coefficients, as at this example, and it would make difference with Datcom model not so notable.
  <table>
     <independentVar lookup="row">velocities/mach</independentVar>
     <tableData>
        0.3000	1.0000
        0.4000	1.0112
        0.5000	1.0112
        0.9000	0.9888
        1.1000	0.9775
        1.5000	0.8315
        2.0000	0.6404
        2.5000	0.5281
     </tableData>
  </table>
Step eight: Controlled surfaces
Again, it's a bit tricky, since method seems to be not so accurate at moments. At first, You need to calculate change of lift coefficient due to surface shift - of aileron, or, as at example, of fully rotated elevator.
I set internal offsets of it to put axle at zero, then external to make it stay at correct position, then just set its "Tilt Angle" to needed values to rotate it. Secondly, You need to multiply result at
distance_from_axle_to_center_of_gravity/wing_chord
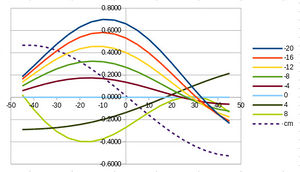
or some span if that was set as multiplier of that coefficient at xml file. At least on resulted graphs difference at CM caused by elevator shift was lower than CM itself, while CM calculated out of CL was greater at needed angles, and model with that variant was controllable, while with pure CM changes - not.
Step nine: Experiments
As I saw at web, some people do not import some body into XFLR5, but do define it as thick profile at core part of wing. Seems to be that approach produces more or less correct results too. You may try it, while I prefer to make conclusions instead.
Resume
Easy and fast tool for beginners. If You made Your first JSBSim model, especially subsonic one, and do want to step further from initial Aeromatic made coefficients, that's what You need exactly - it would give You needed results in day or two.
But, making better picture, it calculates more, say, scientific results than Datcom, and some additional steps are needed to make output of it more or less exact with subsonics; at oversonics I went 2.5Mach without reheat at resulted "Su-15" model. Though it was not made for this at all, and would evolve, but at now I would recommend some other approaches to mature developers.
External links
Su-15 XFLR5 Pack, including Blender export script, .ac, .txt, and .xfl examples
Author
Victor Slavutinsky, vitosnet at mail dot ru
