Making a SourceForge Merge Request
| This article has been nominated for deletion since 21 March 2025. To discuss it, please visit the talk page.
Do not remove this tag until the discussion is closed. Reason for the nomination: Since FlightGear has moved most of its repositories to GitLab, no further merge requests should be made on SourceForge. |
| Git |
|---|
|
Git is a version control system, used to store all files required to build FlightGear. |
How do I submit a change in FlightGear? Making a SourceForge Merge Request tries to help those interested in making their first merge request.
Preamble
We will use the FGData repository as an example and assume that your changes are to be contributed to its next branch. It is perfectly fine to work on a copy of your “normal” FGData folder for more safety. Let us also assume that the goal of the merge request is to add or update some joystick configuration files in FGData.
STEP 1: SourceForge Account
If you don't have an account at SourceForge, create one.
STEP 2: Your SSH public key
If you already have an SSH key, upload its public portion to SourceForge using Me → Account Settings → SSH Settings; otherwise, be prepared to enter your SourceForge password a few times!
- Background information if using Raspberry Pi OS or Linux: SSH Passwordless.
- More background information from SourceForge: SSH info.
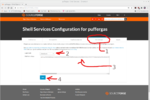
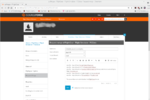
Description of screenshot Uploading your public SSH key:
- SSH Settings section.
- Default Login Shell selection is OK. More information about this setting is given below.
- Place your public SSH key in this box.
- When finished click on the Save button.
STEP 3: Fork
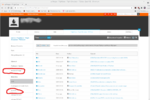
Log in at SourceForge, go to the repository you want to contribute to (for instance, this page would work for FGData) and click on the Fork button that is on the left hand side of the browser. This makes a new copy of the repository on the SourceForge servers: your own fork of the original repository.
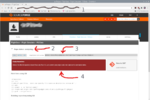
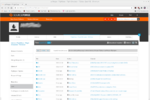
The process is shown here and may take a few minutes if the repository is large (e.g., FGData). Don't be confused by the commands displayed there (git init, etc.): these are meant for people creating a repository from scratch. Thus, we can and should simply ignore them here. In the end, you should have a URL similar to what is displayed on the final screenshot of this step.
STEP 4: Change directory
Direct your terminal to the folder of interest. For example: cd ~/flightgear/dnc-managed/install/flightgear/fgdata. Of course, you need to change this to suit your project.
STEP 5: Check the repository state
Run git status to make sure everything is clean. Take note of the branch you are on, since we are going to switch to a different one.
STEP 6: Add a remote to point to your fork
In this step, we want to run a command like:
git remote add myfork url
Here, myfork is the name of the Git remote we want to add to our repository. The url argument needs to be replaced with an appropriate URL, which can be obtained as follows:
- In the above screenshot showing the fork process, note 3, you can see the following:
git clone ssh://puffergas@git.code.sf.net/u/puffergas/flightgear puffergas-flightgear - From this command (which we don't need to run), we extract the following URL:
ssh://puffergas@git.code.sf.net/u/puffergas/flightgear.
Thus, our command to add the myfork remote to our repository is:
git remote add myfork ssh://puffergas@git.code.sf.net/u/puffergas/flightgear
Do the same process yourself and run the resulting command—which ends with your URL.
STEP 7: Verify the list of remotes
Run git remote -v. This will list the available Git remotes.
pi@400:/media/pi/nextFGData/fgdata $ git remote -v
myfork	ssh://puffergas@git.code.sf.net/u/puffergas/flightgear (fetch)
myfork	ssh://puffergas@git.code.sf.net/u/puffergas/flightgear (push)
origin	https://git.code.sf.net/p/flightgear/fgdata (fetch)
origin	https://git.code.sf.net/p/flightgear/fgdata (push)
This output shows the initial origin remote, as well as the myfork remote we just added.
STEP 8: Create a new branch
Run git checkout -b joystick origin/next This creates a new branch named joystick that starts the same as origin/next.
STEP 9: Update the branch to its latest upstream state
Run git pull --ff-only. You can drop --ff-only if you're confident. This simply updates the branch to its latest upstream state.
pi@400:/media/pi/nextFGData/fgdata $ git pull --ff-only
remote: Enumerating objects: 24, done.
remote: Counting objects: 100% (24/24), done.
remote: Compressing objects: 100% (10/10), done.
remote: Total 10 (delta 8), reused 0 (delta 0)
Unpacking objects: 100% (10/10), done.
From https://git.code.sf.net/p/flightgear/fgdata
   f3ded8b3c..ead418412  next           -> origin/next
   7b78667ca..f904e0c87  release/2020.3 -> origin/release/2020.3
Updating f3ded8b3c..ead418412
Fast-forward
 Translations/default/sys.xml | 4 ++++
 1 file changed, 4 insertions(+
STEP 10: Make your changes
Add your files where they belong. Run git add some/file to add each one to “the index” (this is Git speak). Check Git tutorials for this if needed (for instance, on git-scm.com, you can watch introductory videos and freely read a good-quality book about Git).
STEP 11: Verify your changes
Run git status and git diff --cached to make sure the commit will contain what you want.
Some more precisions: when, in the previous step, you did git add some/file-or-dir, it added the file(s) to the Git index, which is some store that gathers what will be part of the next commit if you just run git commit. The git diff --cached command (or git diff --staged, which is just an alias) goes in the store (the index) and tells you what differs in it as compared to the current state of your repository (i.e., its HEAD, what is already committed). So, it tells you what the next git commit is going to change if you proceed along.
On the other hand, if you run a plain git diff command, you'll see the changes made to files followed by Git in the repository, that have not been added to the index. In other words, if you made changes to files that are not ignored by Git and didn't use git add for these files, they will show up in the output ofgit status (only the file paths) and of git diff (the precise changes in diff-like format).
STEP 12: Commit the changes
Run git commit. This will invoke $GIT_EDITOR, or $EDITOR if the former is unset. There you can write your commit message. The first line must be a short description; then add a blank line, then you may describe your commit in more details. When the editor exits, the commit will be done (but only locally on your hard drive) unless you saved a blank-or-empty commit message. You need to save the file then exit the editor.
Note: if the editor is emacsclient, you don't need to quit Emacs: just type C-x # after saving the buffer containing your commit message.
STEP 13: Verify that everything is as expected
Use git status, git log -p, git log --name-only, git log and gitk to make sure everything is as you expected. You might need to install gitk.
STEP 14: Just in case the upstream folder was updated
Run git pull --rebase, just in case FGData was updated in the meantime.
pi@400:/media/pi/fgdata $ git pull --rebase
Current branch joystick is up to date.
Step 15: The push
Run git push myfork joystick. Of course, change myfork and joystick to suit your project (the former is the name of a Git remote you added earlier to your repository; the latter is the name of the branch you created for the changes you want to contribute).
Note: smart shells can autocomplete the remote and branch names.
Step 16: File a merge request
- Log in at SourceForge and visit a page that belongs to your fork of the repository you want to contribute to (in our example,
https://sourceforge.net/u/puffergas/flightgear/ci/next/tree/can do; adapt the URL, of course).
- Click on the Request merge button (see the Request Merge screenshot). This should cause the Merge Request Form to be displayed.
- Fill in the fields. Make sure the Source Branch is the one you just pushed (
joystickin our example) and choose next as the Target Branch—this is where most of FG development happens.
- Click on the Save button.
Step 17: Going back to the original branch
In step 5, the git status command printed the name of the branch that was checked out in our repository before we created and switched to the joystick branch. If we want to use FlightGear or download_and_compile.sh normally with that FGData repository, we may need to switch back to the original branch. This is usually either next, or something like release/2020.3. Assuming that was next, the following command does the job:
git checkout next
Step 18: Waiting for feedback and cleaning up
Wait for comments on your merge request. If/when it has been merged, you may delete your “feature branch”:
git branch -d joystick
You can also delete it from the SourceForge servers, although nobody will notice if you don't. This is mainly useful if you have too many branches on your private fork at SourceForge and this is becoming inconvenient to browse (using the list of available branches). The following command can be used to delete the joystick branch from your fork on the SourceForge servers:
git push myfork --delete joystick
Of course, only perform this step if you are really sure that your work is in the official repository!
In case the merge request takes some time to be reviewed, you might need to:
- make sure the
joystickbranch is checked out in your repository; - run
git pull --rebaseto rebase your changes on top of the most recent commits from the official repository; - force-push the updated branch to your personal fork on the SourceForge servers, using something like
git push myfork +joystick(note the+sign); - and finally click on the Refresh commits button of the merge request page.
If the force-push is refused by the server, ask on flightgear-devel mailing list—you might need to set denyNonFastforwards=false in a Git configuration file located on the SourceForge servers.
Congratulations!
If you arrived here, your merge request should be completed. You may take a break, enjoy a good cup of coffee or whatever you feel appropriate. Thank you for your contribution to FlightGear! :-)
Appendix: the SourceForge login shell and force-pushes
| Note This section is in a kind of a draft state, and shouldn't be necessary to read. |
What is the “login shell” in the SourceForge SSH settings tab for?
Normally, you won't need SourceForge's shell service for filing merge requests, except possibly if you decide to enable force-pushes, which allows one to easily push a new revision of a branch to one's personal fork, without changing the branch name. This can be useful during discussion of a merge request (one can click on the Refresh commits button of a merge request page to make that page aware of a branch update that has been pushed). But it has yet to be confirmed that force-pushes are refused by the SourceForge servers in the default config (some people including me didn't need to change any setting, others did).
For the person who had force-pushes refused by the SourceForge servers, the key to solve the problem was to set denyNonFastforwards=false in a particular configuration file at SourceForge, which can be done using their shell service :
- https://sourceforge.net/p/forge/documentation/Git/#allowing-force-pushes
- https://sourceforge.net/p/flightgear/mailman/message/37044020/
- https://sourceforge.net/p/flightgear/mailman/message/37045405/
The configuration file in question was something like /home/git/u/your-username-here/flightgear-fgdata.git/config (a path on the SourceForge servers). By the way, according to this comment, the command sf-help --scm can be run on the SourceForge servers to list the paths to one's repositories.
Keep in mind that all this is a refinement, since regardless of the denyNonFastforwards setting, it is always possible to delete a branch and push it right afterwards to achieve pretty much the same effect as a force-push.
Additionally, since several people were able to push non-fast-forward updates to their forks at SourceForge without doing any configuration change, don't bother about this until:
- you actually need to push a non-fast-forward update to your fork at SourceForge;
- it gets rejected by the server.
