FIAT G91R1B the VHF / UHF PTR 175 radio
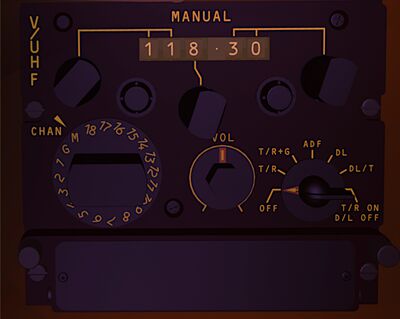
The FIAT G91R1B used various models of VHF-UHF radios, this is one of the most typical and advanced in the 60 '. It is a radio that can operate in a relatively wide frequency spectrum ranging for the VHF band from 117.5 to 135.95 Mhz with 50 KHz spaced channels and for the UHF band from 225.0 to 399.9 MHz with 100 KHz spaced channels.
The frequencies are generated with the PLL synthesis method by a quartz carusel arranged inside a special drum, the drum was placed inside a box that contained the electronics, all made of thermionic valves The carusel is rotated by a synchronized motor with the position of the selectors inserted in the box available to the pilot.
The box allows, in manual mode, to select the single frequencies using three selectors placed at the top of the box, the selected frequency appears in a window at the top.
The manual mode is not used much as the pilot cannot concentrate on the flight, for this other 18 frequencies can be pre-inserted in the radio via a special switch box located at the base. The eighteen frequencies can be selected via a 20-position switch on the left. The switch over 18 channels for pre-inserted frequencies has two other positions:
- M - Manual, which is the manually preset frequency visible in the top window.
- G - Guard, that is the distress frequency which for this radio is 243 MHz. Note that I currently use this frequency, but it can be changed to the current one which is 121.5 MHz or to others at the pilot's discretion.
Switch-on the radio
The radio must be turned on (Using the switch on the right), normally this operation is carried out after the engine has started to avoid excessive electrical stress. The ignition time is about 30 seconds, before this time the radio does not work as it is warming up. There is nothing that says that the radio is on or that the radio is receiving a carrier, the radio is really essential and this can give perplexity to those who are not used to aircraft of this era.
The only way to know if this works is to listen to the audio, which is not always easy because of the noise of the plane.
The switch on the right at various positions, currently only the T / R (Transmission and Reception) is active, the others are not active, even if they still allow you to turn on the radio.
Note: If the pilot moves the switch to OFF the radio switches off, but as the electronics are still hot, the warm-up time is shorter, as in reality.
Changing frequencies
The manual change of frequencies, while fun, is impractical, so the simulator program that governs the radio has a trick:
- When the radio is turned on for the first time, the program copies the frequency present in the Radio Frequencies COM1 system menu and inserts it in the manual management of the radio. In this case, if the pilot changes the frequency manually, it is immediately copied in the COM1 field of Radio Frequencies. In this way, compatibility with the various programs is maintained.
- When the pilot (or an ATC program) inserts a frequency in COM1, a little magic happens, that is, the new frequency is written as a pre-inserted frequency with a channel number chosen in sequence. In this way it is possible to memorize the frequencies that are entered sequentially.
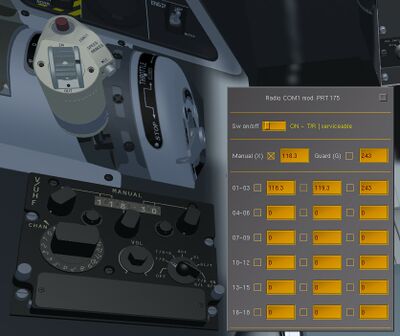
To manage the frequencies it is possible to use the GUI interface which can be activated from the FIAT G91 menu by selecting the Radio COM1 mod PRT 175 panel. The interface in the upper part (first tag) has the status of the off-on switch with the description of the operating status.
The second tag contains the two switch positions of channels M and G. Channel M is the manual one and reports the frequency selected manually or entered as the first frequency (Radio system COM1) when the program is activated. Then there is the G channel which reports the frequency of 243 MHz which can however be changed in the case of another emergency call frequency.
The bottom tag contains the 18 preset frequencies. A pilot can select and activate any of the 18 frequencies by clicking on the corresponding check-box. When the check-box is clicked, the repositioning of the channel switch can be observed.
Note: Unlike reality, when the channel is selected, the corresponding frequency is displayed on the top window, overwriting the set manual frequency. This difference is mechanically very complicated to obtain and therefore is not implemented in the real object, but at least allows the pilot, in the flight simulator, to have knowledge of the actual selected frequency. However, the previously set manual frequency can be recovered by returning the switch to channel M.
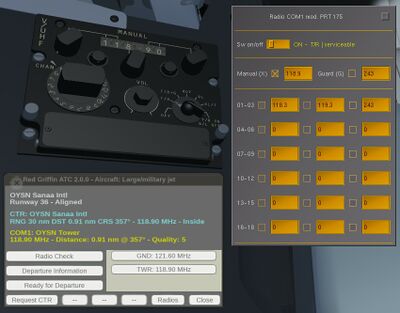
Red Griffin ATC
The radio is interfaced with the Red Griffin ATC system for frequency management and ATC voice commands. The program can only be activated if it finds the radio tuned to one of the ATC frequencies. To achieve this, the radio must be switched on and positioned on an active frequency. Normally this happens automatically in the start-up phase of the simulator (the frequency is written automatically by the system on the COM1 field of the system radio), as the first frequency that uses the ATC program. Therefore the pilot, at the start, can observe that the frequency of the airport is entered on the manual from which ATC then derives all the other frequencies that will be used to activate the individual services.


