Es/Howto: Lightmap: Difference between revisions
(Created page with "{{BeingTranslated}} thumb|270px|[[Boeing 747-400|Boeing 744 cockpit with several lightmapped panels.]] [[File:Boeing_747-400_light...") |
|||
| (16 intermediate revisions by the same user not shown) | |||
| Line 1: | Line 1: | ||
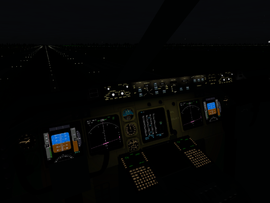
[[File:Boeing_747-400_lightmap_cockpit.png|thumb|270px|Cábina del [[Boeing 747-400|Boeing 744]] con mapeado de iluminación en varios paneles.]] | |||
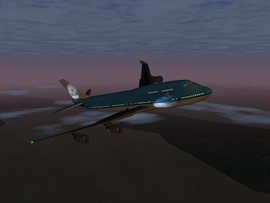
[[File:Boeing_747-400_lightmap_cockpit.png|thumb|270px|[[Boeing 747-400|Boeing 744]] | [[File:Boeing_747-400_lightmap_exterior.png|thumb|270px|Exterior del [[Boeing 747-400|Boeing 744]] con mapeado de iluminación en en fuselaje y cola.]] | ||
[[File:Boeing_747-400_lightmap_exterior.png|thumb|270px|[[Boeing 747-400|Boeing 744]] | |||
''' Lightmap''' o mapeado de iluminación es una textura que contiene el brillo de las superficies en un computo gráfico. Cuanto más oscuro es un píxel en el lightmap, menos emisivo será el correspondiente píxel en la textura de color/foto. | |||
Algunas razones por las que los mapeados de iluminación son útiles: | |||
* Nos permiten iluminar superficies sin la necesidad de crear capas alfa (como anteriormente se hacía en muchos aviones). | |||
* Podemos editar los colores de una textura, sin interferir con la iluminación. Es útil si deseas más adelante añadir un poco de suciedad en los paneles. | |||
* Las luces aparecen realistas en todo momento del día. A diferencia de una animación textranslate, donde puedes cambiar las texturas de día/noche (pero a menudo aparecen muy oscuras durante el amanecer/atardecer). | |||
=== FlightGear 2.6.0 | == Mapeados de iluminación en FlightGear == | ||
=== De FlightGear 2.6.0 en adelante === | |||
Ver [[FlightGear Newsletter December 2011#Shaders]] | |||
=== FlightGear 2.4.0 === | === FlightGear 2.4.0 === | ||
''' | '''Nota:''' para que los mapeados de iluminación funcionen los shaders de materiales deben estar habilitados en el dialogo de opciones de visualización <tt>View > Rendering options</tt>. | ||
==== | ==== El lightmap ==== | ||
Vas a tener que crear un lightmap para cada textura única destinada a ser mapeada. Esto puede hacerse a mano, o mediante algún software 3D, como [[Blender]] (el cual se utilizará para el ejemplo en esta página). | |||
# | # Abrir/importar tu modelo en Blender. | ||
# | # Ir a <tt> Add> Lamp </tt>, y seleccionar uno de los tipos de lámpara. La luz se creará en el origen del modelo. | ||
#* '''Lamp:''' | # *'' 'Lamp:''' la lámpara propaga la luz en todas direcciones. Puede ser utilizada para las luces anticolisión, luces de navegación, etc | ||
#* '''Area:''' | # *'' 'Area:''' longitud y tamaño del área de las lámparas, como en la iluminación del panel de instrumentos en el que se utilizan lámparas fluorescentes. | ||
#* '''Spotlight:''' | # *'' 'Spotlight:''' para iluminar un area específica/dirección. Se utiliza para las luces de aterrizaje. | ||
# Move/rotate | # Move/rotate situa la lámpara en el lugar preferido/orientación. '''Nota:''' dejar las herramientas de escala sin tocar, ampliar la lámpara NO afecta al lightmap. | ||
# | # Seleccione la lámpara (botón derecho del ratón) y abrir el menú Shading (F5). Aquí es donde podemos editar la lámpara. Algunos de los ajustes más importantesson: | ||
#* '''Dist:''' | # *'' 'Dist:''' la distancia (en metros) en la que la intensidad de la luz es la mitad de intensa que en su fuente. | ||
#* '''Energy:''' | # *'' 'Energy:''' intensidad de la luz. | ||
#* '''R/G/B:''' | # *'' 'R/G/B:''' el color de la luz. Sí, los mapeados de iluminación admiten colores! | ||
#* '''SpotSi:''' | # *'' 'SpotSi:''' anchura del haz de foco en grados. | ||
#* '''SpotBl:''' | # *'' 'SpotBl:''' suavizado del borde del haz de luz. Los bordes más suaves crean una apariencia más natural para las luces de la mayoría de los aviones. | ||
# | # Selecciona el objeto del cual deseas crear el lightmap. Entra en el modo de edición y luego de nuevo a modo de objeto (para cargar la textura del objeto). | ||
# | # Ve al menú de escena (F10) y abre la ficha Bake(hornear). Selecciona full render (render completo) y haz clic en el botón bake grande. Blender empezará a generar tu lightmap. | ||
# | # Cambia tu ventana principal (o añade una ventana extra) al editor de UV/Image. Verás que el lightmap se está creando poco a poco. | ||
# | # Cuando el lightmap haya terminado, haz clic en <tt>Image > Save as...</tt> y guarda la imagen en el directorio de tu avión. | ||
That's it! Now, you probably want to see how it looks on your aircraft, which is explaind in the next paragraph. If you are not yet satisfied with the result, you can edit your lamp's settings (step 4) and add more lamps to see what effect that has on the result. | That's it! Now, you probably want to see how it looks on your aircraft, which is explaind in the next paragraph. If you are not yet satisfied with the result, you can edit your lamp's settings (step 4) and add more lamps to see what effect that has on the result. | ||
==== | ¡Eso es! Ahora, es probable que desees ver cómo se ve en tu avión, lo que se explica en el párrafo siguiente. Si aún no estás satisfecho con el resultado, puedes editar la configuración de la lámpara (paso 4) y añadir más luces para ver el resultado que tiene el efecto. | ||
==== El xml ==== | |||
En el archivo. xml de tu modelo XML, agregua el siguiente bloque de código: | |||
<syntaxhighlight lang="xml"> | <syntaxhighlight lang="xml"> | ||
| Line 55: | Line 57: | ||
</effect> | </effect> | ||
</syntaxhighlight> | </syntaxhighlight> | ||
En el que: | |||
* '''image:''' [[#The lightmap| | *'''image:''' es [[#The lightmap|el propio lightmap]] | ||
* '''condition:''' | *'''condition:''' cuando esta propiedad es mayor o igual a 1, el lightmap se habilitará. | ||
* '''factor:''' | *'''factor:''' se puede utilizar para controlar la intensidad de la luz, en una escala de 0-1. | ||
Recuerda que este bloque se requiere para cada una de las texturas únicas que deseas mapear. Puedes tener varios objetos por efecto, pero no efectos múltiples por objeto. | |||
=== | === Problemas conocidos === | ||
* FlightGear | * FlightGear no soporta múltiples shaders (sombreadores) por objeto. Por lo tanto, tendrás que elegir entre shaders o el lightmap, la [[Howto: Aircraft Reflection Shader|reflexión]] o el [[Howto: Use the normal map effect in aircraft|normalmap (mapeado normal)]]. | ||
* | * No hay una manera flexible para (de)seleccionar un lightmap sobre una base por-objeto. En la actualidad sólo escucha a una sola de propiedad definible por objeto. | ||
[[en:Howto:_Lightmap]] | |||
[[Category:Aircraft enhancement|Lightmap]] | [[Category:Aircraft enhancement|Lightmap]] | ||
[[Category:Howto|Lightmap]] | [[Category:Howto|Lightmap]] | ||
[[Category:Modeling|Lightmap]] | [[Category:Modeling|Lightmap]] | ||
Latest revision as of 10:29, 20 April 2012


Lightmap o mapeado de iluminación es una textura que contiene el brillo de las superficies en un computo gráfico. Cuanto más oscuro es un píxel en el lightmap, menos emisivo será el correspondiente píxel en la textura de color/foto.
Algunas razones por las que los mapeados de iluminación son útiles:
- Nos permiten iluminar superficies sin la necesidad de crear capas alfa (como anteriormente se hacía en muchos aviones).
- Podemos editar los colores de una textura, sin interferir con la iluminación. Es útil si deseas más adelante añadir un poco de suciedad en los paneles.
- Las luces aparecen realistas en todo momento del día. A diferencia de una animación textranslate, donde puedes cambiar las texturas de día/noche (pero a menudo aparecen muy oscuras durante el amanecer/atardecer).
Mapeados de iluminación en FlightGear
De FlightGear 2.6.0 en adelante
Ver FlightGear Newsletter December 2011#Shaders
FlightGear 2.4.0
Nota: para que los mapeados de iluminación funcionen los shaders de materiales deben estar habilitados en el dialogo de opciones de visualización View > Rendering options.
El lightmap
Vas a tener que crear un lightmap para cada textura única destinada a ser mapeada. Esto puede hacerse a mano, o mediante algún software 3D, como Blender (el cual se utilizará para el ejemplo en esta página).
- Abrir/importar tu modelo en Blender.
- Ir a Add> Lamp , y seleccionar uno de los tipos de lámpara. La luz se creará en el origen del modelo.
- * 'Lamp:' la lámpara propaga la luz en todas direcciones. Puede ser utilizada para las luces anticolisión, luces de navegación, etc
- * 'Area:' longitud y tamaño del área de las lámparas, como en la iluminación del panel de instrumentos en el que se utilizan lámparas fluorescentes.
- * 'Spotlight:' para iluminar un area específica/dirección. Se utiliza para las luces de aterrizaje.
- Move/rotate situa la lámpara en el lugar preferido/orientación. Nota: dejar las herramientas de escala sin tocar, ampliar la lámpara NO afecta al lightmap.
- Seleccione la lámpara (botón derecho del ratón) y abrir el menú Shading (F5). Aquí es donde podemos editar la lámpara. Algunos de los ajustes más importantesson:
- * 'Dist:' la distancia (en metros) en la que la intensidad de la luz es la mitad de intensa que en su fuente.
- * 'Energy:' intensidad de la luz.
- * 'R/G/B:' el color de la luz. Sí, los mapeados de iluminación admiten colores!
- * 'SpotSi:' anchura del haz de foco en grados.
- * 'SpotBl:' suavizado del borde del haz de luz. Los bordes más suaves crean una apariencia más natural para las luces de la mayoría de los aviones.
- Selecciona el objeto del cual deseas crear el lightmap. Entra en el modo de edición y luego de nuevo a modo de objeto (para cargar la textura del objeto).
- Ve al menú de escena (F10) y abre la ficha Bake(hornear). Selecciona full render (render completo) y haz clic en el botón bake grande. Blender empezará a generar tu lightmap.
- Cambia tu ventana principal (o añade una ventana extra) al editor de UV/Image. Verás que el lightmap se está creando poco a poco.
- Cuando el lightmap haya terminado, haz clic en Image > Save as... y guarda la imagen en el directorio de tu avión.
That's it! Now, you probably want to see how it looks on your aircraft, which is explaind in the next paragraph. If you are not yet satisfied with the result, you can edit your lamp's settings (step 4) and add more lamps to see what effect that has on the result.
¡Eso es! Ahora, es probable que desees ver cómo se ve en tu avión, lo que se explica en el párrafo siguiente. Si aún no estás satisfecho con el resultado, puedes editar la configuración de la lámpara (paso 4) y añadir más luces para ver el resultado que tiene el efecto.
El xml
En el archivo. xml de tu modelo XML, agregua el siguiente bloque de código:
<effect>
	<inherits-from>Effects/lightmap</inherits-from>
	<parameters>
		<texture n="1">
			<image>Aircraft/747-400/Models/Effects/lightmap.png</image>
		</texture>
		<condition><use>/controls/lighting/logo-lights</use></condition>
		<factor><use>/controls/lighting/panel-norm</use></factor>
	</parameters>
 	<object-name>fuselage</object-name>
</effect>
En el que:
- image: es el propio lightmap
- condition: cuando esta propiedad es mayor o igual a 1, el lightmap se habilitará.
- factor: se puede utilizar para controlar la intensidad de la luz, en una escala de 0-1.
Recuerda que este bloque se requiere para cada una de las texturas únicas que deseas mapear. Puedes tener varios objetos por efecto, pero no efectos múltiples por objeto.
Problemas conocidos
- FlightGear no soporta múltiples shaders (sombreadores) por objeto. Por lo tanto, tendrás que elegir entre shaders o el lightmap, la reflexión o el normalmap (mapeado normal).
- No hay una manera flexible para (de)seleccionar un lightmap sobre una base por-objeto. En la actualidad sólo escucha a una sola de propiedad definible por objeto.