Terragear complete guide and FAQ
Using TerraGear can be a hassle, when you don't know how to use it correctly. This has become even harder, since the central source for the data files TerraGear needs (mapserver.flightgear.org) has been taken down some time ago, and the alternative http://mapserver.mgras.net/shpdl is not accessible, apparently because it was abused by some people. But, scenery can still be built, and if you know how, it's not that complicated. If you had any problems getting TerraGear, getting the data or processing the data, read on.
Getting TerraGear
There are several ways of getting TerraGear, most of them are described in the main TerraGear article. If you are a Linux user and can't get TerraGear to compile, you can get pre-compiled binaries from docker - there is a dedicated wiki article on this.
I want to get the pre-compiled binaries for Linux, but I don't want to install docker just for this
For non-docker users, I wrote a bash script which you can get from GitHub (you need curl and jq installed to run it). It downloads any docker image to a local directory of your choice. In the same repository you can also find a bash script that runs any of the TerraGear tools (some of the TerraGear programs need libraries that are included in the docker image, but your system will not know by default where to find them. You can make your system find them by setting some environment variables; this is what the launcher script does).
Other requirements
If you don't want to build scenery for the whole world, you have to slice and merge data files. This is done with the utility program ogr2ogr. On Ubuntu / Debian you can get it by installing the gdal-bin package. The program also needs the gdal-data package installed, else it may not work.
Not a requirement, but a convenience are the Python scripts from the terragear-tools GitHub repository (work-in-progress, does not work yet).
Directory structure
To not get confused about which file is what (and also to be able to follow this guide, as it is based on this structure), I recommend using following directory structure (these folders are assumed to be in your $HOME/tg directory, if they are located somewhere else, just substitute ~/tg with that path in all file paths you find on this page):
data/airports/: Put your apt.dat file(s) hereshapefiles_unsliced/: Put the shapefiles you download here.shapefiles/: We will later slice the downloaded shapefiles because you want to only store data that you will be actually using. The result of the slicing goes here.elevation/: elevation data
work/: Output of all TerraGear programsoutput/: Ready to use FlightGear scenery - after you generated your scenery, add this folder to the list of additional scenery folders in the Addons tab of the FGLauncher.
This guide also assumes that you have the directory containing the TerraGear executables listed in your PATH environment variables so that the TerraGear programs can be called like this
~$ gdalchop [arguments]
instead of
~$ /path/to/some/directory/containing/terragear/executables/gdalchop [arguments]
Getting the data
To produce scenery usable by FlightGear, TerraGear needs some data like elevation (how far above (or below !) the sea a certain point of the terrain is), land-use (what a certain area is used for, for example forests, meadows, fields, towns, etc.), landmass (the borders of an island or a continent), and others. Additionally, if you have any airports in the area you want to build with TerraGear, you will need their apt.dat files (they contain information about runways, taxiways and parking's for every airport). For each data type there are many sources, but I am not going to list them all here, only one or two per data type.
Please note that all data that is downloaded as a ZIP archive has to be uncompressed before used.
Additionally to the data listed below, you also need the coordinates of the upper-left and lower-right corner of a rectangle your region of interest fits into. For this guide, the region of interest will be Germany, and the coordinates are defined as below:

- Upper left corner: E 5° N 55°
- Lower right corner: E 16° N 47°
Elevation data
Details
Elevation data is called DEM (Digital Elevation Model). They exist in multiple resolutions, but the highest one should always be preferred:
- 1-arc-second: High resolution data, the spacing between data points is about 30 meters.
- 3-arc-second: Low resolution data, the spacing is about 90 meters.
If you have too slow internet to download high-resolution data for a big area (or too few disk space to store it, or your PC is too slow to process it), use the low resolution. There is also 15-arc-second resolution data, but using this should be out of question because there are 450 meters between the data points.
Sources
The simplest-to-use source is viewfinderpanoramas.org. It provides low-resolution data for the entire world, but high-resolution data is only available for Greenland, Northern Europe and parts of Southern Europe.
If you want to use high resolution data and your region of interest is not covered, you can download it from USGS's EarthExplorer (to download the data, you will need an account though). In the following short tutorial, we are going to download data for Germany:
- First, create an account and / or login.
- Go back to the main page.
- On the left side, there is a series of tabs, where you can enter which data you want.
- Go into the Search Criteria tab.
- There, switch from US Features to World Features
- You have to select your area of interest, else you will have to choose from about 15000 files.
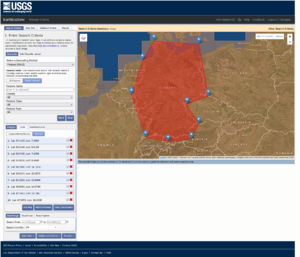
- Inside the Search Criteria tab, there are three tabs for selection of an area. We are going to use the Polygon tab
- To select an area, simply click on the map to create a polygon that roughly encloses Germany. Result should look about like this:
- Then, go into the Data Sets tab.
- In this tab, you have a tree view containing the different datasets. Expand the Digital Elevation item.
- Several items appear. The last one is SRTM. Expand that.
- Tick the box for the first dataset 1 Arc-Second Global.
- Now go to the Results tab. All datasets that contain data for the selected region are shown. Add all datasets you need (for Germany, if you selected what I selected, all that are displayed) to bulk download. This is done by clicking on the second-last button of each dataset. To unselect one, click again.
- Now click on the Item Basket button in the navigation bar. There you can start an download order. To actually download the selected datasets, you have to download the Bulk Download Application. If you don't want to, you have download all the datasets one by one using the third-last button of a dataset. Each dataset can be downloaded in three different formats: BIL, DTED and GeoTIFF. I recommend trying GeoTIFF first because it is supported in many applications, but TerraGear may fail on that. In that case, use the BIL format.
- Download all datasets to a directory. In the end, you have a directory containing multiple ZIP archives, each of them contains the BIL file and his auxiliary files for a 1 latitude x 1 longitude area.

Landmass
Details
Landmass data describes the outline of the land you can walk and drive on - it is actually derived from the coastlines.
Sources
The number one source is OSMdata. Download the unsplitted WSG84 data. Sadly you can only download it for the whole world and not for single countries; at the time of writing, the ZIP has a size of ~730 MB.
Landuse, roads, railways, streams, lakes
Details
Landuse data defines what a certain area is: a forest, a lake, a field, a town, a road, …
Sources
For Europe, CORINE is the best source; for the rest of the world, use OSM data. For this guide I decided to only use OSM data, as it is easier to handle, I think, and also, because I want this guide to be applicable for the whole world, and CORINE data is only present for Europe. But if you want to try CORINE, read the extra article on that. OSM data can be downloaded for example from the Geofabrik Download Server. Go to the continent your region of interest is on (for this guide, Germany, so choose Europe). On the Europe site go to Germany. Sadly, for countries that have sub-regions (Germany counts under these), you have to download the sub-regions one at a time. Please download the .shp.gz file for each region / subregion. Then, unzip the gz file and put every shapefile and it's auxiliary files into a separate subdirectory of data/shapefiles_unsliced ! We will later merge the data files into one for easier use. After you downloaded and unpacked all landuse shapefiles for Germany, your data/shapefiles_unsliced should have a structure like this:
osm_buildings_a/berlin/osm_buildings_a.dbfosm_buildings_a.prjosm_buildings_a.shposm_buildings_a.shx
brandenburg/osm_buildings_a.dbfosm_buildings_a.prjosm_buildings_a.shposm_buildings_a.shx
.../
osm_landuse_a/berlin/osm_landuse_a.dbf...
.../
.../
apt.dat file(s)
Details
apt.dat files tell TerraGear how to create your airport : where the runways are, how long they are, position and shape of taxiways, position and orientation of parkings, and so on. They also tell TerraGear which material a runway or taxiway is made of: Concrete, dirt, ice, asphalt, gravel, grass ... A grass runway looks different than a asphalt runway in reality, and also in FlightGear, which we are building the scenery for.
Sources
If you have created your own airport(s), for example with the XPlane WorldEditor (often shortened to WED), use the Export to apt.dat option in the File menu of WED to get an apt.dat file. The same applies if you modified an existing airport (or multiple). If you just want to build the terrain with the airports as they are already present in FlightGear, simply use the $FG_ROOT/apt.dat.gz file (IMPORTANT: UNCOMPRESS BEFORE USING IT WITH TERRAGEAR !!!).
When you have together all the data described above, you can
Prepare the data for TerraGear
We now have to prepare the data for TerraGear, because TerraGear cannot read GeoTIFF or BIL elevation files, nor OSM shapefiles.
Elevation data
First of all, we need to prepare the elevation data, because the other data depends on this. We use TerraGear's gdalchop command for that. The command can be run on a whole folder of elevation data files (.tif, .bil or .hgt):
~/tg$ gdalchop work/elevation data/elevation; done
For a single file, it would be for example:
~/tg$gdalchop work/elevation data/elevation/n51_e010_1arc_v3.bil
But if you have multiple elevation files which you are going to use together in your scenery, you should process the whole folder at once.[1]
Replace .bil with .tif or .hgt, depending on which format you downloaded.
After that, we have to run terrafit:
~/tg$ terrafit -e 5 -x 20000 work/elevation
You may want to change the -e and -x arguments:
-especifies how much deviation from the data is allowed; the lower this number is, the exacter the resulting terrain is in comparison to the real terrain, but if you specify a lower value, you also need more vertices.-xspecifies how much vertices on one scenery tile is allowed. The higher this number is, the lower the elevation errors are in the end; but the more vertices you have in a tile, the more disk space it needs; also, more vertices can have quite a big effect on the frame rates in FlightGear.
The values here are the same as the ones used for building the TerraSync 2.0 scenery; if you allow bigger errors, you will have more differences between the TerraSync terrain and the terrain you built.
Landmass data
Make a slice with the coordinates of your region of interest because we don't want to build the whole world:
~/tg$ ogr2ogr -clipsrc 5 55 16 47 data/shapefiles/osm_landmass/osm_landmass.shp data/shapefiles_unsliced/osm_landmass/osm_landmass.shp
Decode the landmass into TerraGear readable files:
~/tg$ ogr-decode --area-type Default work/Default data/shapefiles/osm_landmass/osm_landmass
References