This article is meant to be a collection of self-contained code snippets for doing Nasal/Canvas coding without having to spend too much time working through APIs, documentation and existing code - the idea is to provide snippets that contain comments and explicit assumptions, so that these snippets can be easily adapted by people without necessarily having to be very familiar with Nasal/Canvas coding.
In the long term, we're hoping to grow a library of useful code snippets to cover most use-cases, while also covering more complex scenarios, e.g. using Canvas-specific helper frameworks like Canvas MapStructure, the NavDisplay or the recent CDU work.
Canvas itself is designed to be front-end agnostic, meaning that it doesn't matter where a Canvas is used/displayed - this is accomplished by so called "placements", which determine where a Canvas texture is shown. Thus, the back-end logic can remain the same usually, so that GUI dialogs may show avionics, but also so that avionics may show GUI widgets, which also applies to HUDs, liveries and even placements within the FlightGear scenery.
We encourage people to use the snippets listed below to get started with Nasal/Canvas coding, but also to provide feedback on extending/improving this article to make it even more accessible and useful. Equally, if you're aware of any Canvas-related efforts that may contain useful code snippets, please do feel free to add those snippets here. Even people who don't have any interest in coding itself are encouraged to get involved by helping test the snippets listed below, for which you only need to the Nasal Console, and while you're at it, please also help provide/update screen shots for each code snippet.
Contributions added to this article should ideally satisfy some requirements:
- be entirely self-contained
- contain good/clear comments
- have pointers/references to related code/use-cases
- make assumptions explicit
- contain screen shots for each example
- avoid overloaded symbol names to ensure that examples can be merged and adapted easily
- dependencies (svg files, images/textures etc) should always be chosen such that snippets always work using $FG_ROOT
- hard-coded assumptions (e.g. texture dimensions in terms of width/height etc) should be encapsulated using variables
| Canvas - the FlightGear 2D drawing API |
|
|
|
|
|
|
| RFC |
|
|
|
|
| Frameworks |
|
|
|
|
| Tutorials |
|
|
|
|
| Reference |
|
|
|
|
| Related |
|
|
|
|
| To be ported |
|
|
|
|
| Deprecated by Canvas |
|
|
| (click on headings to toggle) |
|
Creating a standalone Canvas
| Screenshot |
Code
|
| Upload requested |
var (width, height) = (512,512);
# Create a standalone Canvas (not attached to any GUI dialog/aircraft etc)
var myCanvas = canvas.new({
  "name": "Livery Test",   # The name is optional but allow for easier identification
  "size": [width, height], # Size of the underlying texture (should be a power of 2, required) [Resolution]
  "view": [width, height],  # Virtual resolution (Defines the coordinate system of the canvas [Dimensions]
                        # which will be stretched the size of the texture, required)
  "mipmapping": 1       # Enable mipmapping (optional)
});

# set background color
myCanvas.set("background", canvas.style.getColor("bg_color"));

# creating the top-level/root group which will contain all other elements/group
var root = myCanvas.createGroup();

# OPTIONAL: Create a Canvas dialog window to hold the canvas and show that it's working
# the Canvas is now standalone, i.e. continues to live once the dialog is closed!
var window = canvas.Window.new([width,height],"dialog");
window.setCanvas(myCanvas); |
Accessing the Canvas Desktop
Sometimes you may want to render to the main screen, without creating a separate Canvas window - this can be accomplished by using the Canvas desktop, note that the following example is fully self-contained, i.e. does not require any code to be added to work:
| Screenshot |
Code
|
| Upload requested |
var myNode = canvas.getDesktop().createChild("text")
      .setText("Hello Canvas Desktop")
      .setFontSize(25, 1.0)          # font size (in texels) and font aspect ratio
      .setColor(1,0,0,1)             # red, fully opaque
      .setAlignment("center-center") # how the text is aligned to where you place it
.setTranslation(160, 80); # where to place the text |
Creating Tooltips
Creating a Canvas GUI Window
| Screenshot |
Code
|
|
| Note This example uses so called method chaining, if you're not familiar with the concept, please see: Method Chaining.
|
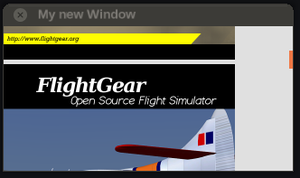
var (width,height) = (320,160);
var title = 'My new Window';

# create a new window, dimensions are WIDTH x HEIGHT, using the dialog decoration (i.e. titlebar)
var window = canvas.Window.new([width,height],"dialog")
 .set('title',title);


##
# the del() function is the destructor of the Window
# which will be called upon termination (dialog closing)
# you can use this to do resource management (clean up timers, listeners or background threads)
#window.del = func()
#{
#  print("Cleaning up window:",title,"\n");
# explanation for the call() technique at: http://wiki.flightgear.org/Object_oriented_programming_in_Nasal#Making_safer_base-class_calls
#  call(canvas.Window.del, [], me);
#};

# adding a canvas to the new window and setting up background colors/transparency
var myCanvas = window.createCanvas().set("background", canvas.style.getColor("bg_color"));

# Using specific css colors would also be possible:
# myCanvas.set("background", "#ffaac0");

# creating the top-level/root group which will contain all other elements/group
var root = myCanvas.createGroup(); |
Adding Raster Images
| Screenshot |
Code
|
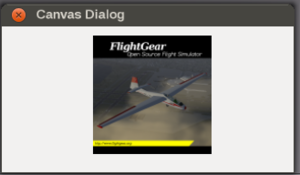 Canvas snippet demonstrating how to load a raster image |
# path is relative to $FG_ROOT (base package)
var path = "Textures/Splash1.png";
# create an image child for the texture
var child = root.createChild("image")
    .setFile(path)
    .setTranslation(100, 10)
.setSize(130, 130); |
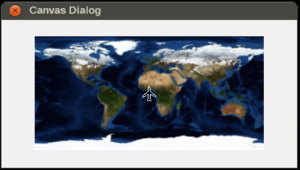
Adding Raster Images downloaded on demand
The path could also just as well be a URL, i.e. a raster image retrieved via http - for example, the following snippet is entirely self-contained and can be pasted into the Nasal Console and directly executed "as is":
| Screenshot |
Code
|
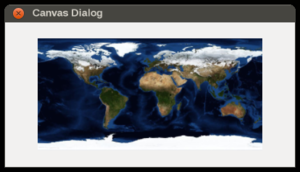 screen shot demonstrating how Nasal and Canvas can be used to display raster images downloaded on demand |
# create a new window, dimensions are 400 x 200, using the dialog decoration (i.e. titlebar)
var window = canvas.Window.new([400,200],"dialog");

# adding a canvas to the new window and setting up background colors/transparency
var myCanvas = window.createCanvas().set("background", canvas.style.getColor("bg_color"));

# Using specific css colors would also be possible:
# myCanvas.set("background", "#ffaac0");

# creating the top-level/root group which will contain all other elements/group
var root = myCanvas.createGroup();


# path now a URL
var url = "http://www.worldwidetelescope.org/docs/Images/MapOfEarth.jpg";

# create an image child for the texture
var child=root.createChild("image")
    .setFile( url )
    .setTranslation(45,22) # centered, in relation to dialog coordinates
.setSize(310,155); # image dimensions |
Clipping
Note

|
Scaling or any other type of transformation or changing the coordinates of individual points is definitely more efficient than clipping (which requires to change the OpenGL clip planes for every rendered object with a different clipping rectangle).
|

|
|
I would suggest to refer to api.nas and look for "clip" and/or "rect" - IIRC, you need to set up a clipping rectangle by setting some kind of "clip" property and setting it to a rect value in the form of rect(...)
| Screenshot |
Code
|
|
# create a new window, dimensions are 400 x 200, using the dialog decoration (i.e. titlebar)
var window = canvas.Window.new([400,200],"dialog");

# adding a canvas to the new window and setting up background colors/transparency
var myCanvas = window.createCanvas().set("background", canvas.style.getColor("bg_color"));

# Using specific css colors would also be possible:
# myCanvas.set("background", "#ffaac0");

# creating the top-level/root group which will contain all other elements/group
var root = myCanvas.createGroup();

# create an image child for the texture
var child=root.createChild(".........")
    .setFile( url )
    .setTranslation(45,22) # centered, in relation to dialog coordinates
.setSize(310,155); # image dimensions |
Adding OpenVG Paths
| Screenshot |
Code
|
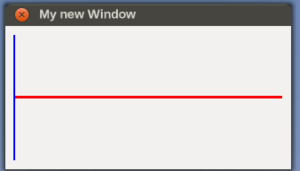 screen shot showing a simple Canvas GUI dialog demonstrating how to use OpenVG-path drawing via Nasal and Canvas |
| Note This assumes that you already have a top-level root group set up, and named it root.
|
var graph = root.createChild("group");

var x_axis = graph.createChild("path", "x-axis")
.moveTo(10, height/2)
.lineTo(width-10, height/2)
.setColor(1,0,0)
.setStrokeLineWidth(3);

var y_axis = graph.createChild("path", "y-axis")
.moveTo(10, 10)
.lineTo(10, height-10)
.setColor(0,0,1)
.setStrokeLineWidth(2); |
| Screenshot |
Code
|
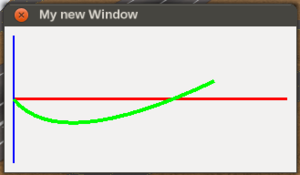 screen shot showing a simple Canvas GUI dialog demonstrating how to use OpenVG-path drawing via Nasal and Canvas (Canvas/OpenVG quadTo API for drawing curves) |
| Note This assumes that you are appending this to the snippet shown above.
|
var points = [	60,height-20,
		230,height-100,
		];

var track = graph.createChild("path", "track")
.moveTo(10, height/2)
.quadTo( points )
.setColor(0,1,0)
.setStrokeLineWidth(4); |
| Screenshot |
Code
|
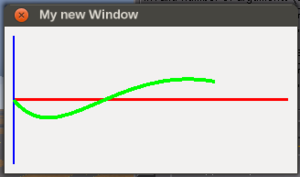 screen shot showing a simple Canvas GUI dialog demonstrating how to use OpenVG-path drawing via Nasal and Canvas (Canvas/OpenVG cubicTo API for drawing curves) |
| Note This assumes that you are appending this to the snippet shown above.
|
var points = [	60,height-20,
		120,height-120,
		230,height-100,
		];

var track = graph.createChild("path", "track")
.moveTo(10, height/2)
.cubicTo( points )
.setColor(0,1,0)
.setStrokeLineWidth(4); |
Adding Vector Images
| Screenshot |
Code
|
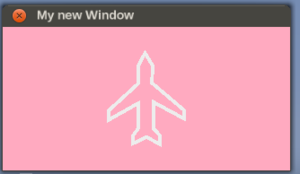 screen shot demonstrating how the scripted Nasal-based SVG parser can be used to dynamically turn SVG files into OpenVG instructions understood by Canvas |
| Note This assumes that you already have a top-level root group set up, and named it root.
|
# change the background color
myCanvas.set("background", "#ffaac0");

# creating the top-level/root group which will contain all other elements/group
var root = myCanvas.createGroup();

var filename = "/Nasal/canvas/map/Images/boeingAirplane.svg";
var svg_symbol = root.createChild('group');
canvas.parsesvg(svg_symbol, filename);

svg_symbol.setTranslation(width/2,height/2);

#svg_symbol.setScale(0.2);
#svg_symbol.setRotation(radians) |
Using the SymbolCache
Whenever a symbol may need to be shown/instanced multiple times (possibly using different styling), it makes sense to use caching - otherwise, identical symbols would be treated as separate OpenVG groups, all of which would need to be rasterized/rendedered separately (i.e. 100 identical symbols would be updated/rendered one by one).
Typically, a map may display multiple instances of an otherwise identical symbol (think VOR, NDB, DME etc) - equally, a multiplayer map may showing multiple aircraft symbols at the same time. In these cases, it makes sense to use the SymbolCache framework, which will render symbols into a separate Canvas texture and provide a texture map that can be treated as a lookup map, which even supports styling for otherwise identical symbols. To learn more, please refer to SymbolCache
...
| Screenshot |
Code
|
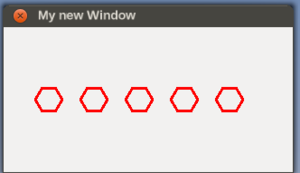 Screen shot showing a Canvas based GUI dialog that is using the SymbolCache for instancing multiple symbols (including support for styling) |
##
# this is the function that draws a symbol using OpenVG paths
# it accepts a group to draw to and returns the rendered group
# to the caller
var drawVOR = func(group) {
    return group.createChild("path")
        .moveTo(-15,0)
        .lineTo(-7.5,12.5)
        .lineTo(7.5,12.5)
        .lineTo(15,0)
        .lineTo(7.5,-12.5)
        .lineTo(-7.5,-12.5)
        .close()
        .setStrokeLineWidth(line_width) # style-able
        .setColor(color); # style-able
};

var style = { # styling related attributes (as per the draw* function above)
    line_width: 3,
    scale_factor: 1,
    color: [1,0,0],
};

# create a new cache entry for the styled symbol
var myCachedSymbol = canvas.StyleableCacheable.new(
    name:'myVOR', draw_func: drawVOR,
    cache: canvas.SymbolCache32x32, # the cache to be used
    draw_mode: canvas.SymbolCache.DRAW_CENTERED,
    relevant_keys: ['line_width', 'color'], # styling related attributes
);

var target = root.createChild('group');

var x=0;
var y=height/2;

var xoffset=50;

# render 5 instanced symbols using the style specified above
for (var i=0;i<5;i+=1) {
# look up the raster image for the symbol
# render it using the passed style and adjust scaling
var instanced = myCachedSymbol.render(target, style)
  .setScale(style.scale_factor)
  .setTranslation(x+=xoffset,y);
} |
The example shown above uses a fixed symbol/icon cache that is set up while booting Flightgear - sometimes, we may need cache for different purposes. So, let's assume, we need a new/custom cache with a different resolution for each entry in the cache (e.g. 256x256), we can easily accomplish that by setting up a new cache like this:
var mySymbolCache256x256 = canvas.SymbolCache.new(1024,256);
Adding Text Elements
| Screenshot |
Code
|
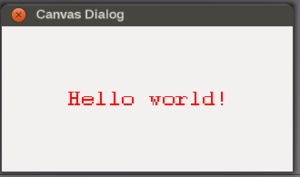 Screen shot showing the CanvasText example contributed by Necolatis |
| Note This assumes that you already have a top-level root group set up, and named it root.
|
var myText = root.createChild("text")
      .setText("Hello world!")
      .setFontSize(20, 0.9)          # font size (in texels) and font aspect ratio
      .setColor(1,0,0,1)             # red, fully opaque
      .setAlignment("center-center") # how the text is aligned to where you place it
.setTranslation(160, 80); # where to place the text |
Adding GUI Labels
| Screenshot |
Code
|
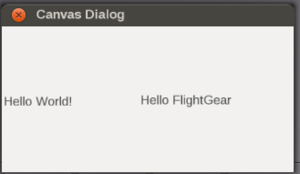 Canvas demo: Layouts and Labels (by Necolatis) |
| Note This assumes that you already have a top-level root group set up, and named it root, just change this variable if you want it to be rendered elsewhere.
|
# create a new layout
var myLayout = canvas.HBoxLayout.new();
# assign it to the Canvas
myCanvas.setLayout(myLayout);

var label = canvas.gui.widgets.Label.new(root, canvas.style, {wordWrap: 0}); # wordwrap: 0 will disable wordwrapping, to enable it use 1 instead
label.setText("Hello World!");
myLayout.addItem(label);

var label2 = canvas.gui.widgets.Label.new(root, canvas.style, {wordWrap: 0}); # wordwrap: 0 will disable wordwrapping, to enable it use 1 instead
label2.setText("Hello FlightGear");
myLayout.addItem(label2); |
Adding GUI Buttons (Layouts)
| Screenshot |
Code
|
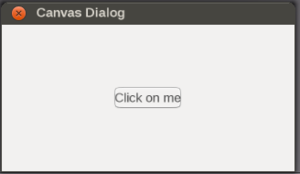 Canvas snippet: buttons and layouts (by Necolatis) |
| Note This assumes that you already have a top-level root group set up, and named it root, just change this variable if you want it to be rendered elsewhere.
|
# create a new layout
var myLayout = canvas.HBoxLayout.new();
# assign it to the Canvas
myCanvas.setLayout(myLayout);

# click button

var button = canvas.gui.widgets.Button.new(root, canvas.style, {})
	.setText("Click on me")
	.setFixedSize(75, 25);

button.listen("clicked", func {
        # add code here to react on click on button.
print("Button clicked !");
});

myLayout.addItem(button); |
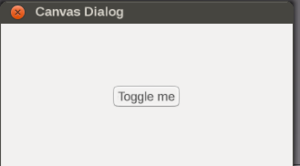 Canvas toggle button demo by Necolatis |
# create a new layout
var myLayout = canvas.HBoxLayout.new();
# assign it to the Canvas
myCanvas.setLayout(myLayout);

var button = canvas.gui.widgets.Button.new(root, canvas.style, {})
        .setText("Toggle me")
        .setCheckable(1) # this indicates that is should be a toggle button
        .setChecked(0) # depressed by default
        .setFixedSize(75, 25);

button.listen("toggled", func (e) {
        if( e.detail.checked ) {
            # add code here to react on button being depressed.
        } else {
            # add code here to react on button not being depressed.
        }
    });


myLayout.addItem(button); |
Canvas Input Dialog
| Screenshot |
Code
|
|
|
# create a new InputDialog with a title, label, and a callback
canvas.InputDialog.getText("Input Dialog Title", "Please enter some text", func(btn,value) {
    if (value) gui.popupTip("You entered: "~value);
}); |
Canvas ScrollArea
| Screenshot |
Code
|
 Screen shot showing a Canvas ScrollArea populated with different splash screens, loaded from $FG_ROOT/Textures |
var vbox = canvas.VBoxLayout.new();
myCanvas.setLayout(vbox);

 var scroll = canvas.gui.widgets.ScrollArea.new(root, canvas.style, {size: [96, 128]}).move(20, 100);
 vbox.addItem(scroll, 1);

var scrollContent =
      scroll.getContent()
            .set("font", "LiberationFonts/LiberationSans-Bold.ttf")
            .set("character-size", 16)
            .set("alignment", "left-center");

var list = canvas.VBoxLayout.new();
scroll.setLayout(list);

for (var i=1;i<=5;i+=1) {
var label = canvas.gui.widgets.Label.new(scrollContent, canvas.style, {wordWrap: 0});
label.setImage("Textures/Splash"~i~".png");
label.setFixedSize(256,256);
list.addItem(label);
} |
Using TabWidgets
| Screenshot
|
Code
|
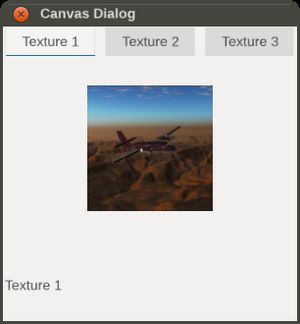 Canvas TabWidget example showing the three default splash screens |
var window = canvas.Window.new([300, 300], "dialog");
var myCanvas = window.createCanvas().set("background", canvas.style.getColor("bg_color"));
var root = myCanvas.createGroup();
var vbox = canvas.VBoxLayout.new();
myCanvas.setLayout(vbox);

var tabs = canvas.gui.widgets.TabWidget.new(root, canvas.style, {});
var tabsContent = tabs.getContent();
vbox.addItem(tabs);

var tab1 = canvas.VBoxLayout.new();
var image1 = canvas.gui.widgets.Label.new(tabsContent, canvas.style, {})
				.setImage("Textures/Splash1.png")
				.setFixedSize(128, 128);
tab1.addItem(image1);
var text1 = canvas.gui.widgets.Label.new(tabsContent, canvas.style, {})
				.setText("Texture 1");
tab1.addItem(text1);
tabs.addTab("tab1", "Texture 1", tab1);

var tab2 = canvas.VBoxLayout.new();
var image2 = canvas.gui.widgets.Label.new(tabsContent, canvas.style, {})
				.setImage("Textures/Splash2.png")
				.setFixedSize(128, 128);
tab2.addItem(image2);
var text2 = canvas.gui.widgets.Label.new(tabsContent, canvas.style, {})
				.setText("Texture 2");
tab2.addItem(text2);
tabs.addTab("tab2", "Texture 2", tab2);

var tab3 = canvas.VBoxLayout.new();
var image3 = canvas.gui.widgets.Label.new(tabsContent, canvas.style, {})
				.setImage("Textures/Splash3.png")
				.setFixedSize(128, 128);
tab3.addItem(image3);
var text3 = canvas.gui.widgets.Label.new(tabsContent, canvas.style, {})
				.setText("Texture 3");
tab3.addItem(text3);
tabs.addTab("tab3", "Texture 3", tab3);
|
Using Layouts
Using Styling
Adding a HUD
Adding a 2D Instrument
Adding a 2D Panel
Adding a PFD
Adding a Failure Mgmt Widget
| Note This kind of widget will typically be useful for dialogs requiring a method for managing aircraft specific system failures (e.g. an instructor console).
|
Adding a MapStructure map to a Canvas
| Screenshot |
Code
|
|
|
| Note This assumes that you already have a top-level root group set up, and named it root, just change this variable if you want it to be rendered elsewhere. Equally, this snippet assumes that your canvas is named myCanvas.
|
var TestMap = root.createChild("map");
TestMap.setController("Aircraft position");
TestMap.setRange(25);

TestMap.setTranslation(    myCanvas.get("view[0]")/2,
                           myCanvas.get("view[1]")/2
                        );
var r = func(name,vis=1,zindex=nil) return caller(0)[0];

# APT and VOR are the layer names
foreach(var type; [r('APT'), r('VOR') ] )
TestMap.addLayer(factory: canvas.SymbolLayer, type_arg: type.name, visible: type.vis, priority: type.zindex,); |
Customizing MapStructure Styling
In general MapStructure symbols contain their own styles using hard-coded defaults, however these can be overridden by providing a hash with keys (fields) to customize these hard-coded defaults.
This means that anything that may be specific to a single style (colors, fonts, images etc) should be encoded in the form of variables that are looked up using the styles hash - this provides a great deal of freedom to customize an existing symbol. In addition, MapStructure layers can be set up to even customize/override the default drawing routines, at which point you are free to do whatever you want basically, because the existing draw routine in .symbol file is ignored
 |
Work in progress
This article or section will be worked on in the upcoming hours or days.
See history for the latest developments.
|
| Screenshot |
Code
|
 MapStructure layers shown in a Canvas GUI dialog. Active VOR and radial in red color, inactive VOR in green color |
| Note This assumes that you already have a top-level root group set up, and named it root, just change this variable if you want it to be rendered elsewhere. Equally, this snippet assumes that your canvas is named myCanvas.
|
var TestMap = root.createChild("map");
TestMap.setController("Aircraft position");
TestMap.setRange(25);

TestMap.setTranslation(    myCanvas.get("view[0]")/2,
                           myCanvas.get("view[1]")/2
                        );
var r = func(name,vis=1,zindex=nil) return caller(0)[0];
var type = r('APT');
# a hash that contains variables that are supported by the relevant_keys vector in APT.symbol
var style_apt = {
    scale_factor:0.5, # 50 %
    color_default:[0,1,0.9], # rgb
    line_width:4, # thickness
    label_font_color:[0,1,0.9], # rgb
    label_font_size:30 # font size
};
TestMap.addLayer(factory: canvas.SymbolLayer, type_arg: type.name, visible: type.vis, priority: type.zindex,style:style_apt);

var type = r('VOR');
# a hash that contains variables that are supported by the relevant_keys vector in VOR.symbol
var style_vor = {
    scale_factor:0.6,
    active_color:[1,0,0],
    inactive_color:[0,1,0],
    line_width:4
};
TestMap.addLayer(factory: canvas.SymbolLayer, type_arg: type.name, visible: type.vis, priority: type.zindex,style:style_vor);

### See $FG_ROOT/Nasal/canvas/map/APT and $FG_ROOT/Nasal/canvas/map/VOR.sy,bolfor the style variables that can be configured. |
Using MapStructure and Overlays
|
|
Support for overlays using geo-referenced raster images isn't too well-developed currently, so would need to work with a few hard-coded assumptions (e.g. being specific to a certain raster image and map layout) - but maybe TheTom can provide a few more ideas on how to proceed from here - otherwise, the Map is normally not aware of any non-Map items, i.e. as long as the overlay is added "outside" the Map, it isn't even aware of the raster image - and when it is added as a map element, it would probably be rotated. So there's still some work needed here. But generally, this should work well enough even in its current form (the screen shot is purely based on the Canvas Snippets article, i.e. it just displays a Canvas GUI dialog, adds the downloaded raster image and then adds the MapStructure APS layer - without the Map being aware of the overlay/geo-referencing that is needed currently).
|
|
| Screenshot |
Code
|
 Using the MapStructure framework in conjunction with raster images as overlays |
| Note This assumes that you already have a top-level root group set up, and named it root, just change this variable if you want it to be rendered elsewhere. Equally, this snippet assumes that your canvas is named myCanvas.
|
|
A simple tile map
| Screenshot |
Code
|
 A simple, canvas based tile map which is centered around the aircraft. |
var (width,height) = (768,512);
var tile_size = 256;

var window = canvas.Window.new([width, height],"dialog").set('title', "Tile map demo");
var g = window.getCanvas(1).createGroup();

# Simple user interface (Buttons for zoom and label for displaying it)
var zoom = 10;
var type = "intl";

var ui_root = window.getCanvas().createGroup();
var vbox = canvas.VBoxLayout.new();
window.setLayout(vbox);


var button_in = canvas.gui.widgets.Button.new(ui_root, canvas.style, {}).setText("+").listen("clicked", func changeZoom(1));
var button_out = canvas.gui.widgets.Button.new(ui_root, canvas.style, {}).setText("-").listen("clicked", func changeZoom(-1));
button_in.setSizeHint([32, 32]);
button_out.setSizeHint([32, 32]);

var label_zoom = canvas.gui.widgets.Label.new(ui_root, canvas.style, {});

var button_box = canvas.HBoxLayout.new();
button_box.addItem(button_in);
button_box.addItem(label_zoom);
button_box.addItem(button_out);
button_box.addStretch(1);

vbox.addItem(button_box);
vbox.addStretch(1);

var changeZoom = func(d)
{
  zoom = math.max(2, math.min(19, zoom + d));
  label_zoom.setText("Zoom " ~ zoom);
  updateTiles();
}

# http://polymaps.org/docs/
# https://github.com/simplegeo/polymaps
# https://github.com/Leaflet/Leaflet

var maps_base = getprop("/sim/fg-home") ~ '/cache/maps';

# http://otile1.mqcdn.com/tiles/1.0.0/map
# http://otile1.mqcdn.com/tiles/1.0.0/sat
# (also see http://wiki.openstreetmap.org/wiki/Tile_usage_policy)
var makeUrl =
string.compileTemplate('https://maps.wikimedia.org/osm-{type}/{z}/{x}/{y}.png');
  #https://maps.wikimedia.org/osm-intl/${z}/${x}/${y}.png
  var makePath =
  string.compileTemplate(maps_base ~ '/osm-{type}/{z}/{x}/{y}.png');
  var num_tiles = [4, 3];

  var center_tile_offset = [
  (num_tiles[0] - 1) / 2,
  (num_tiles[1] - 1) / 2
  ];

# simple aircraft icon at current position/center of the map
g.createChild("path")
.moveTo( tile_size * center_tile_offset[0] - 10,
  tile_size * center_tile_offset[1] )
.horiz(20)
.move(-10,-10)
.vert(20)
.set("stroke", "red")
.set("stroke-width", 2)
.set("z-index", 1);

##
# initialize the map by setting up
# a grid of raster images

var tiles = setsize([], num_tiles[0]);
for(var x = 0; x < num_tiles[0]; x += 1)
{
  tiles[x] = setsize([], num_tiles[1]);
  for(var y = 0; y < num_tiles[1]; y += 1)
  tiles[x][y] = g.createChild("image", "map-tile");
}

var last_tile = [-1,-1];
var last_type = type;

##
# this is the callback that will be regularly called by the timer
# to update the map
var updateTiles = func()
{
  # get current position
  var lat = getprop('/position/latitude-deg');
  var lon = getprop('/position/longitude-deg');

  var n = math.pow(2, zoom);
  var offset = [
  n * ((lon + 180) / 360) - center_tile_offset[0],
  (1 - math.ln(math.tan(lat * math.pi/180) + 1 / math.cos(lat * math.pi/180)) / math.pi) / 2 * n - center_tile_offset[1]
  ];
  var tile_index = [int(offset[0]), int(offset[1])];

  var ox = tile_index[0] - offset[0];
  var oy = tile_index[1] - offset[1];

  for(var x = 0; x < num_tiles[0]; x += 1)
  for(var y = 0; y < num_tiles[1]; y += 1)
  tiles[x][y].setTranslation(int((ox + x) * tile_size + 0.5), int((oy + y) * tile_size + 0.5));

  if(    tile_index[0] != last_tile[0]
    or tile_index[1] != last_tile[1]
    or type != last_type )
  {
    for(var x = 0; x < num_tiles[0]; x += 1)
    for(var y = 0; y < num_tiles[1]; y += 1)
    {
      var pos = {
        z: zoom,
        x: int(offset[0] + x),
        y: int(offset[1] + y),
        type: type
      };

      (func {
        var img_path = makePath(pos);
        var tile = tiles[x][y];

        if( io.stat(img_path) == nil )
        { # image not found, save in $FG_HOME
          var img_url = makeUrl(pos);
          print('requesting ' ~ img_url);
          http.save(img_url, img_path)
          .done(func {print('received image ' ~ img_path); tile.set("src", img_path);})
          .fail(func (r) print('Failed to get image ' ~ img_path ~ ' ' ~ r.status ~ ': ' ~ r.reason));
        }
        else # cached image found, reusing
        {
          print('loading ' ~ img_path);
          tile.set("src", img_path)
        }
        })();
      }

      last_tile = tile_index;
      last_type = type;
    }
  };

##
# set up a timer that will invoke updateTiles at 2-second intervals
var update_timer = maketimer(2, updateTiles);
# actually start the timer
update_timer.start();

##
# set up default zoom level
changeZoom(0);


###
# The following lines were recently added and have not yet been tested
# (if in doubt, remove them)
window.del = func()
{
  print("Cleaning up window:", ,"\n");
  update_timer.stop();
# explanation for the call() technique at: http://wiki.flightgear.org/Object_oriented_programming_in_Nasal#Making_safer_base-class_calls
call(canvas.Window.del, [], me);
}; |
Adding a NavDisplay
Adding a CDU
Adding a Multi-Function Display (MFD)


