FlightGear Admin Wizard: Difference between revisions
Jump to navigation
Jump to search
m (sorry, very little mistake (thumg > thumb)) |
No edit summary |
||
| Line 13: | Line 13: | ||
# Close the wizard with the Quit button. | # Close the wizard with the Quit button. | ||
# You could remove the file you've downloaded from FlightGear.org after you made a test fly above the scenery you just installed. | # You could remove the file you've downloaded from FlightGear.org after you made a test fly above the scenery you just installed. | ||
[[Category:Software]] | |||
Revision as of 14:46, 6 October 2008
See FlightGear Wizard for the main article about the Wizard.
With the FlightGear Admin Wizard (FGAdmin) is it possible to install new scenery on a simple and quick way.
Manual
- Download a scenery chunk from FGFS Scenery Downloads and place it somewhere on your computer where you could find it back (your desktop?).
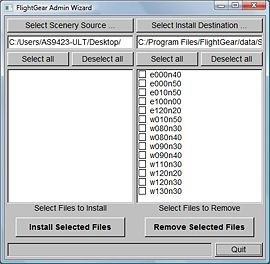
- Open FGAdmin (on Windows you'll find it at FlightGear/bin/win32) and you'll see a window like you see on the pic right of this text.
- Click Select Scenery Source to select the folder where you've stored your scenery chunk. Tick the box in front of your scenery file.
- Press Select Install Destination and select the FlightGear scenery folder (usually FlightGear/data/scenery/terrain).
- Now press Install Selected Files to install the scenery. You see the progress in the bar below the button.
- Close the wizard with the Quit button.
- You could remove the file you've downloaded from FlightGear.org after you made a test fly above the scenery you just installed.
