TerraGear GUI
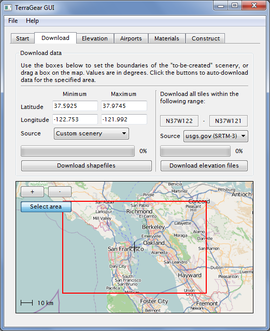
 The download page with the San Francisco bay area selected. | |
| Developed by | Gijs de Rooy (original by Alex Park) |
|---|---|
| Initial release |
March 24, 2009 (original) March 27, 2010 |
| Latest release | 0.9.20 (2015) |
| Written in | C++ (Qt) |
| OS | Windows, Linux, Mac OS X |
| Website | |
The GUI tool for TerraGear allows people to create scenery for FlightGear without using commandlines.
Obtaining the GUI
You can either build the GUI from source, or download a pre-compiled build:
Please note that:
- you need to download/compile a recent version of TerraGear as well;
- for Windows users, you'll need to add three DLLs to you TerraGear GUI root directory:
- msvcp71.dll (see TerraGear_Installation_for_Windows to know how to get it)
- mscvr71.dll (see TerraGear_Installation_for_Windows to know how to get it)
- gdal12.dll (this can be retrieved from ftp://ftp.ihg.uni-duisburg.de/FlightGear/Win32/terragear-cs-Win32-20101002.zip )
For GNU/Linux users
- Grab the sources and store it where you want:
git clone git://git.code.sf.net/p/flightgear/fgscenery/terrageargui
- Then go in the source:
cd terrageargui
- Create a build dir:
mkdir build && cd build
- Now build it:
qmake ..
orqmake-qt4 ..
thenmake
- In case of ERRORS You may have to add the following via SYNAPTIC:
- for "/usr/lib/i386-linux-gnu/qt4/bin/uic: Command not found" add: libqt4-dev-bin
- for "QtGui/QApplication: No such file or directory" add: qt4-dev-tools
- In case of ERRORS You may have to add the following via SYNAPTIC:
- You can now start it with:
"./bin/TerraGUI" or "./build/TerraGUI"
You're done!
Using the GUI
The GUI exist of several tabs. For normal scenery creation, all the tabs should be gone through in the order they are arranged.
Start
- Set the TerraGear directory, in which you'll find the subdirectories bin/ and share/. TerraGear must be downloaded/build seperatly from the GUI!
- Set the project's directory. In this directory, all project related stuff will be stored throughout the process. You best choose an empty directory specific to your project.
- Set your FlightGear's root ($FG_ROOT). This is used to retrieve the list of available terrain materials.
Download
Specify boundaries in the boxes on the left, or select an area on the map. Next select a source to download shapefiles for that area. Note that OpenStreetMap only includes line date (roads, rivers), so you'll need some polygon data for the actual terrain. Both Custom Scenery and CORINE (only Europe) provide that. The GUI downloads and unpacks the package to your {project's directory}/data/.
Alternatively you can download shapefiles from the mapserver by hand. Unpack the downloaded file(s) to your {project's directory}/data/.
Elevation data
Elevation files are optional, but of course required to generate scenery with elevation offsets (even flat countries like the Netherlands need elevation data, since no country is completely at sealevel. Simply select a data source and then click the button to download the HGT files that span your specified area. The original source is usgs.gov, but a cleaned variant of the same data is available from fgx.ch (see the readme for more information). The data will be saved in in {project's directory}/data/SRTM-3.
By hand
Downloading tiles by hand is somewhat tricky. If your scenery has a boundary of:
| Min | max | |
|---|---|---|
| Latitude | 33 | 37 |
| Longitude | -2 | 2 |
The GUI would display the range as N33W002-N37E002. This means you have to download all tiles in that range, which are all the tiles as shown in the image on the right. Unpack the downloaded elevation file(s) in {project's directory}/data/SRTM-3.
If you don't know how to find the boundaries range you can use Google Earth with this KMZ file : grid_1_degree.kmz
- Download KMZ file above
- Open it with Google Earth and active it (if not yet active). A lot of red lines should appears
- Zoom where you want know the boundaries range
- Click on the bottom left boundary wanted and report the displayed value in TerraGear GUI. (i.e: if Google Earth value is "W9_N42", report Minimum Latitude value "42" and Minimum Longitude value "-9")
- Click on the top right boundary wanted and report the displayed value in TerraGear GUI. (i.e: if Google Earth value is "E6_N45", report Maximum Latitude value "45" and Maximum Longitude value "6")
Elevation
This will convert the .hgt.zip files (that you have downloaded earlier) into a form that TerraGear can read. Simply select the directory in which you placed the elevation downloads (probably {project's directory}/data/SRTM-3). Make sure you do set the correct resolution! For the USA this can be 1 arcsec, while the rest of the world is provided in 3 arcsec resolution.
Airports
What is scenery without airports in a flight simulator? If your area does not contain any airports, you can skip this part and continue with ogr-decode.
You can do two things now:
- Already-made airports: use FlightGear's apt.dat.gz file, which is usually in $FG ROOT/Airports/.
- Home-made airports: if you created an airport in WorldEditor, use the .dat file that you exported.
Use the button to browse to the .dat file of your choice.
- All airports in area generates all the airports within the boundaries as set on the start tab.
- Single airport to generate the scenery for a specific airport. Enter the ICAO code into the field.
- Single tile only processes airports that are located on the given tileid.
- All airports in apt.dat the tool will run through the entire apt.dat file, which can take a long (!) time when using the default apt.dat from FlightGear.
Materials
Now we need to decode the shapefiles into TerraGear format, which we do with OGR Decode. After clicking the "Retrieve shapefiles" button, the list will be populated with the shapefiles from your project's data directory. The GUI will try to assign fitting materials. If a shapefile has no material, you'll need to assign it by hand. Each single shapefile must have a material.
You can delete shapefiles from the list by double-clicking on them. A single click on a material will allow you to edit it; to create custom materials that are not (yet) in materials.xml (do note that FlightGear will apply the default material to those landclasses, untill you create the material in materials.xml!).
Line width is only used on line-data (like roads, rivers and railroads). If you leave the line width fields empty, a default width of 10 meters is used.
Example
| Shapefile | Material | Line width (in meters) |
|---|---|---|
| osm_canal | Canal | 12 |
| osm_motorway | Road-Motorway | 12 |
| osm_primary | Road-Primary | 10 |
| osm_rail | Railroad | 5 |
| osm_river | Canal | 8 |
| osm_secondary | Road-Secondary | 8 |
| osm_stream | Stream | 3 |
| osm_tertiary | Road-Tertiary | 6 |
| osm_trunk | Road-Trunk | 18 |
Construct
Note: with recent TerraGear builds, it is required to add the used material-names to the default_priorities.txt file.
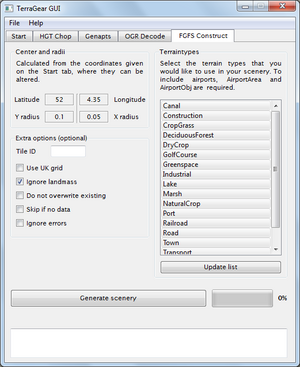
The tg-construct tool brings all your gathered data together, throws it in a washing machine and spits it out the otherside in a format ready for use with FlightGear. Click the "Update list" button to populate the field with all decoded shapefiles. In the list you select all types that you'd like to include in your scenery.
After clicking the "Generate scenery" button, it may take a long time for TerraGear to finish. Depending on the size of the area you are creating the scenery for and the level of detail in your shapefiles. Simple and small sceneries will take a couple of minutes, where larger, more detailed areas can take over an hour! So trying new things on small areas first will save you a lot of time.
Running the scenery
The folders and files in your project's output/ directory are ready to use as scenery. You can set the scenery path of FlightGear to this directory to check if the scenery is generated correctly.
GUI development
The current source code can be retrieved from SourceForge.
Feel free to add feature requests and/or bug reports to this page. Anyone interested in helping is invited to contact Gijs at the forum.
Requested features
Also see TerraGear scenery build server
- Multi-threading, so the GUI doesn't freeze when running a process [1]
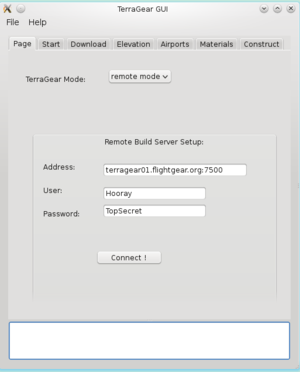
- Support a new "Setup" page where people can decide if TerraGear is installed locally or remotely
 Not done
 - Add a command handler abstraction so that commands can be easily run over SSH [2]
 Not done
 - File retrieval would ideally be wrapped via SFTP
 Not done


