Julia photoscenery generator
 | |
| Developed by | Adriano Bassignana |
|---|---|
| Initial release | 18.04.2021 |
| Latest release | (rolling releases) |
| Written in | julia |
| OS | Windows, GNU/Linux, MacOS |
| Development status | Active |
| Type | Photoscenery generator |
| License | GNU General Public License v2 |
| Website | |

Through the Julia photoscenery generator using ImageMagic and written in the Julia programming language you can create photoscenery tiles.
Once you have everything installed you will discover how easy it is to fill your disk with hundreds of GB made from thousands of images of our planet and then fly over vast territories and recognize our cities and villages.
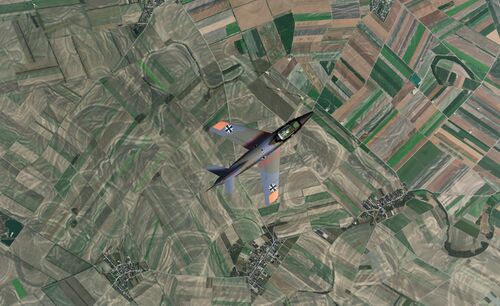
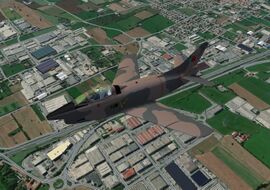
The use of World Scenery by FlightGear together with the photoscenery as a background can make the scene very rich in details and pleasing to your eyes.
Quick method for Windows users
Steps
- 1. Down-Inst Julia Programming Language.
- 2. Down-Inst ImageMagick.
- 3. Down-Inst photoscenary.jl.zip Easy Manual installation. Unzip Photoscenary-main folder, place it where you preferred. Look inside for the file photoscenary.jl and make it executable by Julia, using Right click >> Properties >> Navigate to the bin folder Julia.exe and choose open with Julia Programming Language.
Check
- 4. Open FGlauncher >> Settings >> Additional settings. Add the property: --telnet=5000
- 5. Make sure you have terrasync activated. Automatic download terrain in FGlauncher.
- 6. In FlightGear v2020.3.18 check the following: Start the simulator (one flight) and access the menu: VIEW/RENDERING OPTIONS. In the right column, make sure you have the "SATELLITE PHOTOSCENERY" option activated and close the flight.
Run & Check
- 7. Run the program photoscenary.jl. It will run and check with Julia, will prompt telnet connection attempts at 127.0.0.1:5000.
- 8. Run FG. Fly and check visually that you are getting textures. Give it a time, you'll get better textures progressively during your flight.
- 9. Check in C:\Users\YOUR_USER_NAME\FlightGear\Downloads\TerraSync\Orthophotos. You should see folders of type "e000n00" containing ".dds" files.
- 10. Check that the Julia's window running photoscenary.jl is getting data (tiles).
In case of doubts, the next video at SUMU Montevideo area by Manuel Aceña is recommended as a reference.
Video
Background
The success that photoscenery is achieving among FlightGear users has prompted me to study a program for downloading and installing photoscenery via a simple command to run inside a terminal (if we are in Linux or Mac OS) or in a command prompt (if we are in Windows).
The program was developed in Julia which is a latest generation programming language developed by MIT. This language looks quite similar to Nasal and therefore the code is easily readable by those who already use the FlightGear Nasal language script, but it is extremely faster and full of features that make the creation of this program quick and easy enough to evolve. Obviously the only inconvenience is that Julia has to be installed on your system, but it is a very simple action and equivalent to the same need to install ImageMagick on your system, this latter program allows the conversion of images in DDS format.
Installing the programs
FlightGear
Currently to utilise photoscenery the minimum FlightGear version is 2020.3.18
Julia installation
Julia installation is straightforward, whether using precompiled binaries or compiling from source. Download and install Julia by following the instructions at https://julialang.org/downloads/.
| Windows | 64-bit (installer), 64-bit (portable) | 32-bit (installer), 32-bit (portable) | ||||
|---|---|---|---|---|---|---|
| macOS | 64-bit | |||||
| Generic Linux on x86 | 64-bit (GPG), 64-bit (musl) (GPG) | 32-bit (GPG) | ||||
| Generic Linux on ARM | 64-bit (AArch64) (GPG) | 32-bit (ARMv7-a hard float) (GPG) | ||||
| Generic Linux on PowerPC | 64-bit (little endian) (GPG) | |||||
| Generic FreeBSD on x86 | 64-bit (GPG) | |||||
For Linux users there are no particular problems, each distribution has Julia among the installable programs. The only problem is the version that may be older than 1.6, in this case I recommend wasting a little more time and updating the installation to 1.6, you can follow this handy guide that explains how to do everything in a few minutes.
The version to use is convenient that it is from 1.6 onwards, 1.5.4 is present in the Ubuntu repositories until 2020.10 but it is better to update it to 1.6 even if this requires a little work, But with Ubuntu/Kubuntu version 2021.4 Julia is already at version 1.6.1 and so just use the command:
sudo apt install julia
Julia is a young language that is continuously updated and the difference between Julia 1.5 and 1.6 is really very big for the application startup speed. For the execution there are no particular differences if you use Julia 1.5.4 onwards.
The installation with windows is absolutely the easiest to do, just follow the installer to get a version of Julia 1.6.x All users who have done the installation have never complained of problems.
For Mac users it might be the slightly more complicated thing, but from the users texts made, I haven't had any issues encountered among Mac users.
For Windows users have not encountered any particular problems with the installation, which is always the most up-to-date.
| Caution The program was designed to work in Linux (any distribution), Windows 10 and Mac OS. This is very unlikely to work with CygWin as there have been reports of problems calling Imagemagick. Instead, it works with Windows Subsystem for Linux, which is basically a well-integrated emulator of Linux inside the Windows system. In this case, multithreading may not work well, so I recommend running the program with only one Julia thread via the command: julia -t 1 photoscenary.jl ... Or with the command: julia photoscenary.jl But this approach seems like an unnecessary complication to me as the program works perfectly in Windows 10. |
ImageMagick installation
https://imagemagick.org/index.php
For download program this is the link: https://imagemagick.org/script/download.php
Normally the files that are released by satellite image servers are in PNG format, but the PNG files are absolutely unsuitable to be used as photoscenery files. The reason is that the graphics engine of FlightGear must still convert these files into DDS format which is more compressed than the PNG format (about 4 times). Conversion, for very large files, takes a lot of CPU time, slowing down the execution of FlightGear. Therefore for this program it has been chosen to release only the DDS format and therefore ImageMagick is the most suitable program for this operation.
ImageMagick allows you to convert files transparently to the user very quickly.
In Linux distributions, ImageMagick is often already present, to find out just type the command convert --version and see if something responds. In windows it must be downloaded with an installer that can be downloaded here: https://imagemagick.org/script/download.php#windows
The installation in Windows of ImageMagick could give problems if it has not been correctly carried out. Therefore, if the photoscenary.jl program returns an error due to the lack of ImageMagick (the program always checks at the start) it is convenient to remove ImageMagick through the Windows program management and install it again.
The photoscenary.jl installation
https://github.com/abassign/Photoscenary
The program is written in pure Julia code, there are no scripts that can complicate your life. However, some rules must be followed that simplify all the work.
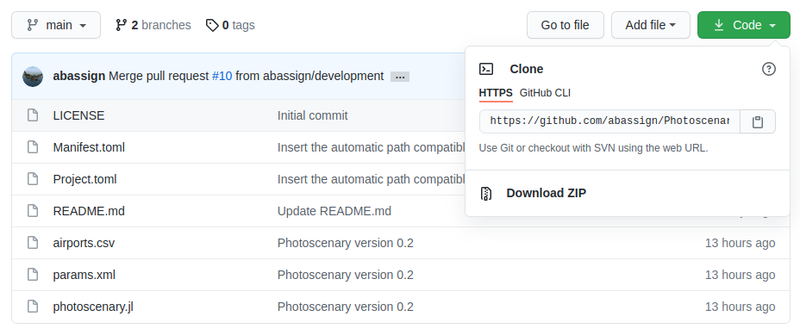
First create a directory where to place the program and its support files. The directory can be placed wherever you want as the program will dynamically build its references. Once the directory (or folder for Mac users) is done, download the Zip file that GitHub generates obtained from this link: https://github.com/abassign/Photoscenary.git
Click on code and it will download the zip file that you can open and insert the contents into the folder you created. In the folder you will find some auxiliary files, but now let's analyze the program files.
photoscenary.jlIt is the Julia program to run, you can open it and see it with a simple text editor, I think some of you who have programmed in Python or NASAL will have no difficulty understanding how it works. However the program is compiled every time you run it, it is this compilation, really efficient and fast, that allows you to obtain an excellent executive performance.params.xmlIt is an XML file that contains some parameters necessary for the correct execution of the program.airports.csvIt is the file, extracted from the correspondent of FlightGear, which contains a list of airports, their coordinates and the extended name. This file is essential in order to use a location option for the area to be downloaded.
Execution of the program
Hello World!
There is a minimal execution that allows you to check if everything we have done has worked correctly, this is a sort of Hello World of the program.
The most important thing is to go to the directory (folder) where you installed the program with a terminal or with a command prompt (if you are in Windows).
So the first thing to do is to be with the terminal inside this directory and run this command:
julia photoscenary.jl
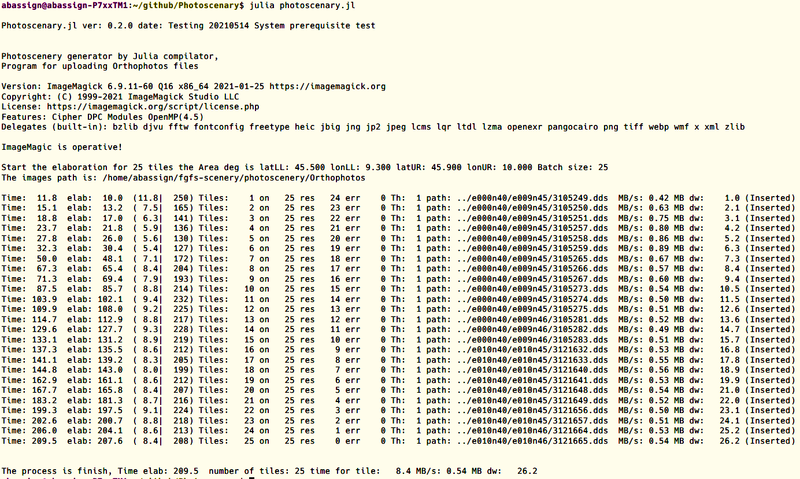
An area of 2048 pixels (long side) tiles with a size of approximately 10x10 NM is generated, with the coordinates of the Orio al Serio Airport (LIME) in the center. Not having entered any other parameters, the processing time is relatively long as only one download per tile is performed.
We carefully observe this execution, the first line shows the name of the program, the version and the date of realization, then follows the indication that the prerequisite test will take place. If we are at the first execution we will see an endless series of compilations that can make us think that something has not gone well, but do not worry, it is simply the module management system that downloads the modules useful for the execution of the program and that are not present in the base system. In this way the Julia program updates the necessary components without having to prompt the user to do it for him.
In this particular case, which occurs only the first time or in a version change, the application communicates that it will terminate the execution and invites the user, once back to the command prompt, to run the same command again, also in this case there could be a lot of updating of the modules that have not been updated in the first cycle, do not worry, everything is going great. At the end of the update, finally, the execution of the code contained in the program takes place.
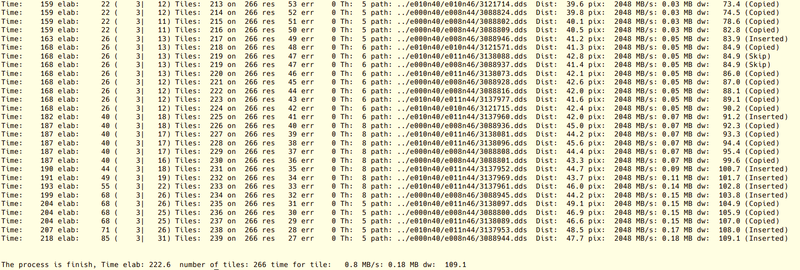
The image above summarizes what happened during the download of the tiles.
Very important to note the line:
ImageMagick is operational!
This line tells us that the system has done a test with ImageMagick installed on its system and has verified that it works correctly. If this does not work, since without ImageMagick the system cannot do anything, you have an exit with a program error (Error code 504).
Description of the individual status lines of the processes performed
We now summarize the content of the individual lines that indicate the modules downloaded and their status:
| Column | Content |
|---|---|
| Time: | Processing time for individual tiles |
| elab: | Total processing time |
|
( ... | ... ) |
The processing time for each tile followed by the estimated time.
These two values allow us to understand the efficiency of the work in progress. |
| Tiles: | Number of tiles that have been processed by the program. |
| on | Total number of tiles to be processed. |
| res | The residual tiles to be processed. |
| Th: | Number of threads used by the process. |
| path: | The path and name of the processed file. |
| MB/s: | Download speed in Mega Bytes on second. |
| MB dw: | Amount of mega bytes downloaded overall. |
| ( ... ) | Type of activity carried out |
Activate the Julia multi thread
Julia is a language created for applications on supercomputers, artificial intelligence, number-crusher, etc.
These are applications that require systems with a lot of CPUs and therefore the compiler has the ability to activate very sophisticated strategies to better manage resources.
The photoscenary.jl program performs many processes in parallel in order to optimize the download and conversion of images. The conversion from the original PNG format to the more efficient format for FlightGear DDS requires a rather heavy application (ImageMagick) which can only be run on single CPUs. For this it is very efficient to run the program on multiple CPUs, but it is necessary to use some care that I explain below.
Core <-> CPU what are they ?
Any PC has a processor with a certain number of physical core ranging from 2 (Intel i3) to values that can go up to 12 or more for more performing desktop processors.
For years, all processor cores have been able to handle two separate CPU, using a hardware trick. Therefore an i3 processor with two core will allow to manage up to 4 CPU (or separate processes) at the same time.
At this point it is important the role of the operating system that must manage the available CPU and assign them to the running programs.
So when you start Julia it is possible to reserve the number of CPU to the application will require than and this must be done at the beginning so that the compiler will configure the code properly.
This is achieved with the -t n command where n is a number equal to or less than the number of available CPU.
The Julia -t n and -p n options
These commands are passed to Julia Programming Language Interpreter.
-t m : The maximum number of threads that can be followed simultaneously.
-p n : The number of CPUs that can be used. **
** Disambiguation. Not to be confused with the parameter -p or --path for the photoscenery.jl program, notice that Julia's commands are placed before (here) photoscenery.jl while the internal parameters like -p or --path are placed after photoscenery.jl (there)
If you run the program with the command:
julia photoscenary.jl
Only one CPU will be used and this can be a bottleneck when downloading files from the web server that distributes the images, since, especially if you have images composed of a single file (from the smallest ones up to 2048 pixels) the program uses only one process (for larger images the program uses many more download processes).
So let's say we have a machine with 6 core and therefore 12 CPU we can launch the program with this command:
julia -t 10 photoscenary.jl
If we are on a 4 CPU as i3 it is necessary to reduce the value to 4, but maybe 3 would also be good, so we can write the command like this:
julia -t 3 photoscenary.jl
Be careful though
If the value of the maximum number of CPU is too high, the behavior of the operating system could be such as to reduce the advantage in execution or even slow down the program!
This certainly happens when the value of the -t number is higher than the number of CPUs and if the system is windows 10 or 8 you will have an incredible slowdown of the program! Therefore on a Windows machine it is not advisable to always enter a value less than or equal to the number of CPU of the processor in use (number of cores multiplied by 2).
For Linux and Mac systems the problem seems to be less evident and so you can try to increase the number beyond the theoretical maximum value.
Now let's try to delete all the files just inserted
This test allows us to understand the use of a very useful parameter to manage the files we create with this application, for example if we want to delete the files, perhaps to have an area managed with the traditional FlightGear system, we can do it with the following command:
julia -t 10 photoscenary.jl --over 9
We will get this result (I show only the last lines to focus attention on the fact that the system declares to perform some removes)
Now lets put the turbojet into the download program
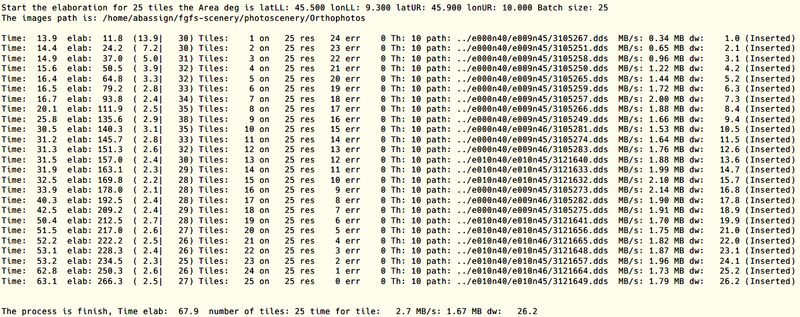
We now put the -t 10 option on the Julia compiler start command. This option allows you to run multiple threads at the same time allowing you to speed up the download of files.
julia -t 10 photoscenary.jl
In this image I show all the lines processed to show how the progression of the download speed increase. As you can see at first the speed seems low, but in reality the system has launched about ten threads that form a queue of requests to the image server. The format of the images, when nothing is declared, as in this example, is 2048 pixels on the long side, and the size of the DDS file (we are at an intermediate latitude between 62-22 degrees) is 1 MB.
The average speed is 1.7 MB/s (but can go even higher) and is determined by the actual workload on the server distributing the images.
This way we have more than tripled the download speed.
Obviously these values can change a lot, but they are on average better than those obtained with single downloads. Not only that, but multithreading also works with the ImageMagick program that performs the transformation of the PNG file into DDS, this transformation is not fast, but in this way it is parallelized, making this phase less expensive in terms of time.
This feature is even more interesting for larger format images.
Increase the resolution of the images, radius and --over option
Let's see these two new options that can be given to the program:
-r 5 where n is the number of miles of radius, if -r (Radius) is equal to 5 it means that we are covering a square whose diagonal is 5 NM. Note that if -r is not defined the system considers the radius of 10 NM.
-s 4 indicates the resolution of the images we want to obtain, if this option is not inserted the default value is 2 equal to an image, on the long side, of 2048 pixels.
julia -t 10 photoscenary.jl -r 5 -s 4
In fact the system has not done anything, the status message, at the bottom of each line, tells us (skip) which means that the program has seen that an image is already present and this image cannot be overwritten as it is an image valid (actually the program checks the image by loading and verifying it), if the image was not valid, it would delete it and replace it with a new one.
But it is still possible to override by inserting the --over 1 option at this point this interesting fact happens:
julia -t 10 photoscenary.jl -r 5 -s 4 --over 1
This download is 16 times slower as the precedent download (Without the -s option the image downloads as -s 2 which corresponds to 2048 pixels long edge) -s 4 option downloads images of 8192 pixels long side. In fact the system downloads 16 images with size of 2048 and composes them into a matrix 4x4, at the end of the composition the images are first transformed into an temporary PNG image format which will be processed by ImageMagick and becomes an DDS format image that is compatible with FlightGear without any on-the-fly conversion (which is done for PNG images). Therefore this line shows us the downloading of the single images that make up the matrix in order to give an idea that something is happening.
Note that the download speed of individual images has increased (in this case 2.98 MB/s) as the system has opened several dozen download threads (96 download tasks are open at the same time as their number is the product of 6 threads x 16 images) .
It is important to understand this aspect of the program which can easily bring the network into saturation. In this example 3 MB/s correspond to about 30-40 MBit/s which is about 70-80% of the bandwidth that the network allows me to have. For this, if the band used is high, in order to keep a good surfing speed on the network, it is sufficient to reduce the value of the threads in Julia from -t 10 to -t 4 or -t 5.
Note: Julia is a programming language that has an incredible variety of methods for exploiting all possible hardware solutions. What I exploit in this program is only a small part, Julia even allows you to distribute the processing on remote machines, perhaps placed on different networks, in order to distribute the workload through the use of a few instructions.
From a series of tests that I have done, 8K images are the most interesting for systems that have at least 16 GB of RAM, if the RAM is lower these images can lead to FlightGear in memory overflow and therefore its closure by the system operating.
The -s parameter
-s defines 7 possible resolutions for images:
| Parameter | Side px | Format | Size MB | Comment | PC RAM GB |
|---|---|---|---|---|---|
| -s 0 | 512 | DDS | 0.064 | 2 | |
| -s 1 | 1024 | DDS | 0.256 | 2 | |
| -s 2 | 2048 | DDS | 1 | 4 | |
| -s 3 | 4096 | DDS | 4 | 2 x 2 matrix = 4 images with 2048 pixels side to download | 8 |
| -s 4 | 8192 | DDS | 16 | 4 x 4 matrix = 16 images with 2048 pixels side to download | 16 |
| -s 5 | 16384 | DDS | 64 | 8 x 8 matrix = 64 images with 2048 pixels side to download | 16 |
| -s 6 | 32768 | DDS | 256 | 8 x 8 matrix = 64 images with 4096 pixels side to download | 16 |
The PC RAM that I recommend for PCs that need to download images. So I was able to download, even with Windows 10, which is much heavier than Linux, 16384 px images with only 4 GB of RAM! In this case there is a huge increase in virtual memory (Both Linux with kernel 5 and Windows 10 have a dynamic virtual memory that is quite efficient if the hard disk is of the SSD type) in use which, due to the structure of the program and the particular compiler used, it does not seem to slow down performance.
The --sdwn parameter
--sdwn It is a parameter that defines how to change the value of the resolution or the distance using a linear method. For example, if the coverage radius is 100 nm and -s 5 (16K pixels), if we set --sdwn 2 we will have this resolution trend:
| Dist. (nm) | 0 | 10 | 20 | 30 | 40 | 50 | 60 | 70 | 80 | 90 | 100 |
|---|---|---|---|---|---|---|---|---|---|---|---|
| Res. (0..6) | 5 | 4 | 4 | 4 | 3 | 3 | 2 | 2 | 2 | 2 | 2 |
As can be seen from the table, the resolution in pixels of the images varies with the distance from the center (radius).
With this method it is possible to obtain very large coverage without occupying too much memory and greatly reducing download times. Certainly the quality of the farther images is lower, but the problem could be not very perceptible as normally an airplane when it takes off is low on the ground and therefore the pilot wishes to have a high resolution (images with many pixels), but then rises in altitude and the resolution of the terrain is acceptable although much lower. With this method it is possible to cover large areas of land in a very short time, shorter than the flight necessary to cross that territory.
The --over parameter
A second important fact is the --over 1 parameter which tells the system it can overwrite, the --over option 1 indicates that overwriting can only occur if the new file is larger than the file it replaces.
With this technique it is possible to build limited areas with higher resolution, for example airport areas, or particularly beautiful areas that we want to enhance.
The --over option has the following recognized parameters:
| Parameter | Overwriting/deletion |
|---|---|
| --over 0 | Default option that inhibits any overwriting of images. |
| --over 1 | Overwrite only if the image to be replaced is larger than the present one
if the previous image is not present, the image will be inserted anyway. |
| --over 2 | Always overwrites, for example if you want to reduce the size of the images by a certain area. |
| --over 9 | Deletes the images present in the defined area. |
Let's go to Fiumicino (Rome in Italy) by -i option
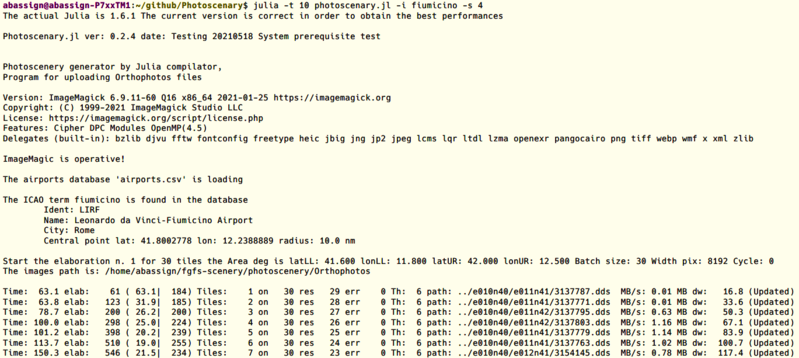
julia -t 10 photoscenary.jl -s 4 -i fiumicino
We are already familiar with these options
The absence of -r indicates that the image extraction radius is the default of 10 nm.
-s 4 indicates a resolution of 8192 pixels long side
But this is new
-i fiumicino
It means that we are selecting an airport containing the word 'fiumicino'. The search takes place in a database, with an Open Data license, which reports over 60,000 airports that have ICAO code.
The database is distributed together with the photoscenary.jl program with the airports.csv file, which is easily editable, via a text editor. The airports.csv file is not actually the database used by the program, but only the data source which is automatically converted into the more practical airports.jdb file which is the database file used by the JuliaDB package.
If you want to edit airports.csv, once the file is saved, you will notice that the next time you run the photoscenary.jl program it will take a few seconds until a new airports.jdb is generated.
The text inserted after the -i parameter can contain a single word or a sentence, but in this case it must be delimited by double quotes.
-i "leonardo da vinci"
Once the program has started, the system will respond by entering also with this output:
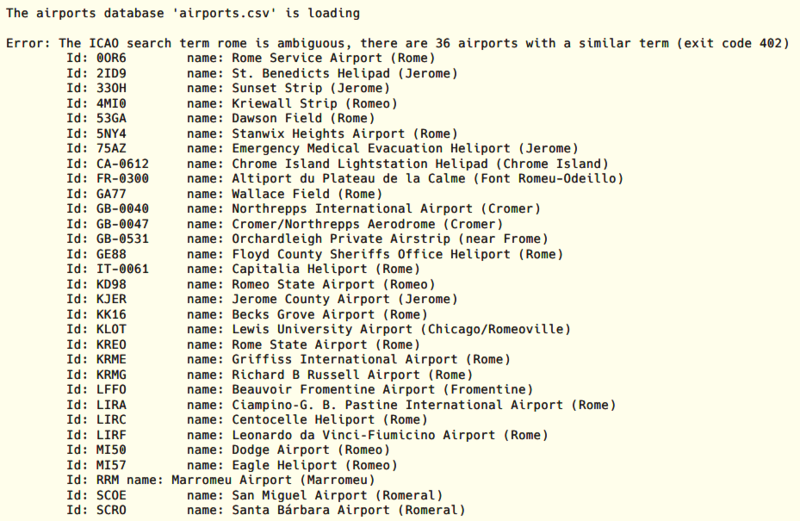
For example, if you enter as a name
-i rome
The program will respond with the first 30 airports that correspond to the presence of the word Rome in one of the three search fields, as shown in this figure.
In this case, just enter a unique selector, such as the ICAO ID, to obtain the searched airport, as in this example:
-i LIRF
Therefore, the search using the -i option can be extremely convenient, as it allows you to quickly have the coordinates of any airport present in the ICAO database.
The search word can also be partial as in this example:
-i zuric
Any accented letters are normalized to the unaccented Latin form, for example:
Zürich Airport becomes Zurich Airport
and therefore the search can be successful if you write:
-i "zurich airport"
Dynamically download orthographic images by --connect
It is very convenient to download the orthographic images of the territory actually flown over by the plane.
In this case, the system will use the aircraft's course as reference, interspersed with points of radius -r.
The program will then download only the images actually needed, thus minimizing the amount of data to download.
The parameter to activate this function is this:
--connect "<IP address>:<port>"
When the program finds this parameter, checks if the syntax of the address is correct and listens showing a line that has as, first character and an arrow that rotates 45 degrees every second, followed by the sentence that begins with the text:
Try the frist connection to Flightgear with address: ...
This delay can last for an indefinite time, until Flightgear is activated with, obviously, the Telnet connection port activated, as explained above.
When Flightgear is activated, the program realizes it and starts evaluating the geographic position of the aircraft and then, if necessary, downloading and positioning the DDS images in the photorealistic scenario.
If you close Flightgear again, the program will be put on hold again, a situation indicated by the message:
Try connect to Flightgear with address: ...
To exit the program it is necessary to type the key sequence: [CTRL] + [C]
Exiting the program will have no effect on the downloaded DDS files as the program operates through transactional methods.
A simple example
For example, you can run this command:
julia -t 4 photoscenary.jl --connect "127.0.0.1:5000"
In this case the program will download the images in a radius of 10 nm for the entire length of the route. Thus forming a corridor of images that can give the illusion of a much larger territorial coverage than reality.
The images, if the -s n parameter is not specified, will have the size of 2048 px, this is a good enough size for flights above 10,000 ft.
If the speed of the plane is not too high and the internet line is good, it may happen that the pilot can get a flight with complete coverage of the orthographic images, giving the illusion of having downloaded very large geographical areas and more a narrow corridor that follows the route followed by the plane ..
If, on the other hand, the speed of the plane is high, or the speed of downloading the images is not high, it may be necessary, from time to time, to activate the option to update the scenario using the command:
[menu] -> [debug] -> [Reload Scenery]
In this case the simulator will freeze for a few seconds and then a scenario will be observed with orthographic images of the territory overflown.
Preparation of Flightgear to allow you to communicate with the photoscenary.jl program
First you need to run Flightgear with the option:
--telnet=5000
This command will activate the telnet server on Flightgear with port 5000 active. The port can be changed, but the important thing is that it is then the communication port entered in the --connect command.
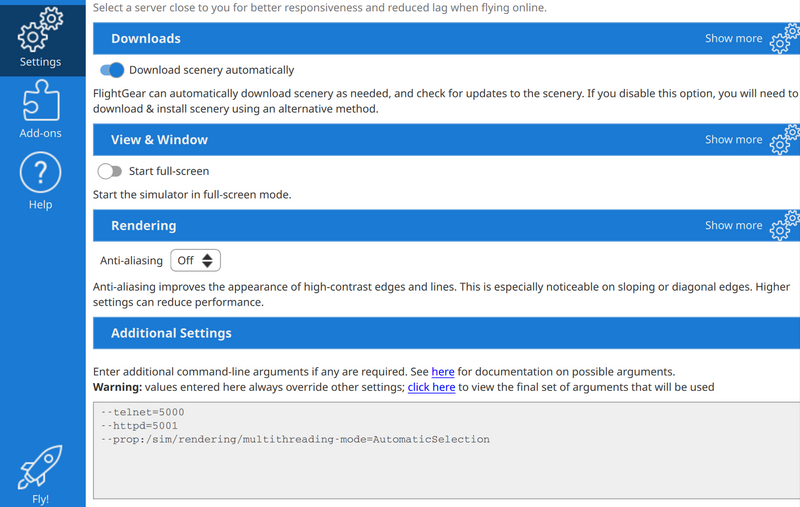
In the example in Additional Settings we see that the first line is the telnet server activation command, server needed to communicate with the photoscenary.jl program.
In additional settings I have inserted two other options that may be useful:
The parameter --httpd = 5001 which activates an HTTP server, visible through the browser, useful for displaying the route on a geographic map. The third option instead activates multithreading which, eg run PC with at least 2 cores, allows you to render the flight more fluid.
Performing dynamic loading of orthographic images during flight
First you need to start Flightgear (and with it the telnet server we configured previously), wait for its loading phase to finish. And then start the program:
julia -t 4 photoscenary.jl --connect "127.0.0.1:5000"
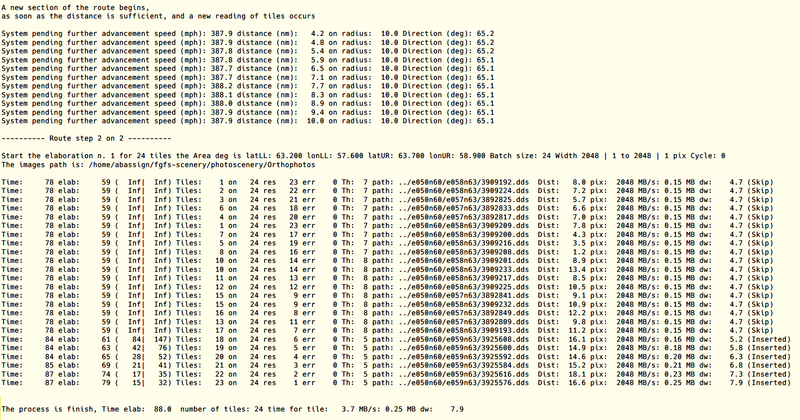
Unlike the other methods of selecting the areas to be filled with images, this method can show an intermediate step called "System pending ..." which allows you to communicate to the pilot that the program is running smoothly, but has already downloaded all the images needed for the current flyover area and then waits to reach the next area from which it will start downloading images again.
However, the other options are also allowed
julia -t 4 photoscenary.jl --connect "127.0.0.1:5000" -s 3 --over 1
The --connect command does not prevent the use of other options, such as image resolution and enabling overwriting if the new image is of a higher resolution than the one already present.
Follow a route generated with route manager by --route
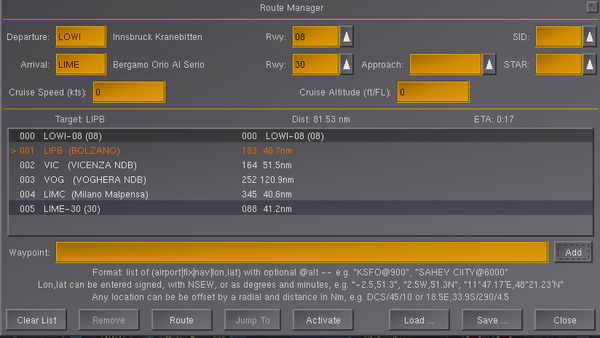
The FlightGear route manager program allows you to generate a route that passes through various points and/or airports, the route can be saved to a file that is placed in the Export folder of the FlightGear $FG Home directory.
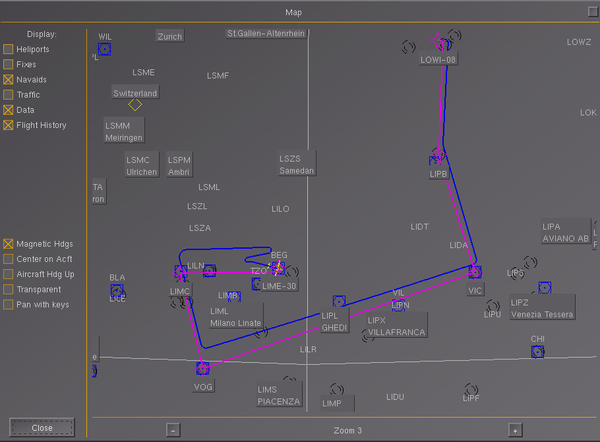
In this example, a route has been generated made up of 6 points, of which the first and last are respectively the departure airport and the arrival airport.
The route can be saved in a file which, in the example, has the name with a name LOWI-LIME.xml
The file is saved in the Export directory of the FGFS HOME directory.
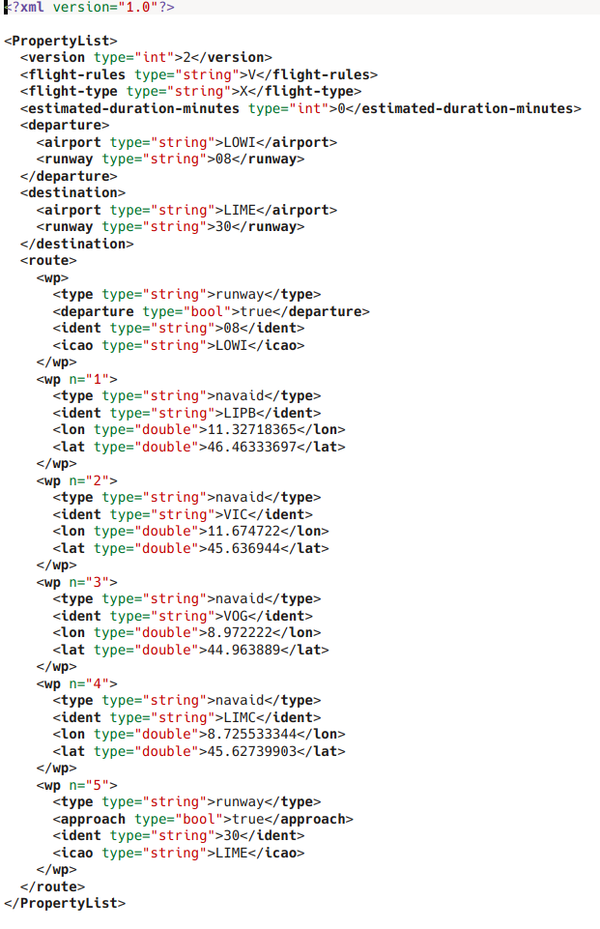
Being an XML file it is possible to open it through any text editor, and possibly also modify it, an operation, by the way, quite simple.
Here's what the xml file used for our example looks like:
The file can be as long as you like, however at the end it defines a path like this:
Now that it has been clarified what a route is and how it is saved, let's see how it can be exploited to cover the photoscenary only for the parts near the route.
julia -t 10 photoscenary.jl --route LOWI-LIME.xml -s 2 -r 10 --over 1 -d 0
In this example, the saved route is taken over by the program that searches for it. This little magic is used to simplify the program execution command as it is assumed that the file is of XML type and contains specific tags. If these tags are not present, the file will be considered invalid. If, on the other hand, if the file is validated, then it becomes the basis for extracting the path.
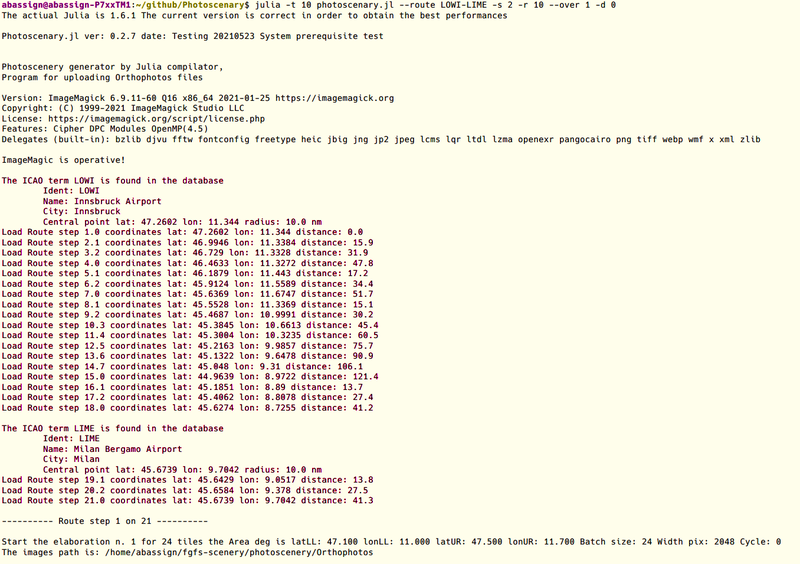
Once the file is validated, the program is executed, but first the project showing the single execution steps is shown.
The step is indicated with its step number and a decimal representing the sub-step. Therefore a step that has zero decimal indicates that that step has been inserted in the route manager, while the others are steps built by the algorithm to give continuity to the coverage of the tiles.
It is noted that at the end of the project (part in red in the screen shown here) the download phase begins for each single step, which, in this example, are 21.
Obviously the execution of the program can take a relatively long time, but certainly much less if that area had been covered with a single large set of tiles.
Note: that instead of entering the file name together with the path, only the file name can be entered, for example LIME-LIMJ.gpx somewhere, as long as it is inside the homepage or a subfolder. The program has an automatic search function which will find the file and use it as a route.
Skyvector format
Since version 0.3.9 the automatic conversion of files produced with Skyvector has been defined. The file in .gpx format is automatically converted to produce the equivalent route to the file produced by the FGFS route manager when supplied via the --route parameter.
Skyvector is a very comprehensive route generator that is often used to plan routes in civil aviation. The use of this tool allows you to create route files in gpx format that can be read by the FGFS route manager and by this program. The conversion is transparent, that is, it is the program that parses the XML and determines its real format.
Let's go via the geographic coordinates by -o -a --latll --lonll --latur --lonur option
The coordinates are made explicit from the first line of the image:
central point lat: 21.317454 lon: -157.91603 radius: 5.0
Not only that, but the second line reminds us in which area we are operating, that is an ideal rectangle with coordinates defined as follows:
Lower left corner
latLL: 21,200 lonLL: -158,100
Upper right corner
latUR: 21.500 lonUR: -157.800
But we could have had the same result with the following parameters that explicitly define the center point:
julia -t 10 photoscenary.jl -r 5 -s 3 -a 21.317454 -o -157.91603
Or with the parameters that define the lower left corner and the upper right corner
julia -t 10 photoscenary.jl -s 3 --latll 21.2 --lonll 158.1 --latur 21.5 --lonur -157.8
Entering the position values explicitly is a very convenient way when you do not know the acronym or name of an airport or want to select a particular area via google maps for example.
| Tip Google maps allows you to give the coordinates in the degrees and fractions of degrees format, used by this program and FlightGear, by simply clicking the right mouse button on the map. Alternatively use the FlightGear scene models map, which has coordinates in decimal format and tile information. |
The sea can be a problem --attemps option
Now let's enlarge the radius area with -r 20 (20 NM) with lower resolution tiles, we use in this example -s 2 (2048 pixels long side)
julia -t 10 photoscenary.jl -r 20 -s 2 -i phnl --attemps 0
At this point we look at the output which points out a few things
Meanwhile, let's see the effect of the --over 0 parameter which prevents smaller images from overwriting images already present, but let's also observe another fact:
The err: column no longer reports the value 0 but numerical values that go up 7..10 and then beyond. This means that some tiles have not been uploaded, not only that, but there is also a very high reduction in the download speed that reaches, barely 0.16 MB/sec.
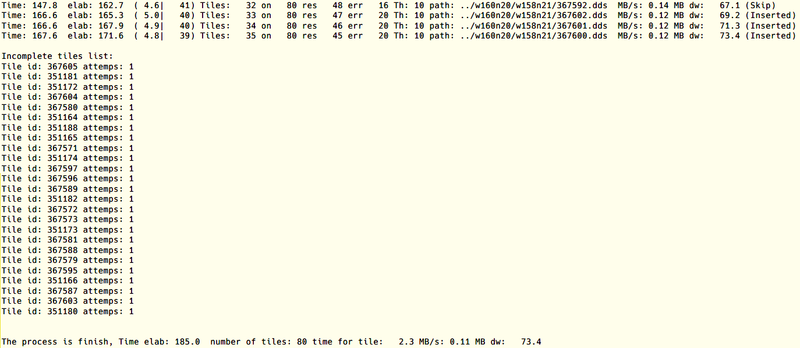
The reason for this behavior is that around Honolulu there is the Pacific Ocean, or the sea, and the image server I am using does not show the sea beyond a certain distance from the coast. This means that the program tries to download a certain tile, but it returns an error, unfortunately not immediately, but only after a few seconds, the error starts a recovery procedure that performs the download attempt for two more times, if the third attempt fails, the system places the tiles, not downloaded, in a special list that can be retried in a subsequent cycle.
Here is what we will have at the end of the download batch:
Now let's see the incomplete file list that shows the tiles that have not been downloaded, the attempts parameter, in the Incomplete file list, indicates the number of attempts made. By stating that the number of attempts is zero, it means that the program lists only the files that have resulted not downloaded and then exits the program. But if you enter a numeric value for the --attempt parameter instead, you can reprocess the tiles that have not been downloaded, but it is possible to change the number of attempts using the parameter:
--attempts n (default is 2)
Where n is any integer. Do not increase this value too much, and only do it if the internet connection line is unstable or if the image server often drops the connection.
Attempts to reconnect are quite slow, especially if the images are small, so it is better not to overdo it to avoid unnecessarily lengthening the download times.
Try to recover the errors --attemps n
Often the errors are due to the presence of marine areas that are covered by maps with lower resolution, so the only way to obtain an error recovery is to lower the resolution.
For this an algorithm has been inserted that in the first recovery step uses a width of 1024, width which is reduced to 512,256,128 etc ... for the following steps whose max number is defined by the value --attempts n.
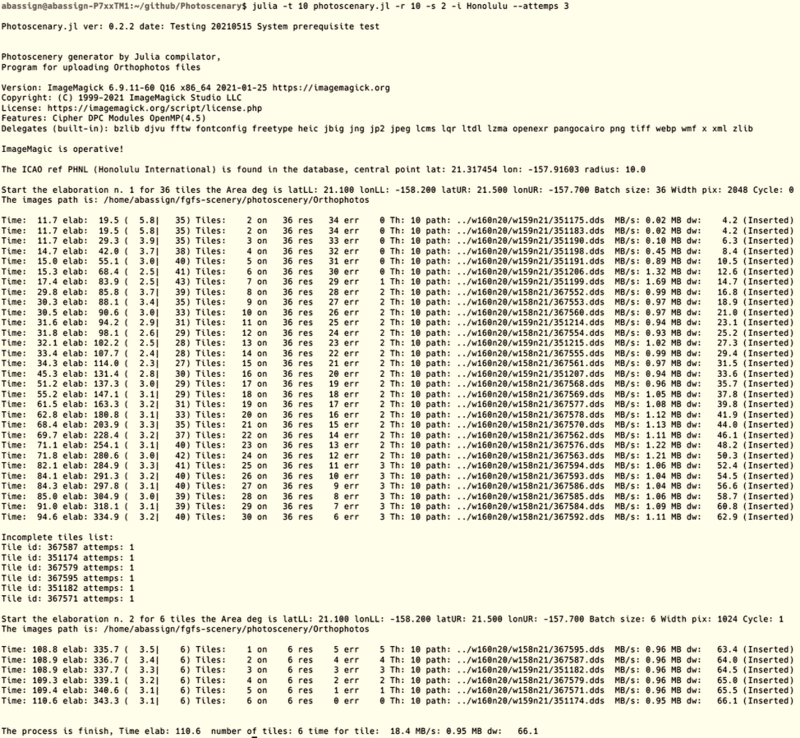
Let's try this download, always with the airport of Honolulu adding the possibility of making 3 attempts:
julia -t 10 photoscenary.jl -r 10 -s 2 -i Honolulu --attemps 3
At the end of the execution it is observed that 6 tiles have been inserted in the incomplete list, therefore it is possible, if the value of --attemps is greater than 0 (by default I remember that it is 2), to obtain a re-execution only for the tiles in error with a resolution request starting from 1024 pixels down.
With the default value --attemps 2 it is hereby possible to arrive at tiles of 512 pixels which always seem to be released by the server, with --attempts 3 it is also possible to try tiles of 256 pixels the server does not yet release 512 pixels.
The end result is complete coverage of the entire area. In two resolution groups, that of 2028 pixels proposed with --s 2 and that of 1024 pixels used by the recovery function.
Other options
The program allows the use of other options that may be useful in certain circumstances, below I give a list with the relative possibilities of use.
--map n
You can change the standard image server. Each image server is identified with a unique id which currently selects the following addresses
| Id | Name | Comment | Address of the organization |
|---|---|---|---|
| 1 | ESRI GIS | Default, this servers is for all over the world | https://www.esri.com |
| 2 | USGS | United States only. Public domain license, only US | https://basemap.nationalmap.gov |
| 3 | PNOA | PNOA only Spain | https://www.ign.es |
| 4 | Geoportal | geoportal.gov.pl only Poland | https://www.geoportal.gov.pl |
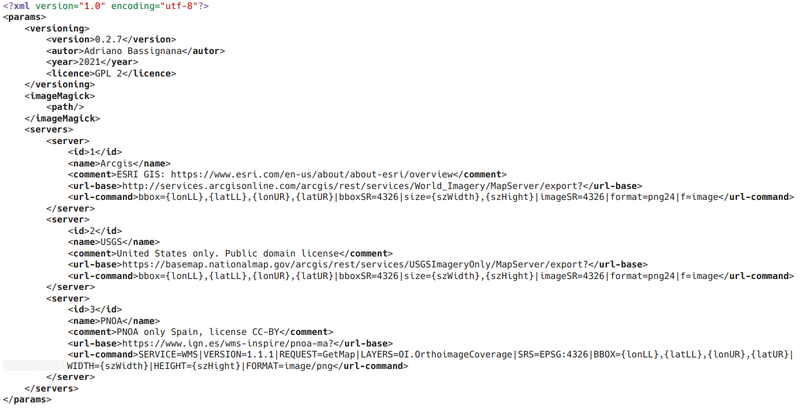
This option allows you to select a specific server different from the standard one (Id = 1). All servers are inserted into the params.xml file in the following form:
Additional servers can be added simply by adding a new <server> ... </server> entry within the general <servers> ... </servers> entry. The Id must be unique, as it is the selector and can take any value. If someone adds their own server they can do it, but I recommend starting from a higher Id, for example 100, so as not to interfere with the Ids that could be added in the future.
An important recommendation is to replace, in URLs, any "&" character with "|" (Pipe or vertical bar)
For example the URL:
<url-command>SERVICE=WMS&VERSION=1.1.1&REQUEST=GetMap&LAYERS=OI ...
It should be written in the form:
<url-command>SERVICE=WMS|VERSION=1.1.1|REQUEST=GetMap|LAYERS=OI ...
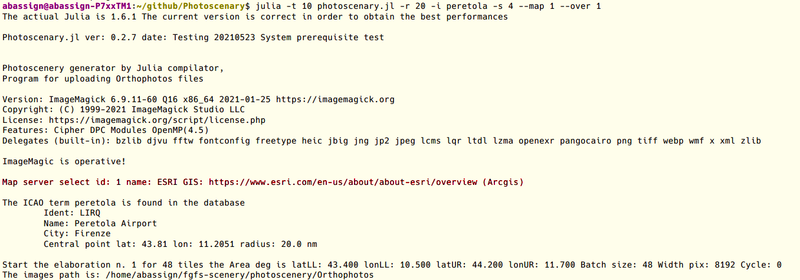
This is the characteristic output that occurs during program execution and shows the image server in use
The selected server highlighted by the red line and shows the main data that allow it to be identified.
Be very careful to use the right server for a certain area, the program does not know if the selected server is valid or not for a certain area, so a wrong server could delete the previously inserted image files.
If you are unsure, check the server site or do a test limited to a certain area. The servers, when they are out of the area, do not give errors, but they release a completely white image, so always be very careful.
--path or -p
The program normally downloads image files in DDS or PNG format directly to the directory:
<home>/fgfs-scenery/photoscenery/Orthophotos
However, sometimes a user wants to use a different destination, perhaps even a different mass storage unit, such as a NAS or a disk connected via USB, in these cases this option becomes very convenient.
There are two ways to define a path:
Path relative to the home directory (in the example the user is /home/abassign):
julia photoscenary.jl -i pantelleria -r 20 -s 3 --attemps 2 -p scenary-dir
The system will respond:
The images path is: /home/abassign/scenary-dir/Orthophotos
Absolute path:
julia photoscenary.jl -i pantelleria -r 20 -s 3 --attemps 2 -p /home/abassign/scenary-dir
The path, in the case of using Windows, can be written in the Windows notation, for example:
c:\users\abassign\scenary-dir
or in Linux:
/home/abassign/scenary-dir
Automatic path if the program is connected to FGFS
Since version 0.3.8 a method has been introduced that extracts the path directly from the FGFS program if it is connected (use the --connect param for the connection). The method is therefore implicit if the program is connected and the path is not defined, the path used will be the one described in the property tree of FGFS /sim/fg-scenery. Obviously, if in the command line there is the --path parameter, the path reported by this has a higher priority.
--save
The program always saves the images (from version 0.3.8) to a directory that can be implicit or explicitly defined with the --save "a path" parameter.
There are therefore two cases:
- If the --save parameter has a valid path, the program will save the images to be deleted on that path.
- If the save parameter is not present, the path is determined automatically by reading the path of insertion of the downloaded files by adding the sub-name <path>-saved to the path so as not to allow FGFS to use it as an operational directory.
If you do not want to save the replaced images, you must explicitly enter the parameter --nosave as explained in the next paragraph.
The path is always absolute, as it must be possible to manage external drives in which you want to insert the files to be saved.
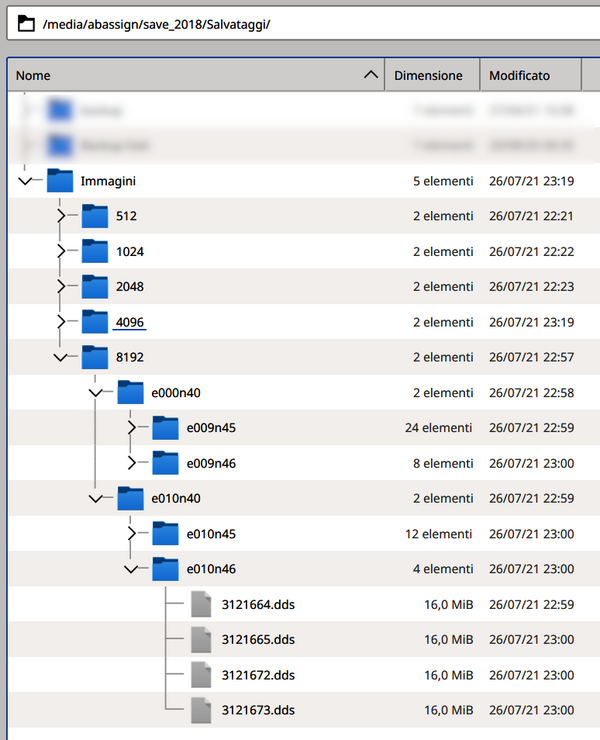
With this technique it is possible to use an external disk, perhaps of a mechanical type of 1-4 TB, to save the files that have been downloaded by the program, all divided by size in pixels, as in this example:
--save /media/abassign/save_2018/Salvataggi
You will get a configuration similar to this:
As you can see, the images are grouped by size in pixels (s 0 <-> 512 ... s 4 <-> 8196 ... etc) and therefore the program, depending on the size of the image to be inserted, can choose the most appropriate image.
It is interesting to try this configuration with -s 3 (4096 pix) which will load all the images from 4096 into the scenario directory:
julia -t 10 photoscenary.jl --over 2 --save "/media/abassign/save_2018/Salvataggi/Immagini" -s 3 -r 20
If you later want to have smaller images, for example le s 2 (2048 pix) or le s 1 from 1024 px just type this command:
julia -t 10 photoscenary.jl --over 2 --save "/media/abassign/save_2018/Salvataggi/Immagini" -s 1 -r 20
The --over 2 option is used to allow the replacement of larger images with smaller ones, as explained in the appropriate paragraph.
The reorganization time of the images is very fast and is linked to the moving time of the images present in the system.
Note that if the 4096 pix images were not saved yet, before replacing with the smaller images, they will be saved in the path indicated by --save.
Summing up
With the --save option you can save the images that will be replaced when loading new images with different resolution. With this technique it is possible to save large areas of images on an external disk and finally, with this technique it is possible to change the resolution of the images without ever losing the downloaded images.
--nosave
If we want to inhibit the autosave mode, just enter the --nosave parameter in the command line. With this parameter, saving of images that are deleted from the path is blocked.
--png
It is a switch that allows you to download images in PNG format without switching to DDS images. This feature makes the downloaded images much larger (4 times) and easily viewable or editable by an image editing program such as GIMP or Imagemagick.
If you subsequently start the program without the --png option, the program will try, before downloading the images from some external server, to check if the PNG images present are compatible with the DDS to be generated, if they are you will have the rapid conversion live PNG images in DDS.
If the --save option has been activated, the PNG images will not be lost, but saved in the chosen path.
--tile
The world of Flightgear is represented with a tessellation of rectangles according to a rule defined at this link:
https://wiki.flightgear.org/Tile_Index_Scheme
The tile defines the minimum loadable area for a photo scenery, its size varies with latitude. Here is an example of how the tiles are distributed on the globe taken from a FGUK movie:
All the images that make up the photoscenery have a unique numerical name that is calculated through a special algorithm according to the latitude and longitude of the tile. This number is defined as the tile identifier.
You can view the tile number in the FlightGear scene models map (lower left corner).
For example if you run the command:
julia -t 10 photoscenary.jl -r 5 -s 1 --tile 3105266
You point to a tile that belongs to the LIME airport area and is approximately equivalent to this command:
julia -t 10 photoscenary.jl -r 5 -s 1 -l lime
In this way it is possible to select any area without having to enter particular coordinates, but only through this number.
--sexagesimal or -x
The angular parameters --lon --lat --lonll --latll --lonur --latur are normally expressed as hexadecimal. But it often happens that you have the coordinates in sexagesimal degrees. If the option is inserted, the system converts the decimal part from sexagesimal to centesimal. For example, if you enter the value of 52.21 sexagesimal degrees, the program will convert them to 52° 21' N which will then be converted to 52.35 degree.
Note: It is not necessary to use the seconds as the tolerance of the tiles is 1/8 of a degree equal to about 7 minutes.
For example is possible to write:
julia -t 10 photoscenary.jl -r 10 -x -a 52.21 -o 13.30
which is equivalent to writing
julia -t 10 photoscenary.jl -r 10 -x -a 52.35 -o 13.50
If the sexagesimal degrees are south or east, a minus sign must be entered, the field does not recognize the symbols N, S, E, W typically used in this type of notation.
--proxy
Which allows you to connect with a proxy server, the parameter is used, for example, as follows:
julia -t 8 photoscenary.jl -s 5 -i "lowi" --over 1 -r 10 --proxy "http://192.168.0.9:8118"
Where "http://192.168.0.9:8118" is the connection string to the proxy server.
--debug or -d
Currently the program defines two levels of debugging:
- level 1
--debug 1adds a series of messages that are a function of the progress of the program, this can be useful when you suspect that the program is not downloading anything or that the network is really slow. The problem is that this option does not display the progress log well and therefore is only useful in special cases.
- level 2
--debug 2is also used to display any execution errors. If the system is properly configured they should be rare, but in some cases it is useful to be able to see them.
--version
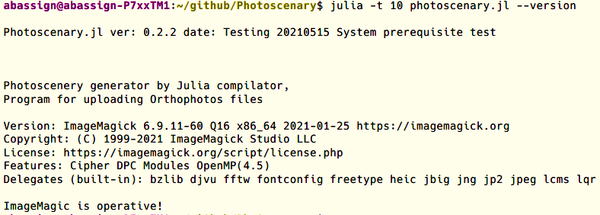
It shows the program version and checks all the modules that need to be loaded:
julia -t 10 photoscenary.jl --version
--help or -h
If you type the option -h or --help you get the complete list of options that can be recognized by the program, this list is obtained even if the option we enter or the value is not recognized, this is an example:
$ julia photoscenary.jl --help
The actiual Julia is 1.9.4 The current version is correct in order to obtain the best performances

Photoscenary.jl ver: 0.4.00 date: 20230523 System prerequisite test

The Photoscenary.jl program has started, it can be stopped with CTRL-C

Photoscenery generator by Julia compilator,
Program for uploading Orthophotos files

Version: ImageMagick 6.9.12-98 Q16 x86_64 18038 https://legacy.imagemagick.org
Copyright: (C) 1999 ImageMagick Studio LLC
License: https://imagemagick.org/script/license.php
Features: Cipher DPC Modules OpenMP(4.5)
Delegates (built-in): bzlib djvu fftw fontconfig freetype heic jbig jng jp2 jpeg lcms lqr ltdl lzma openexr pangocairo png raw tiff webp wmf x xml zlib

ImageMagic is operative!
usage: <PROGRAM> [-g ARGS] [--map MAP] [--latll LATLL] [--lonll LONLL]
                 [--latur LATUR] [--lonur LONUR] [-a LAT] [-o LON]
                 [-x] [--png] [-i ICAO] [--route ROUTE] [-t TILE]
                 [-r RADIUS] [-s SIZE] [--sdwn SDWN] [--over OVER]
                 [--search SEARCH] [-p PATH] [--save SAVE] [--nosave]
                 [--connect CONNECT] [--proxy PROXY]
                 [--attemps ATTEMPS] [-d DEBUG] [--version] [-h]

optional arguments:
  -g, --args ARGS      The arguments files in txt format
  --map MAP            The map server id (type: Int64, default: 1)
  --latll LATLL        Lower left area lat (type: Float64, default:
                       0.0)
  --lonll LONLL        Lower left area lon (type: Float64, default:
                       0.0)
  --latur LATUR        Upper right area lat (type: Float64, default:
                       0.0)
  --lonur LONUR        Upper right area lon (type: Float64, default:
                       0.0)
  -a, --lat LAT        Latitude in deg of central point (type:
                       Float64)
  -o, --lon LON        Longitude in deg of central point (type:
                       Float64)
  -x, --sexagesimal    Set the sexagesimal unit degree.minutes
  --png                Set the only png format files
  -i, --icao ICAO      ICAO airport code for extract LAT and LON
  --route ROUTE        Route XML for extract route LAT and LON
  -t, --tile TILE      Tile index es coordinate reference (type:
                       Int64)
  -r, --radius RADIUS  Distance Radius around the center point (nm)
                       (type: Float64, default: 0.0)
  -s, --size SIZE      Max size of image 0->512 1->1024 2->2048
                       3->4096 4->8192 5->16384 6->32768 (type: Int64,
                       default: 2)
  --sdwn SDWN          Down size with distance (type: Int64, default:
                       0)
  --over OVER          Overwrite the tiles: |1|only if bigger
                       resolution |2|for all (type: Int64, default: 0)
  --search SEARCH      Search the DDS or PNG files in the specific
                       path
  -p, --path PATH      Path to store the dds images
  --save SAVE          Save the remove files in the specific path
  --nosave             Not save the DDS/PNG files
  --connect CONNECT    IP and port FGFS program, default value and
                       format: "127.0.0.1:5000"
  --proxy PROXY        Proxy string ipv4:port for example:
                       "192.168.0.1:8080"
  --attemps ATTEMPS    Number of download attempts (type: Int64,
                       default: 3)
  -d, --debug DEBUG    Debug level (type: Int64, default: 0)
  --version            Program version
  -h, --help           show this help message and exit
Management coverage of tiles on the territory
From version 0.2.8 a more articulated method of managing the loading and distribution of the tiles has been added.
Unloading of tiles on the territory assigned with a spiral rule
An algorithm performs the sequence of downloading the tiles as a function of the distance from the center. The download starts from the tiles closest to the center up to the last tiles downloaded which will be the ones farthest from the center.
In this motion it is possible to start the download procedure in parallel with the execution of the Flightgear program.
If you leave the airport where the plane is initially located and use the same airport as the center point (--icao lime for example) during take-off we will already have the tiles of the take-off area and therefore the scenario will appear well covered with orthographic images. During the climb of the plane it will therefore be probable that the following images will always give the pilot the illusion that the territory is well covered with images, even if we are only one part of the work. It will be enough for the pilot, from time to time, to update the scenario with the appropriate Flightgear menu.
Database of all orthographic images uploaded in .dds format.
This database is loaded at the beginning of the download session and contains all the images present in the home directory of the user who launched the program.
Before downloading the image from the designated website, the program checks in the database if the requested image is already present in the database, if the image is found in any directory of the home, it is copied to the current path. In this way it is possible to avoid carrying out a download job when the image is already present. Obviously the image must have and the pixel size requirements compatible with those required.
With this technique it is possible to distribute the images also on external supports and then make them converge on a working directory, usually with faster access (for example the system SSD). The only constraint is that the external media has a link that links it to a local folder.
With this technique it is also possible to exploit virtual folders that rely on other repositories, for example those shared with P2P techniques.
This example shows a mixed image download with database support. Images (copied) are images copied from other directories on your system, (inserted) are images inserted after a download from the image distribution web server. The images (skip) are those already present in the folder of the images we are creating.
Saving arguments in a text file
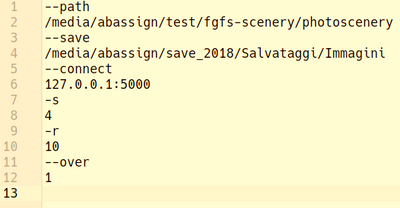
Often the number and length of the arguments can become difficult to manage and therefore it is convenient to be able to save them on a file. For this reason, the --args (or -g) parameter was introduced followed by a filename to be used as an argument container.
Let's take an example to better understand how this parameter works:
julia photoscenary.jl -i lowi -s 4 -r 20
The arguments associated with the launch of the program are: -i lowi -s 4 -r 20
If we add the --args test.txt parameter:
julia photoscenary.jl -i lowi -s 4 -r 20 --args test.txt
In the directory where we ran the program we will find a new file called test.txt which contains the list of the parameters just entered.
It is now possible to recall the parameters entered using the command:
julia photoscenary.jl test.txt
The test.txt file, first created, can be edited with a simple text file editor and then modified according to our needs.
Arguments implicit saving
Launching the program with parameters, but without the --args option, still generates an arguments file called args.txt
This file can be recalled for the next program run, simply by running the program with no arguments.
For example:
julia photoscenary.jl -i lowi -s 4 -r 20
The args.txt file is generated and the program, if run without parameters, will search the args.txt file and load it again using the previous parameters.
julia photoscenary.jl
The program runs exactly as in the previous execution.
Recipes to be able to try the program and live satisfied
There are quite typical configurations that can give a lot of satisfaction to those who want a photorealistic vision, here I give some examples that can be used by anyone.
The simplest
julia photoscenary.jl
Will rerun with the last commands. The last commands are read from the file "args.txt".
At the first run, this will establish a telnet session where photoscenery is downloaded on demand from your flightgear instance; see Julia_photoscenery_generator#Dynamically_download_orthographic_images_by_--connect.
The scenario of the airport closest to you
julia photoscenary.jl -i lowi
If we live near Innsbruck LOWI is the closest airport.
julia photoscenary.jl -i lowi -s 4 -r 20
-i followed by the airport abbreviation ICAO, allows you to download that area for a radius of 20 nm (-r 20) and resolution 8K pix (-s 4)
A flight plan has been generated with Skyvector https://skyvector.com/
julia -t 6 photoscenary.jl -s 4 -r 20 --sdwn 1 --over 1 --route "LIMJ.gpx" --path "/media/abassign/test/fgfs-scenery/photoscenery"
The area is processed along a route defined with Skyvector (but the same methodology also applies to the one defined with the FGFS route planner). The program parses the xml file inserted as a parameter of --route and determines the format.
The scenario is shown along the route
julia -t 10 photoscenary.jl --connect "127.0.0.1:5000" -r 20 -s 3
-t 10 tells the compiler that it can use up to 10 CPUs, this speeds up the download speed by 2-5 times. --connect allows you to connect to the Flightgear program (obviously if remote control has been activated (with port 5000) with the launch option of FGFS --telnet = 5000. The parameter -s 3 means that the images will be 4096 pix, a good resolution for flights above 3000 ft.
The images are saved for later reuse
julia -t 10 photoscenary.jl --over 2 --save "/media/abassign/save_2018/Salvataggi/Immagini" -s 3 -r 20
--save shows the possibility to save the images also in an external drive, in this way it is possible to create collections of images even in the order of TB avoiding using the system disk space.
--over 2 It allows the replacement of images already present in the path directory, even if of higher resolution.
The images are saved for later reuse and the operational image directory is defined by the path option.
julia -t 10 photoscenary.jl --over 1 --path "/media/abassign/test/fgfs-scenery/photoscenery" --save "/media/abassign/save_2018/Salvataggi/Immagini" --connect "127.0.0.1:5000" -s 3 -r 20
Generation of tiles along the route with maximum efficiency and quality
If you want to have a high quality scenario along the route, but at the same time light enough to allow the generation of images in good synchronization with the flight, you must enter the option --sdwn which, as explained before, allows you to automatically reduce the size of the tiles with the distance, in this way if the tile is distant a small tile is downloaded, if instead the tile is close, the downloaded tile is larger , at most the dimensions are those declared with the --s option. In this way it is possible to fly with a fairly synchronized scenario.
julia -t 6 photoscenary.jl --path "/media/abassign/test/fgfs-scenery/photoscenery" --save "/media/abassign/save_2018/Salvataggi/Immagini" --connect "127.0.0.1:5000" -s 4 -r 20 --over 1 --sdwn 1
In case you want to get a faster loading of the images that are loaded along the route, remember that the program can overwrite the previous higher resolution images with lower resolution images without losing the images already downloaded, as they will be inserted in a area outside the scenario (for example a different disk) that can be reached with the path defined with the --save parameter.
This option means that instead of overwriting the images, the program first saves the files, then downloads the images from some external server and then overwrites them. With this technique the overall loading of the images (tiles) is faster as it is useless to download large images of 4-8-16 K pixels placed in distant areas from the pilot's point of view.
Therefore, to minimize the images it is necessary to communicate to the program that it will be able to overwrite the images with the option: --over 2 But since the --save option is inserted, the program will not delete the previous images, but will insert them in the designated saving areas.
At this point a good command can be this:
julia -t 6 photoscenary.jl --path "/media/abassign/test/fgfs-scenery/photoscenery" --save "/media/abassign/save_2018/Salvataggi/Immagini" --connect "127.0.0.1:5000" -s 4 -r 20 --over 2 --sdwn 1
However, it must always be remembered that currently FGFS does not reload the images of the scenario automatically, but you must click on the debug menu under reload scenario.
It is possible to avoid entering the --path and --save commands if you adopt the automatic path search method that is activated with --connect active. This makes the command simpler, but obviously you lose the ability to allocate unused images to a certain area on an explicit directory, this is an example:
julia -t 6 photoscenary.jl --connect "127.0.0.1:5000" -s 4 -r 20 --over 2 --sdwn 1
Example of loading multiple scenarios
It is possible to use two sessions of photoscenary.jl at the same time to have an updated low resolution scenario (obviously this method only makes sense if the route follows a path in which a tiles load has never been performed). The first session will have a low resolution -s 1 or -s 2 while the second resolution could be much higher, e.g. -s 4 or -s 5
With this configuration it is very likely that the download speed of the orthophoto server you have selected is sufficient to show the images of the territory at low resolution (remember that currently FGFS requires the manual scenario update if we want to see the scenario just written), while the second program proceeds to download the images at a higher resolution which will then be visible only in a second flight, obviously on the same route (it is very unlikely that from resolutions of -s 4 onwards the images can be downloaded with the same speed with which you fly over the territory).
In this example I have given 4 cores to the high resolution scenario, and 3 cores to the lower resolution scenario. The number of cores cannot exceed the maximum allowed by your CPU, therefore the program, if this number exceeds the available one, automatically reduces the number of cores.
The presence of the --over 1 parameter is fundamental, which manages the insertion of images according to the resolution. However, remember that the low resolution images that will be replaced will not be deleted if you have entered the --save parameter with the relative save path.
High resolution scenario tasks -s 4 (8K) and -r 10
julia -t 4 photoscenary.jl --path "/media/abassign/test/fgfs-scenery/photoscenery" --save "/media/abassign/save_2018/Salvataggi/Immagini" --connect "127.0.0.1:5000" -s 4 -r 10 --over 1
Low resolution scenario tasks -s 2 (2K) and -r 20
julia -t 3 photoscenary.jl --path "/media/abassign/test/fgfs-scenery/photoscenery" --save "/media/abassign/save_2018/Salvataggi/Immagini" --connect "127.0.0.1:5000" -s 2 -r 20 --over 1
Using the generated photo scenery in FlightGear
1. Inform FG about additional directory with scenery tiles: --fg-scenery=/your/path/to/photoscenery/directory/ either in command line or as extra options in launcher.
E.g. if you have a directory structure like C:\FlightGear\fg_customscenery\photoscenery\Orthophotos\e000n40\e007n46 then use --fg-scenery=C:\FlightGear\fg_customscenery\photoscenery
2. Check the option Menu > View > Rendering Options > Satellite Photoscenery.
Use the maps generated by photoscenary.jl for professional applications
The photoscenary.jl application allows you to generate maps even only in .png format useful to assemble with gimp (or other painting graphics programs) as the generation of the images guarantees the correct connection. Obviously, reference is made to cylindrical coordinates that must eventually be deformed in case you want to work with a different cartographic model. Currently the program defines the possibility of operating with some image sources defined in the parameter file params.xml in the sub-section <servers> ... </servers>. Those that offer the most permissive license conditions are produced by USGS (USA) which is an American federal enete and therefore does not bind which all maps with particular limitations of use, the same rules apply as the otographic images produced by NASA that are used in Flightgear for images of the Earth as seen from space.
If one wants to read the terms of use, he can refer to what is reported in this USGS link.
Download images for professional use or publications
This paragraph is based on the terms of use of the USGS server, so they may not apply to other servers reachable with this program. The server, as you can see by reading the USGS params.xml file, has id = 2. For use not related to flightgear it is normally useful to work with files in .png format as the .dds is used only for simulation or games. For technical applications a pair of coordinates is normally used which are: Upper right (UR) and Lower Left (LL) of the requested area. You can also find a set of images using polar coordinates and a radius in nautical miles.
Let's now give one examples:
julia -t 6 photoscenary.jl -s 5 --latll 21.2 --lonll 158.1 --latur 21.5 --lonur -157.3 --map 2 --png -p "/some path/ortho"
The coordinates are defined in:
-s 5 is the resolution of the images (s 5 -> 16384 pix for tile)
--latll 21.2 --lonll 158.1 --latur 21.5 --lonur -157.3
Coordinates in six hundredth degrees.
--map 2 indicates that the images will be downloaded from the USGS server.
--png means that the images WILL NOT BE CONVERTED to .dds but will remain in .png!
-p "<path>" Defines the path where the images will be downloaded.
-x If the coordinates are expressed in sexagesimal degrees, just enter this additional parameter,
In this case the decimal part of the coordinate value is in prime, for example:
--latll 21.50 --latll 158.50
It is equivalent to writing:
-x --latll 21.30 --lonll 158.30
Wiki articles
Forum topics
- Photoscenery generator for Julia compiler topic on the forum
 (April 2021 - May 2021)
 - 16k Photoscenery topic on the forum
 (September 2020 - Gen 2021)

