Howto:Translate FlightGear
FlightGear supports localization, that is, showing the user interface in the user's native language rather than in English.
This page will help you translate FlightGear to a new language or improve the existing translations.
What can be translated
The following parts of the simulator can be translated:
- the menus, splash screens, startup tips and the text shown when the
--helpcommand-line option is used (FlightGear 2.7.0 and later) - the shortcut file on Linux systems (FlightGear 2017.1 and later)
- the man pages (FlightGear 2017.3 and later)
- the built-in launcher (FlightGear 2018.3 and later)
How to translate
- Determine the two letter ISO 639-1 language code for the language you want to translate FlightGear to. A list can be found on the Library of Congress Web site.
- Check whether your language already has a subdirectory below the Translations directory. If it does not, ask on the development mailing for the empty translation files to be created for you. (It's better to do this than copying an existing translation, because of data that will be accidentally included otherwise)
- Open the .XLF files in the subdirectory of your language and translate the English strings in them. You can edit the .XLF files in a text editor (such as Notepad++ or GEdit) but you can also use translation tools such as Qt Linguist or any XLIFF editor. Using a structured tool is recommended because it can track the translation state (flagging untranslated strings) and most tools include helpers to partially automate the translation process.
- Start FlightGear to test your translation. By default, the simulator will select the locale of your operating system as the language to use; you can explicitly select a language using the command-line option
--language=language code. - Submit your updated .XLF files for inclusion via the development mailing list or a SourceForge merge request
There are two XLF files in each language subdirectory : one for the core simulator strings (startup messages, command line arg help, hints) and one for the launcher.
Note that the user interface might have not full Unicode support (some special/accented characters might not be shown): should you encounter such a location, please write to the flightgear-devel mailing list at flightgear-devel@lists.sourceforge.net.
How to translate the shortcut file
Open the FlightGear .desktop file and translate the GenericName, Comment and Keywords keys (add the GenericName[xx], Comment[xx] and Keywords[xx] keys, where xx is the two letter ISO 639-1 code of the language).
How to translate the man pages
- Determine the two letter ISO 639-1 language code for the language you want to translate the man pages to.
- Check whether your language already has a subdirectory below the man pages directory. If it does not, create an empty directory in it named after the language code, then copy
man1andman5from the man pages directory to the directory of your language. - Edit man/CMakeLists.txt and add the instruction
add_subdirectory(xx)in theif(NOT WIN32)block (where xx is the language code). - Edit
man/xx/man1/CMakeLists.txtandman/xx/man5/CMakeLists.txt: on the last row, set the installation directory (DESTINATION), respectively, to${CMAKE_INSTALL_MANDIR}/xx/man1and${CMAKE_INSTALL_MANDIR}/xx/man5. - Open the man pages in the subdirectory of your language and translate them.
Using QtLinguist to translate XLF Files
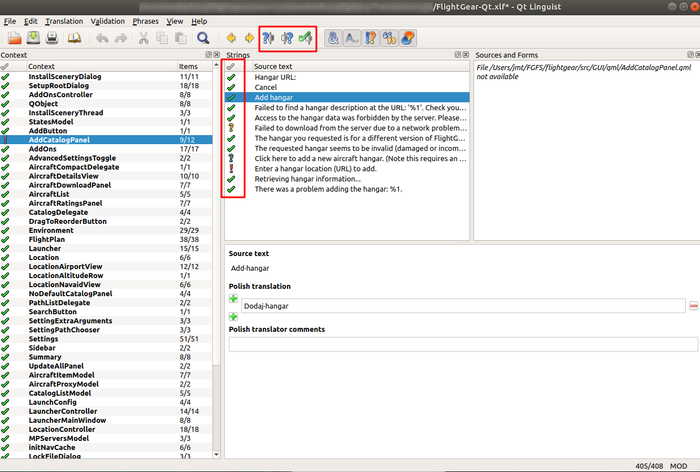
One can use QtLinguist (application from the QT package) to translate XLIFF files. Install QT package from the Qt home page (https://www.qt.io/download). Opening QtLinguist will show default translation environment. Open XLF file and start translating. The interface is divided into four main sections:
- Context - this is a grouping of the strings to translate. Defined by the developer. Icon beside the group show translation status. Everything should be in the end with the green check sign.
- Strings - strings in the selected group. Select string to translate it
- Sources and Forms - additional information about location of the translated string in the source code (not always visible and with correct information)
- Source text - the main place where translation occurs. Translate here selected strings.
One have to translate the original strings into the target language. Icon beside the original text in the 'Strings' section will show status. Green check mark when everything is correct. Yellow question mark, when the translation is in place but it it not marked as "verified". Untranslated strings are marked with the grey question mark. Sometimes QtLinguist displays exclamation mark - this shows that the translated text does not conform to the original text e.g. original text ends with the punctuation but the translated text not. Buttons (and keyboard shortcuts) on the main toolbar area helps with the strings matching. When the text is translated and you're comfortable with the style/meaning etc. you select green check mark button. It marks the translation as translated-verified. So this is the expected end state for this.
Reference:
