Anaglyph (3D): Difference between revisions
m (small wiki-styling/enhancements. Great article already Ozgur!) |
|||
| Line 1: | Line 1: | ||
This wiki describes how to use the '''stereo vision''' or '''[http://en.wikipedia.org/wiki/Anaglyph_image anaglyph images]''' ability of [[OpenSceneGraph]] and let you experience the [[FlightGear]] world in 3D. Another excellent example and simple application of FlightGear's flexibility and realism. | |||
Another excellent example and simple application of | |||
As you might know or not, | ==Anaglyph, that weird looking glasses...== | ||
As you might know or not, FlightGear migrated graphics functions from [[PLIB]] to [[OSG]]. [[FlightGear 1.9.0]], released Decemeber 22, 2008, marked the release of the OSG version of FlightGear. As of August 2010, most recent stable version of Flightgear uses OSG. For those who are unaware of OSG, it is an open source high performance 3D graphics toolkit. | |||
Stereo vision exploit the human perception by showing a 3-Dimensional image on a 2-Dimensional surface. To understand stereo vision and human judgement of visual distance (that is how we keep visual separation from the traffic), make the following small experiment. While reading this text, close your left eye and then right eye, open left. When you alternate your view, it'll feel like the monitor is moving to little left when you observe with right eye, and vice versa. This situation gives us two different images. Now imagine you took this two "slightly" different images and match it such that each eye sees what it is supposed to see. There are not so many but quite a few ways to achieve this separation. And OSG is capable of doing all of this. Now apply this to your short final 28R at KSFO! | |||
==How to multiply your realism level by 10== | |||
For this experience, you will need | For this experience, you will need | ||
# | # A working copy of FlightGear, of course. | ||
# A pair of Red-Green or Red-Cyan pair of 3D glasses | # A pair of Red-Green or Red-Cyan pair of 3D glasses. You might have one at home or if you are a DIY type, check [http://stereo.gsfc.nasa.gov/classroom/glasses.shtml NASA way of doing glasses] or [http://en.wikipedia.org/wiki/Liquid_crystal_shutter_glasses Liquid Crystal Shutter Glasses] and probably suitable hardware (anyone experienced with or owns one pair of this thing might help developing this page). | ||
# Start FlightGear, select your aircraft and select your location | The easiest and shortest way to experiment with this is to follow the procedure below (quick start). | ||
# On the next screen, click "Advanced" just above "Run" | |||
===Windows=== | |||
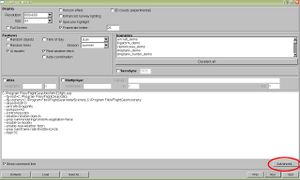
[[Image:Anaglyph1.jpg|thumb|Accessing advanced options.]] | |||
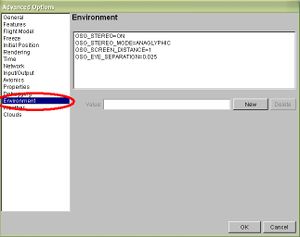
[[Image:Anaglyph2.jpg|thumb|Final result in Environment settings.]] | |||
# Start the [[FlightGear Launch Control|FlightGear launcher]], select your aircraft and select your location. | |||
# On the next screen, click "Advanced" just above the "Run" button. | |||
# On the new window, titled "Advanced Options" highlight the "Environment" from the list on the left | # On the new window, titled "Advanced Options" highlight the "Environment" from the list on the left | ||
# Now, you will create new environment variables, click "New" and type | # Now, you will create new environment variables, click "New" and type <tt>OSG_STEREO=ON</tt>, then again click "New". At this point you should be seeing "OSG_STEREO=ON" on environment list. | ||
#The commands that you have to pass to OSG | #The commands (including the one we just created) that you have to pass to OSG consist of: | ||
#*<tt>OSG_STEREO=ON</tt> | |||
#*<tt>OSG_STEREO_MODE=ANAGLYPHIC</tt> | |||
#*<tt>OSG_SCREEN_DISTANCE=1</tt> | |||
#*<tt>OSG_EYE_SEPARATION=0.025</tt> | |||
The result should be something like shown on the right. | |||
After you entered the last value, click "OK" to quit from the Advanced Options window. Remove your pilot raybans, put your fancy 3D glasses and click "Run". | |||
===Tweaking The View/Stopping Nausea=== | ===Tweaking The View/Stopping Nausea=== | ||
(on the way...)--[[User:Ozgur|Ozgur]] 17:57, 30 August 2010 (UTC) | (on the way...)--[[User:Ozgur|Ozgur]] 17:57, 30 August 2010 (UTC) | ||
Revision as of 19:49, 30 August 2010
This wiki describes how to use the stereo vision or anaglyph images ability of OpenSceneGraph and let you experience the FlightGear world in 3D. Another excellent example and simple application of FlightGear's flexibility and realism.
Anaglyph, that weird looking glasses...
As you might know or not, FlightGear migrated graphics functions from PLIB to OSG. FlightGear 1.9.0, released Decemeber 22, 2008, marked the release of the OSG version of FlightGear. As of August 2010, most recent stable version of Flightgear uses OSG. For those who are unaware of OSG, it is an open source high performance 3D graphics toolkit.
Stereo vision exploit the human perception by showing a 3-Dimensional image on a 2-Dimensional surface. To understand stereo vision and human judgement of visual distance (that is how we keep visual separation from the traffic), make the following small experiment. While reading this text, close your left eye and then right eye, open left. When you alternate your view, it'll feel like the monitor is moving to little left when you observe with right eye, and vice versa. This situation gives us two different images. Now imagine you took this two "slightly" different images and match it such that each eye sees what it is supposed to see. There are not so many but quite a few ways to achieve this separation. And OSG is capable of doing all of this. Now apply this to your short final 28R at KSFO!
How to multiply your realism level by 10
For this experience, you will need
- A working copy of FlightGear, of course.
- A pair of Red-Green or Red-Cyan pair of 3D glasses. You might have one at home or if you are a DIY type, check NASA way of doing glasses or Liquid Crystal Shutter Glasses and probably suitable hardware (anyone experienced with or owns one pair of this thing might help developing this page).
The easiest and shortest way to experiment with this is to follow the procedure below (quick start).
Windows
- Start the FlightGear launcher, select your aircraft and select your location.
- On the next screen, click "Advanced" just above the "Run" button.
- On the new window, titled "Advanced Options" highlight the "Environment" from the list on the left
- Now, you will create new environment variables, click "New" and type OSG_STEREO=ON, then again click "New". At this point you should be seeing "OSG_STEREO=ON" on environment list.
- The commands (including the one we just created) that you have to pass to OSG consist of:
- OSG_STEREO=ON
- OSG_STEREO_MODE=ANAGLYPHIC
- OSG_SCREEN_DISTANCE=1
- OSG_EYE_SEPARATION=0.025
The result should be something like shown on the right.
After you entered the last value, click "OK" to quit from the Advanced Options window. Remove your pilot raybans, put your fancy 3D glasses and click "Run".
Tweaking The View/Stopping Nausea
(on the way...)--Ozgur 17:57, 30 August 2010 (UTC)

