Boeing 777-200 Tutorial
From wiki.flightgear.org
The intention of this article is help beginners with little or no flight simulator experience to fly the amazing Boeing 777-200ER in FlightGear with a certain degree of success, hopefully encouraging them to learn more about the vast world of FlightGear and simulated flight. Please note that this is not complete training but a general help to get you started, once you are able to get your copy of FlightGear running on your system. If you want to discuss the 777-200 flights ask questions about the tutorial or just generally improve your flying , and all things flightgear and flightsimulator , my forums are now open and free to join , learn more here , post wishlists ,questions and your pics and video's click here now registration NOT required
If needed, you might join the FlightGear IRC channel at irc.FlightGear.org (channel = #fg_cantene) and ask for further help. My aim is to upgrade this page frequently and add additional "missions" to get you all the way to "Captian of the left seat " Status ! Stay tuned...[http://wiki.flightgear.org/index.php/777tutoriaI_sfo-klax#Your_first_City_to_City_Flight....21 fly San Francisco KSFO to Los Angeles KLAX here advanced instruction page NEW !]
Contents |
Things to know about FlightGear
As with most models, the right mouse click cycles through three different modes. To use the dash panel instruments you will need to cycle through them. First right mouse mode is the standard mode, in which you are able to click in the menu and instruments.
- The second mode is a crosshair and allows you to steer the aircraft manually by moving the mouse position.
- With the third mode you can vary your viewpoint as if you are turning your head and looking around.
You can adjust your view with the following keys:
| Key | Function |
|---|---|
| x | Zoom in |
| Shift + x | Zoom out |
| Ctrl + x | Zoom reset |
| v | Goto next view |
| Shift + v | Goto previous view |
You CAN ... Fly !
Preflight briefing
To fly this mission you need to select your airport: KSFO (San Francisco) and runway (set it to 28R). Absolute beginners are advised to set the time to noon in summer and leave real weather turned off until you have a feel for flying. Do check the box that says auto-coordination (for aircraft rudder) it will be a great help.
Starting the engines
When FlightGear is launched, you will be required to perform certain tasks to start the aircraft. On the 777-200 you can simply click the autostart button in the 777-200ER pulldown menu (press F10 if you do not see the menubar at the top of the screen) to start the engines with a single mouseclick. The two screens on the dash should light up.
First Flight to Woodside
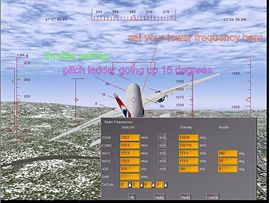
(113.9 Nav 1 ) San Jose (114.1 Nav 2) and land back at San Francisco (KSFO) NAV 1 set to (111.7 nav 1)localiser for runway 28 L at San Francisco International press F12 ... a popup dialog box appears...
now in the popup menu set woodside left box set to 113.9
and experiment whith the others by switching on the navigation green needles and setting the display type by "left clicking" in the **MIDDLE black portion** of the right hand rotary switch closest to the nav 1 ... (3 way) toggle switch
make sure caps-lock light is off
Pressing Ctrl-x simultaneously will set the view back and holding Shift and x-key will zoom out in increments. Make sure you can see you instruments clearly.
lets start by selecting 777-200 on the pulldown menu >>.autostart
the pulldown menu *** Toggles*** 'on and off' with the F10 key
Now ...get the dash screens Working..ie ie autostart (takes a few secs) hit the page up key a dozen or more times to oncrease throttle and when at Maximum Hit Shift-b keys and this will release the parking brakes , . comma and fullstop keys (ie < and > keys ) are left and right brakes usd for taxing and landing .
Make sure caps lock is never on in FG
You are now 275 metric tons of rolling death
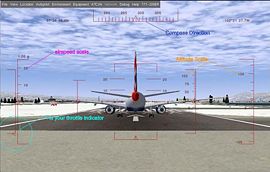
So have you started moving yet if so point the 777 right down the middle and get up to 165-175 knots ( press v once for chase mode and h (toggles three diffent hud modes ..green ,red and off...and five different v modes which are configurable in the pulldown menu )
You will pull back the stick (down arrow) once the aircraft reaches 175-180 knots and point the nose up 10- 15 degrees using the chase view
At the top of the HUD is the compass 0 -359 degrees on the right top to bottom is your altitude and on the left is your airspeed in knots. A ( > ) indicates the amount of throttle being used The page up and page down keys throttle up and down hold key down for smooth slide of the > symbol up and down indicating your throttle setting Bottom least top most). See the check make slide up the left hand updown speed scale.
To move hold down shift and then the b key .(release parking brakes) make sure you do this as the amount of throttle you use will determine your success be sure to decrease throttle to half as soon as your altitude reaches 400ft and never exceed 310 knts reduce speed to 250 (to be able use flaps ) and then tap ] key to lower flaps one click at a time near land never try and land faster than 155knts)
For summary of commandsand genral help Switch on F10 menu (pressing F10 switches/toggles it on/off) and use help menu common keys and aircraft help etc. ).
OK, do not throttle up yet (page up)hit the F12 key now..radio settings click cursor in the left hand column that says NAV 1 .this is vital now type 113.90 into the box both delete and backspace work to edit ..done apply and close exit the menu F11 brings up the auto pilot menu. you will not be using it today.
Here's ..the good part .reading and using the dials
Left click and middle click to move these switches and are vital to your flight today. Make sure you are ready the nav dials .. press CTRL-C now it activate yellow highlight boxes that show usable or clickable parts of the dash (press CTRL and then c key a few times to switch on and off...Toggles)
You are going to learn now how to steer towards a radio beacon for the first time
The NAV 1 needle you just set up points to a radio transmitter on the ground ,where you are now on the runway it is 13.miles at 7 'clock (the needle would point a seven on a 12 hr clock .
By switching on our receiver on the dash which is marked VOR1
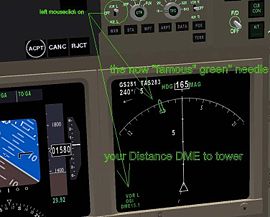
"left mouse click" or ... "click scroll wheel" to reverse the 3-position switch dashboard /instumet panel switch **NB ** you must switch this switch on **
You can now read your distance to the tower DME (Distance Measuring Equipment) on the bottom left of the right screen in the front of the dash. You are now going to learn to steer in the direction the needle is pointing. Traditionally pilots use the RMI (radio magnetic indicator) with two needles for navigation, but today you only need one needle. It is pointing at Woodside tower right now, beaming info at you on 113.9 Mega-Hertz. On our way out >>>>>
the final procedure
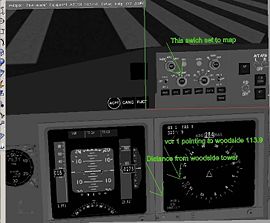
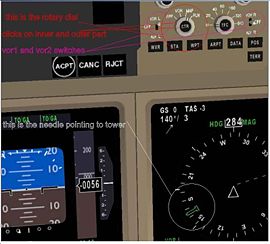
We now need to make the left of our two "glass type displays" display the tower VOR1 and it's distance from us on runway 28R KSFO . To the immediate left or the small VOR 1 are two round (rotary) multiposition switches the right hand side switch switches modes of the left hand display (left click mouse forward ..middle click scroll middle key to make the switch move back a position). The center "BLACK AREA "LEFT MOUSE CLICKS" TO SET DIFFERENT TYPES OF DIAL IN LEFT SCREEN this is the rotary swich next to the 'Vor 1 ' toggle switch. Did you see the VOR1 DME info bottom left of the right display?
Once you have found the green needle which will now point nearly back wards. Press F12 again and set in another setting for NAV 1
Lets try the airport across the road.. set nav 1 to 116.8 Oakland International
Make sure you know how to find the needle and which direction it points and remember that you must aim to get it pointing straight ahead (12o' clock) which means you are flying directly towards it (have a good look at the pictures provided). Ok, we are trying to help you find the green needle that points to the tower you need to turn towards.
Did the VOR 1 display change? Does it say OAK DME 6.0 odd nms? This appears if you use the rotary switches mounted just above the displays and on the left of the dash board. Do no click anything I have not told you to click. Be very careful to only at this point click in the region of the dash containing the VOR1 the left and right rotaries (the right hand one sets the distance on the right screen; you will not use it today).
But we are not nearly there yet first what's with that NAV 1 thing.
The first rule of flying an Airliner
Know and plan very carefully where you are going and what to do if things go wrong .
Today you will attempt to take off gently coax the nose up around 175 knots full thrust remember not to go up more than 10 -15 degrees .it marked on the HUD ( press v after that hit the h key try it 3 times and watch the two colours and its off setting light green-red- and on /off ok try toggle ! )
Press g To lift ... shift- g to lower the landing gear
While on the runway, practice extending your flaps and make sure to practice using the x and shift-x (zoom) keys. Be sure to use the square brackets on your keyboard ] [ for flaps. Tap a few time the ] key (left) first and watch the flaps extend. Flaps are extra bits of wing that when lowered allow you to fly at lower speeds. Do not extend them above 250 knots. Every time you tap the keys, the flaps will be extended a little further (or less).
But later for that. if at first you do not get off he runway left and right arrow keys will steer you while taking off and getting up to 200 knots on the runway will make your take-off much smoother .. do not forget to throttle to half as soon as you level out 4 thousand foot get the HUD ladder dead centre .for this take off as soon as your gear is up (press g ) turn very gently to the left and press CTRL- and V look at the green VOR 1 needle on the right display as you turn left and make sure you are at half throttle and not speeding faster than 250 knts.as you level at 400 and turn left (towards the needle the needle will start to move to the 12 a clock position the needle will move now to the RIGHT as you steer Left towards it as it gets to the top !12' Clock upright position make sure you understand how it works.to get your airliner on course for your tower (pointing arrow straight up to 12 'o clock meaning you are headed towards the over .later we set your radial settings .as you do not need them now see the advanced pages coming soon ) the rule is to centre the needle you steer towards it.now make very sure you know how to get NAV1 VOR 1 before you take off while on the runway get the DME and direction for the following NAV 1 settings 113.9 Woodside 114.1 San Jose 111.7 KSFO runway 28R localiser with DME .make sure you see the needle and settings on your dash /panel before you hit the throttle.remember shift-b (hold shift and press b to release the brakes )
The next beacon
As we pass over the woodside VOR 113.9, press F12 again and set the needle to point to San Jose Airport near San Francisco. Set F12 NAV 1 114.1 do it start turning left now. the beacon is 10 nauticals you need to get the green needle VOR 1 pointing towards 12 O' clock showing that you are heading towards it and also what the Distance at the bottom left of the right screen.
And now to land
So lets say that you kept turning left until you got to San Jose. If you are less than 2.0 nm DME you can turn. So about 2.5 DME pointed at woodside press F12 and set it for SAN JOSE 114.1. And about 1.5 to 2 Nm DME on VOR 1 again turn and head for KSFO so again press F12 and set the left hand NAV 1 box for 111.7.
Now fly toward the needle. When you see the Hayward bridge turn along it and then turn right just before the end toward along the coastline. If you have made a controlled and navigated circle your HUD compass should read 280 degrees and the runway should be right in front of you. Well done!
Extend flaps and lower gear to slow down to around 150 knots.
Make sure you speed never exceeds 310 knots. Use chase view and left upright scale on HUD to check your airspeed. It is also indicated on the instrument panel on left display middle left. The right side reading is altitude.
You should now see the runway lights.
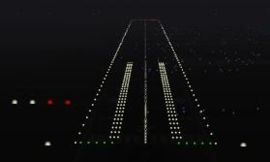
Be sure to use the white and red lights to guide you in coming down safely. They are called VASI or PAPI and are a row of lights. Equal red and white lights means you are on the right glidepath (usually ca. three degrees). Throttle at 10-15%, depending on your altitude and speed. As soon as you are in line with the runways tap the ] key a few times and press Shift-g (landing gear down). Point nose of 777 down no more than 5-10 degrees. Add throttle to maintain height and speed 140-180 knots till you touch the runway. You must practice coming down vertically as slowly as possible (there is a dial that shows your vertical speed, we will talk about that later). For now just use chase view (press v key) and the HUD for guidance. Press Delete once you have landed to reverse thrust .
See aircraft help for speedbrakes... usually Ctrl-b. Use speed brakes carefully preferably only once wheels on runway , and . keys are left and right brakes .Hold down comma key and fullstop key also marked < and > key for left (,) and right (.) braking ...or press b key to engage parking brake , also once wheels are FIRMLY DOWN on the Runway... hit the delete key (del for reverse thrust until your speed is under 60 knts ,then hit delete key again (say under 40 knots) to forward thrust and set throttle to minimun ...page down...pgdwn key ... also once landed ctr-b for air brakes , Never use Air Brakes while'st flying at this early stage . Practice will make Perfect ... Happy Landings ... Captain Vaeron
Thanx to "Captain" Gijs de Rooy ... for tiresmoke effects on this new 777-200ER Release
-Enjoy !Many Thanx "Captain" Vaeron
Work in progress email me vaeronique@yahoo.com
More vaerospace research Here ! Link Fixed 10/12/2009
[http://wiki.flightgear.org/index.php/777tutoriaI_sfo-klax#Your_first_City_to_City_Flight....21 fly San Francisco KSFO to Los Angeles KLAX here advanced instruction page NEW !]
