OpenRadarGuide
Preface
OpenRadar is a prototype to support flight sim ATCs in their work on our airports.
Please note There are some major changes in the upcoming prototype release. The changes improve the usability and make working as an ATC effective. This guide will be updated soon.
Some words to our project targets in advance:
- Realism means we show the data that we have/can calculate and that a real live ATC would have. For instance, we do not update the positions as soon as they are coming in, instead we simulate a radar antenna and perform one position update per antenna rotation. On the other hand, we don't have professional ATCs, neither we have professional pilots contacting our ATC. So we have to make some compromises...
- Useability: The application should simply work. It should be handy, behave consistently and require almost no training. The ATC has other things to do than to fight with the application
We hope that we met your needs and are happy to get feedback!
Important The tooltip texts that appear when you hover with your mouse over an active area, is there to remind you, if should you have forgotten how to trigger a feature. Try pointing your mouse everywhere! Maybe there is something you missed until now...
Prerequisites
Internet
Of course you need an uninterrupted Internet access to exchange data between You and your clients. The requirements for that connection are not very high -- but they must be uninterrupted!
Communication / FGCOM
We urge you to always offer your services as well in typing (MPchat) as also in speaking (FGcom). You will soon discover, that FGcom makes it much easier to communicate, as well for you (who hopefully will control many pilots at the same time) as also for the pilots (who need both hands to control their plane). So very often there will be not enough time for typing!
- MPchat is an integral part of OpenRadar and needs no further installations. (ref.: http://wiki.flightgear.org/Howto:Multiplayer)
- But FGcom is a standard application which must be installed in addition.
If FGCOM is not yet installed, see:
- For Windows and Linux: http://code.google.com/p/fgcomgui/
- For OSX: We do not know of a standalone installation source - but we do know that starting with version 2.0.0 the FGFS-OSX-version does contain the FGCom. That fits and works for OSX >= 10.5.
In addition you may inform yourself about FGCOM on:
| for general infos | http://wiki.flightgear.org/FGCom |
| for more detailed informations | http://wiki.flightgear.org/FGCOM_for_Windows |
| if you have problems with FGCOM | http://wiki.flightgear.org/FGCOM_Testing |
Java V7
Make sure you have installed at least Version 7 of Java. Verify and or Download the installation packages from: http://www.java.com/en/download/index.jsp
OpenRadar
For the currently available Prototype of OpenRadar see http://wagnerw.de/OpenRadar_121119.zip. Extract the content of this ZIP to a place where it is easy to find. Make sure you have read and write permissions for that directory.
Startup
Inside the downloaded OpenRadar base-directory you will find start-scripts. See
- for Windows: OpenRadar.bat
- for Linux: OpenRadar.sh
- for OSX: We do not know yet – pls help us with a FGFS-PersonalMessage to “wagnerw” or “jomo”
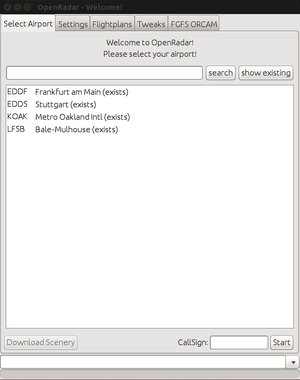
At Startup you will always be welcommed with a the window “OpenRadar – Welcome” that presents 2 TABs to define your preferences:
For all data there are standard values given as defaults. If you do change any values, they will be saved and presentet to you during the next start.
If this is the very first time you start OpenRader you first have to verify your “Settings”, thus click onto that “Settings”-tab:
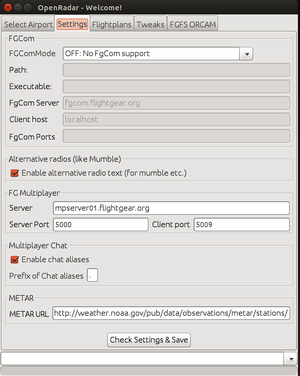
OpenRadar-Welcome - Settings
These settings are grouped into 3 parts:
1) FGCom Settings
- OpenRadar can support up to 4 instances of FGCom in 2 ways:
- It can start and controll FGcom instances that operate in the background as sub-tasks of OpenRadar
- or just control manually started FGCOM-session.
- You select these modes of operation by the “FGcomMode” selection:
- a) Internal: FGcom(s) are started and controlled by OpenRadar
- For this mode you have to define all available fields to tell OpenRader where your FGcom resides and what options shall be used:
- Path: Here you define where your FGcom is installed.
- In the following some examples:
type Windows Linux OSX a standard installation C:\Programs\FGcom /home/YourName/fgcom *) on another disk D:\FlighGear_2.6\FGCOM /media/DiskName/FGFS/fgcom *) on a LAN-server \\ServerName\Central\FGFS /home/YourName//.gvfs/fgfs on nas-server/fgcom *)
- *) for OSX we do not know – pls help us by definig it here or send a PersonalMessage to “Wagnerw” or “jomo”
- Executable: Here you define the Programname that shall be started
- For Windows: "fgcom.exe" or "anyName.bat"
- for Linux: "fgcom" or "anyName.sh"
- OSX: We do not know – pls help us by definig it here or send a PersonalMessage to “Wagnerw” or “jomo”
- Server: There are 2 FGcom-servers available:
- delta384.server4you.de (we do suggest this one)
- fgcom.flightgear.org.uk
- Client: will always be “localhost” - unless you want to run FGcom on a different PC than OpenRadar.
- FGcom Ports: The here defined values are crucial for the operation because:
- They are the only connection between the OpenRadar and FGcom. So you must define those the same in OpenRadar as well as in FGcom !!
- They also define how many “Radio Units” (COM0, COM!, etc.) are generated within OpenRadar
- Simply provide a coma separated list of UDP Ports to be used by FGcom, but be warned, more than two are hard to handle.
- e.g. 16661,16662
- Server: There are 2 FGcom-servers available:
- b) External: Control a manually started external instance of FGcom.
- For this one you only need to define where that FGcom is running and what the connecting port is. e.g.:
- Client: locahost
- FGcom Ports: 16661,16662 (if e.g. 2 FGcom instances were started)
- For this one you only need to define where that FGcom is running and what the connecting port is. e.g.:
- c) OFF: No FGcom support
- That means that You do not want to work with FGcom during your ATC-session – thus you do not need to define any of the fields and there will not be defined any Radio (e.g. COM0) in OpenRadar. This mode is not sugested!
2) Multiplayer Settings
- Here you find the server and connection port of FlightGears multiplayer server. It delivers the radar contact position information and is used for chat.
- You won't have to change the settings, as long as the server won't change.
- PLEASE NOTE: The local port is the port used by your computer to talk with that server. If you want to use FlightGears internal chat parallel to OpenRadar, you must use a different port than FlightGear. Because of that, the default port of OpenRadar is 5001 and not 5000.
3)METAR Server
- OpenRadar retrieves the weather information via METAR messages from a server in the internet. This information is being displayed and used to calculate the usability of runways and the air speed of the radar contacts.
- If your airport is too small to be in that worldwide list, you can provide the code of another bigger airport with METAR data nearby in the sector.property file.
Please click on the verify button to have your settings checked!
Search an aiport
When you start OpenRadar later, you will see the list of already downloaded airports. Double click on one of them and you are in the ATC seat. When you use OpenRadar for the first time or when you need a new airport, you can easily download it from the landcover database.
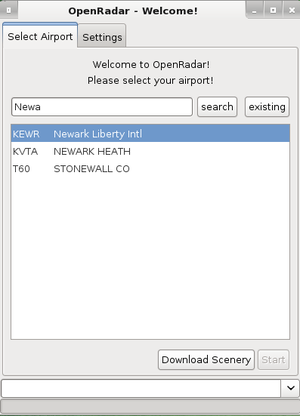
Simply enter the airport code or a part of the name into the search field and hit enter: The list below shows the results found in the airport database delivered with OpenRadar. If an airport does already exist, it will be shown. Then select your desired airport and hit download via click on the button below.
After the download, OpenRadar displays the existing airports again. Double click on an airport to start your work as ATC!
Main Screen
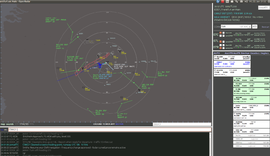
The main screen is divided into three regions: Top left you see the radar screen showing the airport, its surrounding, the navaids and the radar contacts. Below it, bottom left, you see the multiplayer chat feature. On the right side, you see the status information about you, the weather and the runway. The white field is an input area for notes you made about the selected radar contacts. On the right bottom you see the flight strip area, where you can manage your radar contacts.
Radar Map
The radar map is the most complex part of this application. You can zoom in and our using your mouse wheel, but you can also use the four zoom levels GROUND, TOWER, APP and SECTOR. You can change the zoom levels anytime by setting up the desired zoom level with your mouse wheel and middle click on one of the zoom levels to assign the new value. This stores also the current center as preset for this zoom level. You can drag the map by dragging it with your mouse (click-hold and drag).
The radar map has so many details to display that it is impossible to display all at once. Because of that we display details depending on the zoom level. For instance we hide Fixes or runway numbers if you are far away. So OpenRadar features an adaptive detail level.
The runway panel on the right side, allows you to define that a runway should be used for landing and/or starting. This state is shown with little green/red dots at the runway end. If the runway is active for landing and has an ILS installed, its ILS center line and range is shown, along with possibly existing marker beacons. If there is no ILS, the radar map shows a line that helps aligning the airplane with the runway.
MP Chat area
The area allows you to enter chat messages, view the chat history and filter it. The history highlights messages of the selected user, messages that contain your callsign and features a message filter. You can select if you want to see all messages, the messages that have been sent while your frequency is tuned-in at users radio and messages of the currently shown radar contacts.
Additionally, a double click on a flight strip selects a contact in exclusive mode, that means, only the messages of this user are displayed in the chat history.
Status Area
Top area This area shows a text box that allows you to see and change your MP callsign. So you can quickly change it, if a second ATC takes another role at the same airport (TW/APP/GND). Below you see code and name of your airport and, on the right side, the currently selected radar contact. The third line features the 'Selection to Pointer feature. For all of us, who have problems to tell a bearing to and from out of thin air, this feature shows the direction from selected radar contact to the mouse pointer and back. It also shows the distance and the time the contact needs to reach the mouse pointer, if it flies to it. Below you see the most important weather information Wind, Pressure and Visibility. If you hover your mouse over it, you can see the active METAR.
Radios Every FGCom instance running in the background got its own radio. Every radio has a list of frequencies showing the frequencies for this airport. Behind is the Push to talk button for this radio. Additional there are PTT keys prepared: With NUM Pad off, Num0 controls radio COM0, Num1 COM1 and so on. Please watch the color change of the PTT buttons to know, when you can speak. If the radio label turns to red, FgCom does not establish a connection on this frequency. OpenRadar has more frequencies available as FgCom knows of...
Runway area The runway area shows you information about the runways. The display shows the runway number followed by the length x width of the runway. Below, you see a graphical display of the cross winds, green from 0-5kn, orange 5-10kn and red above. Gusts are additional highlighted. In next column you can see the fractions of the wind strength from in front and in cross wind direction and below the relative wind direction (relative to runway heading). The last column lists possibly existing ILS information.
With the check boxes in second column you can define if a runway is open for starts or landings. The map will reflect these settings by showing hints and helping symbols (the ILS cone). If you have at least one runway selected, you can collapse the others with a double click on the background. This is a toggle feature.
Note editor The white field below the editor is the note editor, provided for your need to write down details about an radar contact. The first three lines are displayed below on the flight strips. The complete text stays stored and appears as soon as the contact is selected again. The flight strip display is updated when you leave the editor to somewhere else. (focus lost) You can drag MP chat messages to this area.
Flight Strip Area Paper Flight Strips are the ATCs help to coordinate his traffic. In reality those strips contain many details about the flight, that we do not have (yet). So we have selected a view: CallSign, the flight mode, flight level, true coarse, aircraft, true air speed(estimated, out of ground speed and METAR winds), ground speed and optionally existing notes out of the note editor.
You can sort the flight strips in order by drag and drop and you can put them in three columns (left, middle and right column). New contacts appear at the end of the list on the right side. Every column has a meaning: The right side means uncontrolled or unknown, middle mean controlled and left means important contacts. This definition is used when the radar contact information is being painted into the radar map: The most important are painted above the other (the selected contact is painted on the very top).
The selected contact is used to display the SelectionToPointer information above and is preselected in chat input and its last messages are highlighted in chat history.
Single click on a strip selects it, double click selects it exclusively, that means, chat messages are filtered to show only messages of this user.
Useful Features
Radar Map
- On contact
- left click selects and sets cursor into the chat input field
- middle click opens the radar contact settings (ATC note and native language)
- right click opens the ATC messages selection box
- left double click on map to center it on airport (return to airport)
- middle click on zoom level defines the current view as new center and zoom setting (stored in a file)
- a click on the texts, on the lower left, toggle display of FIX, NDB, VOR,...
Flight Strip Area
- On flight strip
- left click selects the contact and sets cursor into the chat input field
- middle click opens the radar contact settings (ATC note and native language)
- right click opens the ATC messages selection box
- left double click centers radar map on the contact (to find contact)
- CTRL+left click sets the contact to be neglected
- a click beside the flight strips moves the flight strips between the three columns (right, middle, left)
Runway area
- right click on runway number opens the runway settings dialog to define the centerline and vectoring settings
- If at least one runway is active you may double click the runway panel background to hide the inactive runways (frees space for flight strips)
Radios
- a right click on the frequency list changes the input to be editable, so you can define the frequencies by yourself
Shortcuts
| Shortcut | Action |
|---|---|
| ESC | Close all open dialogs and cancel the text input (reset chat input field) |
| ALT + L | Toggle FGCom Log Window (only if you run FgCom started by OpenRadar) |
| Left CTRL | PTT Radio COM0 (if it has been activated via Port in Settings) |
| NUM off: Num0 | PTT Radio COM0 (if it has been activated via Port in Settings) |
| Left SHIFT | PTT Radio COM1 (if it has been activated via Port in Settings) |
| NUM off: Num1 | PTT Radio COM1 (if it has been activated via Port in Settings) |
| NUM off: Num2 | PTT Radio COM2 (if it has been activated via Port in Settings) |
| NUM off: Num3 | PTT Radio COM3 (if it has been activated via Port in Settings) |
Acknowledgments
This project was founded and driven by Ralf Gerlich. Still today he is supporting it as a mentor.
And not to be forgotten: This project links different efforts of many people together. Thank you for your great work!


