Nasal scripting language: Difference between revisions

From FlightGear wiki
Jump to navigation Jump to search
(Some more cleanup)
 
(28 intermediate revisions by 3 users not shown)
Line 1: Line 1:
:''Please note that a considerable amount of resources has not yet been incorporated here, you can check these out by going to the [[Talk:Nasal scripting language|discussion page]], where we are collecting links to webpages and mailing list discussions/postings related to Nasal.''
{{Nasal Navigation}}
'''Nasal''' is FlightGear's built-in scripting language. Originally written and developed by Andy Ross for a personal project, it was integrated into FlightGear in November 2003, and has been continuously developed, improved, and refined since then. Over time, it has become probably FlightGear's most powerful, and has been used to create a huge variety of systems, ranging from [[wildfire simulation|wildfires]] to [[Control Display Unit]]s.


[[FlightGear]] offers a very powerful functional '''scripting language''' called '''[http://plausible.org/nasal/ Nasal]''', which supports reading and writing of internal [[Property Tree Intro|FlightGear properties]], accessing internal data via extension functions, creating GUI dialogs and much more.  
Within FlightGear, Nasal supports the reading and writing of internal [[Property Tree|properties]], accessing internal data via extension functions, creating GUI dialogs and much, much more. Please see the right navigation bar to get additional information.

{{Template:Nasal Navigation}}
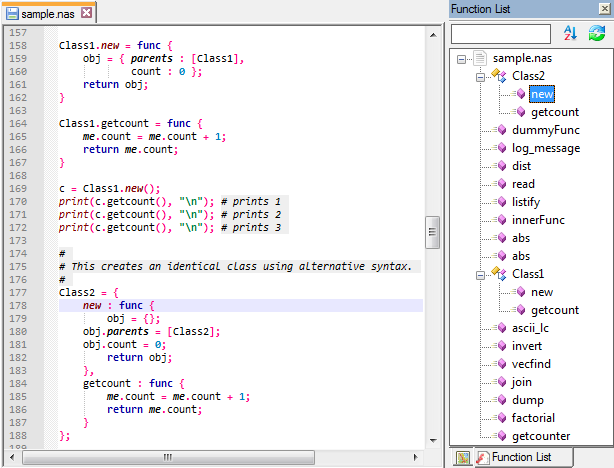
[[File:Highlight parse.png]]<!--


== Not another scripting language ==
<syntaxhighlight lang="nasal">
Nasal uses some of the concepts of ECMA/JavaScript, Python and Perl and implements a simple but complete way of Object Oriented Programming (OOP), Nasal uses an internal garbage collector so that no manual memory management is required by the programmer.
# to be saved in $FG_ROOT/Nasal/hello.nas
 
print("Hello World!");
People familiar with other programming languages, and scripting languages like JavaScript in particular, are usually able to learn Nasal rather quickly. FlightGear provides a rich library of simulation-specific and general-purpose functions that can be accessed by Nasal scripts.
 
Nasal code can be run by [[aircraft]] configuration files, and it can be embedded in various [[XML]] files (dialog files, animation files, bindings for [[joystick]]s, keyboard and cockpit controls, and even in [[Howto:Nasal in scenery object XML files|scenery objects]]). Nasal is platform independent and designed to be thread safe.
 
=== Some success stories ===
These were taken from the developers [[mailing list]]:
 
* "Nasal is *very* well designed, compact, and efficient.  It is used heavily throughout many areas of FlightGear."
* "It's interesting though how much nasal you can actually get away with using without making a blip on frame rates.  Nasal is *very* efficient and powerful for being an interpreted script language."
* "FlightGear needed a built-in scripting language, and it has one. A compact, clean, elegant and fast one, Nasal extension functions interface perfectly to the property tree, the event manager, the built-in XML parser etc. Nasal is very tightly integrated in fgfs and used all over the place."
* "There's no question that scripting languages are good; fgfs has a lot of Nasal code now. In my profiling I have never seen the nasal interpreter as a hot spot"
* "I'm a simple content contributor with very little background in programming. When I made my first Aircraft (the bf109) I was confronted with the need to deploy slats automatically at a given speed. I din't want to embed C++ code or had such a complex script that the error messages in FG wouldn't help me and I previously only used a bit of python. I looked at some Nasal scripts and within a few hours it worked. I was impressed how easy it is to write even complex Nasal scripts. Later I started developing the walker feature that made it possible to walk around in the scenery, all with nasal. Stuart kindly enhanced the walker and added an animation system to it (see bluebird), again with nasal. Others have made Flight computers with it (see V-22 and Su-37). Nasal is a worthy tool"
* "I used Nasal to build several rather complex systems, like Fuel System, Stab Augmentation System, Autopilot Logic, Terrain Avoidance Radar, Radar Warning Receiver and much more, and yes, I love Nasal too. Learning Nasal use was easy and fun and I din't found any limitation yet."
* There are many vital parts of FlightGear currently coded in nasal.  There are also random bits of nasal code scattered around in joystick configurations, instrument and aircraft models, scenery models...  everywhere.
* "We have an entire directory full of Nasal 'function' libraries now, and I'm quite happy using them instead of rolling my own duplicate functionality."
* Nearly every sophisticated Aircraft uses some kind of Nasal, be it Effects like tyre smoke or important functionalities like Engine and electric management, The Bluebird FDM is completely written in Nasal, vital parts of the V-22 Osprey rely on it, Flyby and Model View wouldn't work anymore, no more interactive objects in the scenery, lots of the MP System would be gone, ... Nasal is THE tool which makes FG development fun and adds nearly unlimited possibilities.  If you need an example, look at the Bluebird animated walker, all done in Nasal."
* "there are good reasons to use Nasal - first of all the user base which regularly compiles their own code is small, whereas people do install addon packages - so I get a lot more feedback and test results. Second that one usually can't really crash the whole system from Nasal. Third, it's very easy to quickly try something and very maintenance-friendly. Fourth, you can actually start developing something without knowing how the core code ties together - which I suppose takes a lot of time to learn.  And so on."
* "Hard-coding every instrument in C++ instead of nasal means only developers following/building the latest cvs  head code get to use whatever until the next release cycle."
* "Hard coding every instrument/flight control in C++ means my WW-II storch (et.al.) is stuck with an autobrake functionality it doesn't have nor need."
* "I think it boils down to the fact that we have two approaches that can accomplish the same thing.  The C/C++ approach offers high performance but there is a dependence on when the C/C++ code was added to FlightGear.  The Nasal approach offers fast prototyping, flexibility, and more (but not complete) independence from the C/C++ code."
* "A basic problem with C++ functions is it is hard/impossible to override them for a special purpose. Writing in pure nasal allows function name hijacking and other tricks that can't be used on C++ code."
* "Given the fact that FG is platform independent, I don't know if the embedded C++ is doing the same on Windows, Linux, PPC and intel Macs. Apart from the fact that if I was able to code c++ I would embed it to FG rather than in an Aircraft specific script"
* "If we ported Nasal code over to C++ we'd lose the ability to change small things "on the fly" without compiling over and over again. We'd also lose good programmers, who prefer scripting over C++. Aircraft creation would not be customizable etc etc."
* "The argument against Nasal is essentially that C++ is faster than Nasal - which, everything else being equal, is certainly correct. But highly specialized Nasal code written for a particular problem outperforms general  purpose C++ code - I've given several examples in the past. If someone were e.g. to add movement to Nasal spawned models by adding a velocity property, I'm not sure it would outperform my Nasal quadtree-sorted adaptive range code which priorizes movement for things actually inside the field of view. Of course, if you'd hard-code that specialized algorithm, it would be faster than the Nasal version - but then you couldn't apply it to other problems any more."
* "How many airplane developer will you loose if you remove the Nasal engine from FGFS because they can write Nasal code but not C++ code?"
* "The algorithm being equal, I don't think there's a question that C++ is faster (I doubt the factor 10 though - that seems to be an extreme case). Everything else being equal, I also don't think there's a question that Nasal code is more accessible. And I would base any decision what to hard-code and what not on that balance."
* "Nasal is just much better suited for FlightGear than many alternatives because of it's size, processing speed and because a number of FlightGear core developers have a good idea what's going on."
* "In theory we could even use VBScript but Nasal has proven to be valuable for almost 10 years, so no reason to change or add another scripting language. Besides, if you know JavaScript then learning Nasal would take little effort."
* "The pool of people with commit rights to the core C++ code is very, very small."
 
 
Nasal really is an excellent choice for prototyping and implementing new features and even completely new systems in FlightGear.
 
For example, the [[bombable]] script implements "dog fighting" support on top of FlightGear, without ANY changes to the C++ side of the code, just by using some fairly advanced scripted code (implemented in the built-in Nasal programming language). You can basically imagine it like a "MOD" of FlightGear. In other words, the bombable script creates a completely new "mode" in FlightGear.
 
No matter if it's scenery, aircraft, AI scenarios or whatever: many things that were originally never planned to be supported by FlightGear core developers, are now implicitly supported because of the loose coupling between highly configurable and flexible systems, such as the property tree and the Nasal scripting language.
 
So we are really standing on the shoulders of giants here, because we are now -after 10+ years- in the position to create significant new features (and even completely new systems in FlightGear) within the constraints of the FlightGear base package, without even touching the C++ source code at all - simply because FlightGear has become so flexible and extensible.
 
All of this became possible by some important architectural decisions, such as for example the use of XML and plain text files for pretty much all configuration files in FlightGear (and thus open file formats in general), a publicly accessible tree of state variables that can be easily inspected and modified at runtime (the property tree). Similarly, the decision to embed a scripting language that can be used for scripting the entire simulator was another important decision.
 
In FlightGear, Nasal is the most accessible method of customizing the whole simulator to a very high degree. Nasal code can be easily edited using a conventional text editor, there are no special tools required: Nasal source code is interpreted, compiled to bytecode and run by the Nasal "virtual machine" using FlightGear itself.
 
The emerging [[A local weather system|Local weather]] system was entirely prototyped in Nasal space, and is now being increasingly augmented by moving performance-critical functions to C++ space instead.
 
Using Nasal, it is even possible to create entirely scripted flights and smart "AI bots":
 
{{cquote|I have something here that I think is kind of fun.  I've been fiddling with this off and on since last fall and decided it was time to clean it up a bit and quit hording all the fun for myself.  Basically I have taken the F-14b and created a high performance Navy "drone" out of it.  It can auto-launch from a carrier, auto fly a route (if you've input one) and can do circle holds (compensating for wind.)  I've added a simulated gyro stabilized camera that will point at anything you click on and then hold that view steady no matter what the airplane does (similar to what real uav's can do.)  Finally, you can command it to return home and it will find the carrier, setup a reasonable approach and nail the landing perfectly every time (factoring in wind, carrier speed, etc.)|[http://www.flightgear.org/uas-demo/ Curt Olson]}}
 
As of 03/2009, there were approximately 170,000 lines of reported Nasal source code in the FlightGear base package <ref>{{cite web |url=http://www.mail-archive.com/flightgear-devel@lists.sourceforge.net/msg21333.html |title=Nasal alternatives : possible, of course, but trivial or hair pulling task? |author=Melchior Franz |date=8 March 2009 }}</ref>, compared to 2006 this is almost a rate of growth of 600% within 3 years <ref>{{cite web |url=http://www.mail-archive.com/flightgear-devel@lists.sourceforge.net/msg01728.html |title=FlightGear Make Process: Amazing |author=Ampere K. Hardraade |date=27 February 2006 }}</ref>. This illustrates the sheer adoption rate Nasal is experiencing in FlightGear.
 
(As of 10/2011, the FlightGear base package contained 326.000 lines of Nasal source code in *.nas files)
 
Note that this page is mostly about FlightGear-specific APIs/extension functions and usage patterns.
Thus, you may also want to have a look here:
 
* [http://plausible.org/nasal/lib.html core language/library documentation]
* [http://plausible.org/nasal/sample.nas annotated source code examples]
* [http://plausible.org/nasal/doc.html Nasal design document]
* [http://www.plausible.org/nasal/flightgear.html a helpful tutorial about using Nasal in FlightGear].
 
In addition, the [http://gitorious.org/fg/fgdata/trees/master/Nasal Nasal directory] in the FlightGear base package contains a wealth of tested, proven and usually well-commented source code that you may want to check out for additional examples of using the Nasal scripting language in FlightGear.
 
If you have any Nasal specific questions, you will want to check out the [[Nasal FAQ]], feel free to ask new questions or help answer or refine existing ones. If you would like to learn more about existing Nasal modules in FlightGear, you may want to check out [[Nasal Modules]].
 
If you are a developer and interested in extending Nasal, you may want to check out [[Howto:Extending Nasal]].
 
Many short "howto"-style tutorials on Nasal programming can be found in the [[:Category:Nasal|Nasal category]].
 
== Hello world ==
 
A simple hello world example in Nasal would be:
 
<syntaxhighlight lang="php">
# hello.nas
print('Hello World!');
</syntaxhighlight>
 
This will show the "Hello World" string during startup in the console window. The hash sign (#) just introduces comments (i.e. will be ignored by the interpreter).
 
Note: Script-specific symbols such as global variables (or functions) will be put into a scope (namespace) based on the script's name, scripts embedded via aircraft-set.xml files can separately specify a corresponding module name (see [[Howto: Make an aircraft]] for details).
 
Strings in Nasal can also use double quotes which support escaping:
<syntaxhighlight lang="php">
# hello.nas
print("Hello\nWorld!");
</syntaxhighlight>
 
Double quotes support typical escape sequences:
 
* \n Newline
* \t Horizontal Tab
* \v Vertical Tab
* \b Backspace
* \r Carriage Return
* \f Form feed
* \a Audible Alert (bell)
* \\ Backslash
* \? Question mark
* \' Single quote
* \" Double quote
 
For example, to print a new line, use:
 
print ("\n");
 
To print a quoted string, use:
 
print ("\"quoted string\"");
 
and so on.
 
Single quotes treat everything as literal except for embedded single quotes (including embedded whitespace like newlines).
 
Nasal strings are always arrays of bytes (never characters: see the utf8 library if you want character-based equivalents of substr() et. al.). They can be indexed just like in C (although note that there is no nul termination -- get the length with size()):
 
== Editing code files ==
 
Note that there is currently no way to tell FlightGear to reload Nasal scripts from the global Nasal directory at runtime, so in order to see changes take effect, you will have to exit and restart FlightGear for the time being. Note that there are some workarounds available, see: [[Nasal_scripting_language#Loading.2Freloading_Nasal_code_without_re-starting_FlightGear|reloading Nasal code without re-starting FlightGear]].
 
Also, note that as of 05/2009, Nasal in FlightGear does not yet support any form of dependency resolution. In other words, there's no "import", "require" or "include" directive - this is also why most code in FlightGear is wrapped inside a _setlistener() call instead, which in turn waits for a FlightGear signal before executing the code (see below for details).
 
== Variables ==
Nasal scripts should make use of the var keyword when declaring variables. The "var" keyword makes a variable guaranteed to be local. Nasal, natively provides support for scalars (numbers, strings), lists (arrays, vectors) and hashes (objects or dictionaries), more complex data structures (such as trees) can be built using vectors or hashes.
 
<syntaxhighlight lang="php">
var w=100;    # w is a local numerical variable
var x="hello"; # x is a local string variable
var y=[];      # y is a local vector (array)
var z={};      # z is a local hash (dictionary or table) - also used for OOP
</syntaxhighlight>
 
Now you may be wondering, what the heck is a vector, and what is a hash - and where's the difference?
The difference is, elements in a vector are sequentially numbered, i.e. each element has a numeric index:
 
<syntaxhighlight lang="php">
var my_vector = ['A','B','C'];
</syntaxhighlight>
 
This initializes a vector with three elements: A, B and C.
Now, to access each element of the vector, you would need to use the element's numerical index:
 
<syntaxhighlight lang="php">
var my_vector = ['A','B','C'];
print (my_vector[0] ); #prints A
print (my_vector[1] ); #prints B
print (my_vector[2] ); #prints C
</syntaxhighlight>
 
As can be seen, indexing starts at 0.
 
Compared to vectors, hashes don't use square brackets but curly  braces instead:
<syntaxhighlight lang="php">
var my_hash = {};
</syntaxhighlight>
 
Now, hashes may not just have numerical indexes, but also symbolic indexes as lookup keys:
<syntaxhighlight lang="php">
var my_hash = {first:'A',second:'B',third:'C'};
</syntaxhighlight>
 
This will create a hash (imagine it like a storage container for a bunch of related variables) and initialize it with three values (A,B and C) which are assigned to three different lookup keys: first, second, third.
 
In other words, you can access each element in the hash by using its lookup key:
 
<syntaxhighlight lang="php">
var my_hash = {first:'A',second:'B',third:'C'};
print ( my_hash.first ); # will print A
print ( my_hash.second ); # will print B
print ( my_hash.third ); # will print C
</syntaxhighlight>
 
 
Nasal supports a "nil" value for use as a null pointer equivalent:
 
<syntaxhighlight lang="php">
var foo=nil;
</syntaxhighlight>
 
Also, note that Nasal symbols are case-sensitive, these are all different variables:
 
<syntaxhighlight lang="php">
var show = func(what) {print(what,"\n");}
var abc=1; # these are all different symbols
var ABC=2; # different from abc
var aBc=3; # different from abc and ABC
show(abc);
show(ABC);
show(aBc);
</syntaxhighlight>
 
Please note that functions assigned to variables are no exception. If you write code without using "var" on variables, then you risk (often hard to debug) breakage at a later time because you may be overwriting symbols in another namespace.
 
So functions bound to variables should use the "var" keyword as well:
 
<syntaxhighlight lang="php">
var hello = func {
  print("hello\n");
}
</syntaxhighlight>
 
But there's another reason why "var" should be used consequently, even if a variable is safe enough from later side effects, because it has a relatively specific or unique name: The "var" keyword makes
reading code for others (and for the author after some time) easier, as it makes clear: "this variable starts its life *HERE*". No need to search around to see whether assigning a value to it means something to other code outside or not. Also, with an editor offering proper syntax highlighting reading such code is actually easier, despite the "noise".
 
The problem with nasal code that does not make use of the var keyword is, that it can break other code, and with it the whole system, but no Nasal error message will point you there, as it's syntactically and semantically correct code. Just doing things that it wasn't supposed to do.
For a more in-depth discussion, please see [http://www.mail-archive.com/flightgear-devel@lists.sourceforge.net/msg13557.html Nasal & "var"].
 
Also, Nasal scripts that are loaded from $FG_ROOT/Nasal are automatically placed inside a namespace that is based on the script's name.
 
For example, referring to our earlier "Hello World" example, global variables defined in the hello.nas script would be accessible by using "hello" as prefix from other modules:
 
<syntaxhighlight lang="php">
# hello.nas
var greeting="Hello World"; # define a greeting symbol inside the hello namespace
</syntaxhighlight>
 
If you were now to read out the value from the greeting variable from another Nasal module, you would have to use the hello prefix:
 
<syntaxhighlight lang="php">
# greetme.nas
print(hello.greeting); # the hello prefix is referring to the hello namespace (or module).
</syntaxhighlight>
 
==Namespaces==
The Nasal Console built into FlightGear is quite handy when it comes to debugging code. However, here the namespaces need to be considered. In addition, Nasal sub modules (see above) have some special rules, too - basically, all Nasal files part of a "sub module" share a single name space based on the folder's name rather than the name of the individual Nasal files.
 
For cases of Nasal code specific for an aircraft (like instruments, for example), the corresponding scripts could be loaded through the aircraft's <tt>-set.xml</tt> file by putting it into the <tt><nasal>...</nasal><tt> section
 
<syntaxhighlight lang="xml">
  <nasal>
    ...
    <moduleA>
      <file>path/to/file1.nas</file>
      <file>path/to/file2.nas</file>
    </moduleA>
    <moduleB>
      <file>path/to/file3.nas</file>
    </moduleB>
  </nasal>
</syntaxhighlight>
 
In this case, variables in files <tt>path/to/file1.nas</tt> and <tt>path/to/file2.nas</tt> can be used in the Nasal console as
 
  moduleA.varName;
 
Variables in <tt>path/to/file3.nas</tt> can be accessed as
 
  moduleB.varName;
 
Please note that Nasal sub modules (i.e. files loaded and run from their own Nasal sub directory), are subject to some special rules, as all Nasal source files are automatically loaded into the same namespace, which is by default based on the sub module's folder name.
 
 
'''''More information can be found at [[Namespaces and Methods]].'''''
 
== Variables - Advanced Uses ==
 
Nasal, also supports Multi-assignment expressions. You can assign more than one variable (or lvalue) at a time by putting them in a parenthesized list:
 
<syntaxhighlight lang="php">
  (var a, var b) = (1, 2);
  var (a, b) = (1, 2);              # Shorthand for (var a, var b)
  (var a, v[0], obj.field) = (1,2,3) # Any assignable lvalue works
  var color = [1, 1, 0.5];
  var (r, g, b) = color;  # works with runtime vectors too
</syntaxhighlight>
 
Vectors (lists or arrays) can be created from others using an ordered list of indexes and ranges.
This is usually called "vector slicing".
For example:
 
<syntaxhighlight lang="php">
  var v1 = ["a","b","c","d","e"]
  var v2 = v1[3,2];  # == ["d","c"];
  var v3 = v1[1:3];  # i.e. range from 1 to 3: ["b","c","d"];
  var v4 = v1[1:];    # no value means "to the end": ["b","c","d","e"]
  var i = 2;
  var v5 = v1[i];    # runtime expressions are fine: ["c"]
  var v6 = v1[-2,-1]; # negative indexes are relative to end: ["d","e"]
</syntaxhighlight>
 
The range values can be computed at runtime (e.g. i=1; v5=v1[i:]). Negative indices work the same way they do with the vector functions (-1 is the last element, -2 is 2nd to last, etc...).
 
== Storage: property tree vs. Nasal ==
With FlightGear's built-in property tree and Nasal's support for it, there are two obvious, and two somewhat competing, ways for storing scalar data: native Nasal variables and FlightGear properties, both of which can be easily accessed and managed from Nasal.
 
The advantage to native Nasal-space data is that it's fast and simple.  If the only thing that will care about the value is your script, they are good choices.
 
The property tree is an inter-subsystem communication thing.  This is what you want if you want to share data with the C++ world (for example, YASim <control-output> tags write to properties -- they don't understand Nasal), or read in via configuration files.
 
Also, native Nasal data structures are usually far faster than their equivalent in property tree space.  This is because there are several layers of indirection in retrieving a property tree value.
 
In general, this means that you shouldn't make overly excessive use of the property tree for storing state that isn't otherwise relevant to FlightGear or any of its subsystems. Doing that would in fact have adverse effects on the performance of your code. In general, you should favor Nasal variables and data structures and should only make use of properties to interface with the rest of FlightGear, or to easily provide debugging information at run time.
 
As of FG 2.4.0, retrieving a value from the property tree via getprop is about 50% slower than accessing a native Nasal variable, and accessing the value via node.getValue() is 10-20% slower yet. This is an insignificant amount of time if you are retrieving and storing a few individual values from the property tree, but adds up fast if you are storing or retrieving hashes or large amounts of data.  (You can easily benchmark times on your own code using systime() or debug.benchmark.)
 
In addition, it is worth noting that the Nasal/FlightGear APIs cannot currently be considered to be thread safe, this mean that -at least for now- the explicit use of pure Nasal space variables is the only way to exploit possible parallelism in your code by making use of threads.
 
== Conditionals ==
 
Nasal has no "statements", which means that any expression can appear in any context. This means that you can use an if/else clause to do what the ?: does in C.
The last semicolon in a code block is optional, to make this prettier
 
<syntaxhighlight lang="php">
var abs = func(n) { if(n<0) { -n } else { n } }
</syntaxhighlight>
 
But for those who don't like typing, the ternary operator works like you expect:
 
<syntaxhighlight lang="php">
var abs = func(n) { n < 0 ? -n : n }
</syntaxhighlight>
 
In addition, Nasal supports braceless blocks, like they're known from C/C++ and other languages. This means basically that the first statement (expression) after a conditional is evaluated if the condition is true, otherwise it will be ignored:
 
<syntaxhighlight lang="php">
var foo=1;
if (foo)
  print("1\n");
else
  print("0\n");
print("this is printed regardless\n")
</syntaxhighlight>
 
 
Instead of a switch statement one can use
 
<syntaxhighlight lang="php">
  if (1==2) {
    print("wrong");
  } else if (1==3) { # NOTE the space between else and if
    print("wronger");
  } else {
    print("don't know");
  }
</syntaxhighlight>
 
Instead of "else if", you can also use the shorter equivalent form "elsif".
 
which produces the expected output of <code>don't know</code>
 
In addition to "else if", Nasal also supports a short-hand version of it, called "elsif", which is semantically identical:
 
<syntaxhighlight lang="php">
  if (1==2) {
    print("wrong");
  } elsif (1==3) {
    print("wronger");
  } else {
    print("don't know");
  }
</syntaxhighlight>
 
 
The <tt>nil</tt> logic is actually quite logical, let's just restate the obvious:
 
<syntaxhighlight lang="php">
  if (nil) {
    print("This should never be printed");
  } else {
    print("This will be printed, because nil is always false");
  };
</syntaxhighlight>


Nasal's binary boolean operators are "and" and "or", unlike C. unary not is still "!" however.
They short-circuit like you expect
 
<syntaxhighlight lang="php">
var toggle = 0;
var a = nil;
if(a and a.field == 42) {
    toggle = !toggle; # doesn't crash when a is nil
}
</syntaxhighlight>
 
Note that you should always surround multiple conditions within outer parentheses, e.g.:
 
<syntaxhighlight lang="php">
if (1) do_something();
if (1 and 1) do_something();
if ( (1) and (1) ) do_something();
if ( (1) or (0) ) do_something();
</syntaxhighlight>
 
Nasal's binary boolean operators can also be used to default expressions to certain values:
 
<syntaxhighlight lang="php">
var altitude = getprop("/position/altitude-ft") or 0.00;
</syntaxhighlight>
 
Basically this will first execute the getprop() call and if it doesn't return "true" (i.e. non zero/nil), it will instead use 0.00 as the value for the altitude variable.
 
Regarding boolean operators like and/or: This is working because they "short circuit", i.e. in an OR comparison, the remaining checks are NEVER done IF any single of the previous checks is true (1), because that'll suffice to satisfy the OR expression (i.e. knowing that a single check evaluates to true).
 
Similarly, an "and" expression will inevitably need to do ALL "and" checks in order to evaluate the whole expression.
 
At first, this may seem pretty complex and counter-intuitive - but it's important to keep this technique in mind, especially for variables that are later on used in calcuations:
 
<syntaxhighlight lang="php">
var x=getprop("/velocities/airspeed-kts") or 0.00; # to ensure that x is always valid number
var foo= 10*3.1*x; # ... for this computation
</syntaxhighlight>
 
So this is to ensure that invalid property tree state does not mess up the calculations done in Nasal by defaulting x to 0.00, i.e. a valid numeric value.
 
Bottom line being, using "or" to default a variable to a given value is a short and succinct way to avoid otherwise elaborate checks, e.g. compare:
 
<syntaxhighlight lang="php">
var altitude_ft = getprop("/position/altitude-ft");
if (altitude_ft == nil) {
  altitude_ft = 0.0;
}
</syntaxhighlight>
 
versus:
 
<syntaxhighlight lang="php">
var altitude_ft = getprop("/position/altitude-ft") or 0.00;
</syntaxhighlight>


Basically: whenever you read important state from the property tree that you'll use in calculations, it's a good practice to default the value to some sane value.
 
But this technique isn't really specific to getprop (or any other library call).
 
Nasal is a language that has no statements, it's all about EXPRESSIONS. So you can put things in pretty much arbitrary places.
 
<syntaxhighlight lang="php">
var do_something = func return 0;
if (a==1) {
  do_something() or print("failed");
}
 
var do_something = func return 0;
( (a==1) and do_something() ) or print("failed");
</syntaxhighlight>
 
In a boolean comparison, 1 always means "true" while 0 always means "false". For instance, ANY comparison with if x ==1 can be abbreviated to if (x), because the ==1 check is implictly done:
 
<syntaxhighlight lang="php">
var do_something = func return 0;
( a and do_something() ) or print("failed");
</syntaxhighlight>
 
== Using Hashs to map keys to functions ==
 
You can easily reduce the complexity of huge conditional (IF) statements, such as this one:
 
<syntaxhighlight lang="php">
    if (a==1) function_a();
    else
    if (a==2) function_b();
    else
    if (a==3) function_c();
    else
    if (a==4) function_d();
    else
    if (a==5) function_e();
</syntaxhighlight>
 
.. just by using the variable as a key (index) into a hash, so that you can directly call the corresponding function:
 
<syntaxhighlight lang="php">
    var mapping = {1:function_a, 2:function_b, 3:function_c, 4:function_d,5:function_e};
    mapping[a] ();
</syntaxhighlight>
 
This initializes first a hash map of values and maps a function "pointer" to each value, so that accessing mapping[x] will return the function pointer for the key "x".
 
Next, you can actually call the function by appending a list of function arguments (empty parentheses for no args) to the hash lookup.
 
Using this technique, you can reduce the complexity of huge conditional blocks. For example, consider:
 
    # weather_tile_management.nas
    460        if (code == "altocumulus_sky"){weather_tiles.set_altocumulus_tile();}
    461        else if (code == "broken_layers") {weather_tiles.set_broken_layers_tile();}
    462        else if (code == "stratus") {weather_tiles.set_overcast_stratus_tile();}
    463        else if (code == "cumulus_sky") {weather_tiles.set_fair_weather_tile();}
    464        else if (code == "gliders_sky") {weather_tiles.set_gliders_sky_tile();}
    465        else if (code == "blue_thermals") {weather_tiles.set_blue_thermals_tile();}
    466        else if (code == "summer_rain") {weather_tiles.set_summer_rain_tile();}
    467        else if (code == "high_pressure_core") {weather_tiles.set_high_pressure_core_tile();}
    468        else if (code == "high_pressure") {weather_tiles.set_high_pressure_tile();}
    469        else if (code == "high_pressure_border") {weather_tiles.set_high_pressure_border_tile();}
    470        else if (code == "low_pressure_border") {weather_tiles.set_low_pressure_border_tile();}
    471        else if (code == "low_pressure") {weather_tiles.set_low_pressure_tile();}
    472        else if (code == "low_pressure_core") {weather_tiles.set_low_pressure_core_tile();}
    473        else if (code == "cold_sector") {weather_tiles.set_cold_sector_tile();}
    474        else if (code == "warm_sector") {weather_tiles.set_warm_sector_tile();}
    475        else if (code == "tropical_weather") {weather_tiles.set_tropical_weather_tile();}
    476        else if (code == "test") {weather_tiles.set_4_8_stratus_tile();}
    477        else ...
 
While this is not a very complex or huge block of code, it is an excellent example for very good naming conventions used already, because the consistency of naming variables and functions can pay off easily here, with just some very small changes, you can already reduce the whole thing to a hash lookup like this:
 
  weather_tiles["set_"~code~"_tile"]();  # naming convention
 
This would dynamically concatenate a key consisting of "set_" + code + "_title" into the hash named weather_tiles, and then call the function that is returned from the hash lookup.
 
So for this to work you only need to enforce consistency when naming your functions (i.e. this would of course CURRENTLY fail when the variable code contains "test" because there is no such hash member (it's "4_8_stratus" instead).
 
The same applies to cumulus sky (fair weather), stratus/overcast stratus.
 
But these are very simple changes to do (just renaming these functions to match the existing conventions). When you do that, you can easily replace such huge IF statements and replace them with a single hash lookup and function call:
 
hash[key] (arguments...);
 
For example, consider:
 
<syntaxhighlight lang="php">
var makeFuncString = func(c) return tolower("set_"~c~"_tile");
var isFunc = func(f) typeof(f)=='func';
var hasMethod = func(h,m) contains(h,m) and isFunc;
var callIfAvailable = func(hash, method, unavailable=func{} ) {
  var c=hasMethod(hash,makeFuncString(m) ) or unavailable();
  hash[makeFuncString(m)] ();
}
callIfAvailable( weather_tiles,code, func {die("key not found in hash or not a func");} );
</syntaxhighlight>
 
== Initializing data structures ==
 
There are some more possibilities to increase the density of your code, such as by removing redundant code or by generalizing and refactoring existing code so that it can be reused in different places (i.e. avoiding duplicate code):
 
For example see weather_tile_management.nas #1000 (create_neighbours function):
 
    1008 x = -40000.0; y = 40000.0;
    1009 setprop(lw~"tiles/tile[0]/latitude-deg",blat + get_lat(x,y,phi));
    1010 setprop(lw~"tiles/tile[0]/longitude-deg",blon + get_lon(x,y,phi));
    1011 setprop(lw~"tiles/tile[0]/generated-flag",0);
    1012 setprop(lw~"tiles/tile[0]/tile-index",-1);
    1013 setprop(lw~"tiles/tile[0]/code","");
    1014 setprop(lw~"tiles/tile[0]/timestamp-sec",weather_dynamics.time_lw);
    1015 setprop(lw~"tiles/tile[0]/orientation-deg",alpha);
    1016
    1017 x = 0.0; y = 40000.0;
    1018 setprop(lw~"tiles/tile[1]/latitude-deg",blat + get_lat(x,y,phi));
    1019 setprop(lw~"tiles/tile[1]/longitude-deg",blon + get_lon(x,y,phi));
    1020 setprop(lw~"tiles/tile[1]/generated-flag",0);
    1021 setprop(lw~"tiles/tile[1]/tile-index",-1);
    1022 setprop(lw~"tiles/tile[1]/code","");
    1023 setprop(lw~"tiles/tile[1]/timestamp-sec",weather_dynamics.time_lw);
    1024 setprop(lw~"tiles/tile[1]/orientation-deg",alpha);
    1025
    1026 x = 40000.0; y = 40000.0;
    1027 setprop(lw~"tiles/tile[2]/latitude-deg",blat + get_lat(x,y,phi));
    1028 setprop(lw~"tiles/tile[2]/longitude-deg",blon + get_lon(x,y,phi));
    1029 setprop(lw~"tiles/tile[2]/generated-flag",0);
    1030 setprop(lw~"tiles/tile[2]/tile-index",-1);
    1031 setprop(lw~"tiles/tile[2]/code","");
    1032 setprop(lw~"tiles/tile[2]/timestamp-sec",weather_dynamics.time_lw);
    1033 setprop(lw~"tiles/tile[2]/orientation-deg",alpha);
    1034
    1035 x = -40000.0; y = 0.0;
    1036 setprop(lw~"tiles/tile[3]/latitude-deg",blat + get_lat(x,y,phi));
    1037 setprop(lw~"tiles/tile[3]/longitude-deg",blon + get_lon(x,y,phi));
    1038 setprop(lw~"tiles/tile[3]/generated-flag",0);
    1039 setprop(lw~"tiles/tile[3]/tile-index",-1);
    1040 setprop(lw~"tiles/tile[3]/code","");
    1041 setprop(lw~"tiles/tile[3]/timestamp-sec",weather_dynamics.time_lw);
    1042 setprop(lw~"tiles/tile[3]/orientation-deg",alpha);
    1043
    1044 # this is the current tile
    1045 x = 0.0; y = 0.0;
    1046 setprop(lw~"tiles/tile[4]/latitude-deg",blat + get_lat(x,y,phi));
    1047 setprop(lw~"tiles/tile[4]/longitude-deg",blon + get_lon(x,y,phi));
    1048 setprop(lw~"tiles/tile[4]/generated-flag",1);
    1049 setprop(lw~"tiles/tile[4]/tile-index",1);
    1050 setprop(lw~"tiles/tile[4]/code","");
    1051 setprop(lw~"tiles/tile[4]/timestamp-sec",weather_dynamics.time_lw);
    1052 setprop(lw~"tiles/tile[4]/orientation-deg",getprop(lw~"tmp/tile-orientation-deg"));
    1053
    1054
    1055 x = 40000.0; y = 0.0;
    1056 setprop(lw~"tiles/tile[5]/latitude-deg",blat + get_lat(x,y,phi));
    1057 setprop(lw~"tiles/tile[5]/longitude-deg",blon + get_lon(x,y,phi));
    1058 setprop(lw~"tiles/tile[5]/generated-flag",0);
    1059 setprop(lw~"tiles/tile[5]/tile-index",-1);
    1060 setprop(lw~"tiles/tile[5]/code","");
    1061 setprop(lw~"tiles/tile[5]/timestamp-sec",weather_dynamics.time_lw);
    1062 setprop(lw~"tiles/tile[5]/orientation-deg",alpha);
    1063
    1064 x = -40000.0; y = -40000.0;
    1065 setprop(lw~"tiles/tile[6]/latitude-deg",blat + get_lat(x,y,phi));
    1066 setprop(lw~"tiles/tile[6]/longitude-deg",blon + get_lon(x,y,phi));
    1067 setprop(lw~"tiles/tile[6]/generated-flag",0);
    1068 setprop(lw~"tiles/tile[6]/tile-index",-1);
    1069 setprop(lw~"tiles/tile[6]/code","");
    1070 setprop(lw~"tiles/tile[6]/timestamp-sec",weather_dynamics.time_lw);
    1071 setprop(lw~"tiles/tile[6]/orientation-deg",alpha);
    1072
    1073 x = 0.0; y = -40000.0;
    1074 setprop(lw~"tiles/tile[7]/latitude-deg",blat + get_lat(x,y,phi));
    1075 setprop(lw~"tiles/tile[7]/longitude-deg",blon + get_lon(x,y,phi));
    1076 setprop(lw~"tiles/tile[7]/generated-flag",0);
    1077 setprop(lw~"tiles/tile[7]/tile-index",-1);
    1078 setprop(lw~"tiles/tile[7]/code","");
    1079 setprop(lw~"tiles/tile[7]/timestamp-sec",weather_dynamics.time_lw);
    1080 setprop(lw~"tiles/tile[7]/orientation-deg",alpha);
    1081
    1082 x = 40000.0; y = -40000.0;
    1083 setprop(lw~"tiles/tile[8]/latitude-deg",blat + get_lat(x,y,phi));
    1084 setprop(lw~"tiles/tile[8]/longitude-deg",blon + get_lon(x,y,phi));
    1085 setprop(lw~"tiles/tile[8]/generated-flag",0);
    1086 setprop(lw~"tiles/tile[8]/tile-index",-1);
    1087 setprop(lw~"tiles/tile[8]/code","");
    1088 setprop(lw~"tiles/tile[8]/timestamp-sec",weather_dynamics.time_lw);
    1089 setprop(lw~"tiles/tile[8]/orientation-deg",alpha);
    1090 }
 
At first glance, this seems like a fairly repetitive and redundant block of code, so it could probably be simplified easily:
 
    var create_neighbours = func (blat, blon, alpha)        {
    var phi = alpha * math.pi/180.0;
    calc_geo(blat);
    var index=0;
    var pos = [  [-40000.0,40000.0], [0.0, 40.000], [40000.0, 40000.0], [-40000, 0],  [0,0], [40000,0], [-40000,-40000], [0,-40000], [40000,-40000] ];
    foreach (var p;pos) {
    x=p[0]; y=p[1];
    setprop(lw~"tiles/tile["~index~"]/latitude-deg",blat + get_lat(x,y,phi));
    setprop(lw~"tiles/tile["~index~"]/longitude-deg",blon + get_lon(x,y,phi));
    setprop(lw~"tiles/tile["~index~"]/generated-flag",0);
    setprop(lw~"tiles/tile["~index~"]/tile-index",-1);
    setprop(lw~"tiles/tile["~index~"]/code","");
    setprop(lw~"tiles/tile["~index~"]/timestamp-sec",weather_dynamics.time_lw);
    setprop(lw~"tiles/tile["~index~"]/orientation-deg",alpha);
    index=index+1;
      }
    }
 
== Loops ==
 
Nasal has several ways to implement an iteration.
 
===for, while, foreach, and forindex loops===
Nasal's looping constructs are mostly C-like:
 
for(var i=0; i < 3; i = i+1) {
  # loop body
  }
 
while (condition) {
# loop body
}
 
The differences are that there is no do{}while(); construct, and there is a foreach, which takes a local variable name as its first argument and a vector as its second:
 
  foreach(elem; list1) { doSomething(elem); }  # NOTE: the delimiter is a SEMICOLON ;
 
The hash/vector index expression is an lvalue that can be assigned as well as inspected:
 
  foreach(light; lights) { lightNodes[light] = propertyPath; }
 
To walk through all elements of a hash, for a foreach loop on the keys of they hash.  Then you call pull up the values of the hash using the key.  Example:
 
myhash= {first: 1000, second: 250, third: 25.2 };
foreach (var i; keys (myhash)) {
  #multiply each value by 2:
  myhash[i] *= 2;
  #print the key and new value:
  print (i, ": ", myhash[i]);
}
 
There is also a "forindex", which is like foreach except that it assigns the index of each element, instead of the value, to the loop variable.
 
forindex(i; list1) { doSomething(list1[i]); }
 
Also, braceless blocks work for loops equally well:
 
var c=0;
while( c<5 )
  print( c+=1 );
print("end of loop\n");
 
===settimer loops===
Loops using <tt>while</tt>, <tt>for</tt>, <tt>foreach</tt>, and <tt>forindex</tt> block all of FlightGear's subsystems that run in the main thread, and can, thus, only be used for instantaneous operations that don't take too long.
 
For operations that should continue over a longer period, one needs a non-blocking solution. This is done by letting functions call themselves after a timed delay:
 
var loop = func {
    print("this line appears once every two seconds");
    settimer(loop, 2);
}
loop();        # start loop
 
Note that the <tt>settimer</tt> function expects a ''function object'' (<tt>loop</tt>), not a function call (<tt>loop()</tt>) (though it is possible to make a function call return a function object--an advanced functional programming technique that you won't need to worry about if you're just getting started with Nasal).
 
The fewer code FlightGear has to execute, the better, so it is desirable to run loops only when they are needed. But how does one stop a loop? A once triggered timer function can't be revoked. But one can let the loop function check an outside variable and refuse calling itself, which makes the loop chain die off:
 
var running = 1;
var loop = func {
    if (running) {
        print("this line appears once every two seconds");
        settimer(loop, 2);
    }
}
loop();        # start loop ...
...
running = 0;  # ... and let it die
 
Unfortunately, this method is rather unreliable. What if the loop is "stopped" and a new instance immediately started again? Then the ''running'' variable would be ''1'' again, and a pending old loop call, which should really finish this chain, would happily continue. And the new loop chain would start, too, so that we would end up with two loop chains.
 
This can be solved by providing each loop chain with a ''loop identifier'' and letting the function end itself if the id doesn't match the global loop-id. Self-called loop functions need to inherit the chain id. So, every time the global loop id is increased, all loop chains die, and a new one can immediately be started.
 
var loopid = 0;
var loop = func(id) {
    id == loopid or return;          # stop here if the id doesn't match the global loop-id
    ...
    settimer(func { loop(id) }, 2);  # call self with own loop id
}
loop(loopid);      # start loop
...
loopid += 1;        # this kills off all pending loops, as none can have this new identifier yet
...
loop(loopid);      # start new chain; this can also be abbreviated to:  loop(loopid += 1);
 
[[Nasal_scripting_language#settimer.28.29|More information about the settimer function is below]]
 
== Listeners and Signals ==
The important thing to keep in mind is that custom listeners are generally not about loading or running Nasal files, most of the Nasal files are loaded and executed implictly during startup. Only the Nasal sub modules (i.e. inside their own $FG_ROOT/Nasal/ directory) are dynamically loaded using a listener). So listeners are really just a simple way to talk to the property tree:
'''Hey property tree, would you please be so kind to call this Nasal function whenever this property is modified?'''
 
So, listeners are callback functions that are attached to property nodes. They are triggered whenever the node is written to, or, depending on the listener type, also when children are added or removed, and when children are written to. Unlike polling loops, listeners don't have the least effect on the frame rate when they aren't triggered, which makes them preferable to monitor properties that aren't written to frequently.
 
===setlistener() vs. _setlistener() ===
You are requested *not* to use the raw _setlistener() function, except in files in $FG_ROOT/Nasal/ when they are
needed immediately. Only then the raw function is required, as it doesn't rely on props.nas.
 
===<tt>When listeners don't work</tt>===
Unfortunately, '''listeners don't work on so-called "tied" properties''' when the node value isn't set via property methods. (You can spot such tied properties by Ctrl-clicking the "." entry in the property browser: they are marked with a "T".) Most of the FDM properties are "tied".
 
Examples of properties where setlistener ''won't'' work:
 
* /position/elevation-ft
* /ai/models/aircraft/orientation/heading-deg
* Any property node created as an alias
* Lots of others
 
Before working to create a listener, always check whether a listener will work with that property node by control-clicking the "." in property browser to put it into verbose mode, and then checking whether the property node for which you want to set up a listener is marked with a "T" or not.
 
If you can't set a listener for a particular property, the alternative is to use settimer to set up a timer loop that checks the property value regularly.
 
Listeners are most efficient for properties that change only occasionally.  No code is called at all during frames where the listener function is not called.  If the property value changes every frame, setting up a settimer loop with time=0 will execute every frame, just the same as setlistener would, and the settimer loop is more efficient than setting a listener. This is one reason the fact the setlistener doesn't work on certain tied and FDM properties is not a great loss.  See the section on timer loops below.
 
=== <tt>setlistener()</tt> ===
 
Syntax:
 
var listener_id = setlistener(<property>, <function> [, <startup=0> [, <runtime=1>]]);
 
The first argument is a property node object (<tt>props.Node()</tt> hash) or a property path. Because the node hash depends on the props.nas module being loaded, <tt>setlistener()</tt> calls need to be deferred when used in an $FG_ROOT/Nasal/*.nas file, usually by calling them in a <tt>settimer(func {}, 0)</tt> construction. To avoid that, one can use the raw <tt>_setlistener()</tt> function directly, for which <tt>setlistener()</tt> is a wrapper. The raw function does only accept node paths (e.g. "/sim/menubar/visibility"), but not props.Node() objects.
 
The second argument is a function object (not a function call!). The <tt>func</tt> keyword turns code into a function object.
 
The third argument is optional. If it is non-null, then it causes the listener to be called initially. This is useful to let the callback function pick up the node value at startup.
 
The fourth argument is optional, and defaults to 1. This means that the callback function will be executed whenever the property is written to, independent of the value.
 
If the argument is set to 0, then the function will only get triggered if a value other than the current value is written to the node. This is important for cases where a property is written to once per frame, no matter if the value changed or not. YASim, for example, does that for /gear/gear/wow or /gear/launchbar/state.
So, this should be used for properties that are written to in every frame, although the written value is mostly the same. If the argument is 2, then also write access to children will get reported, as well as the creation and removal of children nodes.
 
For both optional flags 0 means less calls, and 1 means more calls. The first is for startup behavior, and the second for runtime behavior.
 
Here's a real-life example:
 
  setlistener("/gear/launchbar/state", func {
      if (cmdarg().getValue() == "Engaged")
          setprop("/sim/messages/copilot", "Engaged!");
  }, 1, 0);
 
YASim writes once per frame the string "Disengaged" to property /gear/launchbar/state. When an aircraft on deck of the aircraft carrier locks into the catapult, this changes to "Engaged", which is then written again in every frame, until the aircraft leaves the catapult. Because the locking in is a bit difficult -- one has to target the sensitive area quite exactly --, it was desirable to get some quick feedback: a screen message that's also spoken by the Festival speech synthesis. With the args 1 and 0, this is done initially (for the unlikely case that we are locked in from the beginning), and then only when the node changes from an arbitrary value to "Engaged".
 
<tt>setlistener()</tt> returns a unique listener id on success, and <tt>nil</tt> on error. The id is nothing else than a counter that is 0 for the first Nasal listener, 1 for the second etc. You need this id number to remove the listener. Most listeners are never removed, so that one doesn't assign the return value, but simply drop it.
 
Listener callback functions can access up to four values via regular function arguments, the first two of which are property nodes in the form of a <tt>props.Node()</tt> object hash.
 
If you have set a callback function named ''myCallbackFunc'' via <tt>setlistener</tt> (''setlistener(myNode, myCallbackFunc)''), you can use this syntax in the callback function:
 
myCallbackFunc ([<changed_node> [, <listened_to_node> [, <operation> [, <is_child_event>]]]])
 
=== <tt>removelistener()</tt> ===
 
Syntax:
 
var num_listeners = removelistener(<listener id>);
 
<tt>removelistener()</tt> takes one argument: the unique listener id that a <tt>setlistener()</tt> call returned. It returns the number of remaining active Nasal listeners on success, <tt>nil</tt> on error, or -1 if a listener function applies <tt>removelistener()</tt> to itself. The fact that a listener can remove itself, can be used to implement a one-shot listener function:
 
var L = setlistener("/some/property", func {
    print("I can only be triggered once.");
    removelistener(L);
});


=== Listener Examples ===
 
The following example attaches an anonymous callback function to a "signal". The function will be executed when FlightGear is closed.
 
setlistener("/sim/signals/exit", func { print("bye!") });
 
 
Instead of an anonymous function, a named function can be used as well:
 
var say_bye = func { print("bye") }
setlistener("/sim/signals/exit", say_bye);
 
Callback functions can, optionally, access up to four parameters which are handed over via regular function arguments. Many times none of these parameters is used at all, as in the above example.
 
Most often, only the first parameter is used--which gives the node of the changed value.
 
The following code attaches the monitor_course() function to a gps property, using the argument ''course'' to get the node with the changed value.
 
var monitor_course = func(course) {
    print("Monitored course set to ", course.getValue());
}
var i = setlistener("instrumentation/gps/wp/leg-course-deviation-deg", monitor_course);
# here the listener is active
removelistener(i);                    # remove that listener again
 
Here is code that accesses two arguments--the changed node and the listened-to node (these may be different when monitoring all children of a certain node)--and also shows how to monitor changes to a node including changes to children:
 
var monitor_course = func(course, flightinfo) {
    print("One way to get the course setting: ", flightinfo.leg-course-deviation-deg.getValue());
    print("Another way to get the same setting ", course.getValue());
}
var i = setlistener("instrumentation/gps/wp", monitor_course, 0, 2);
 
 
The function object doesn't need to be a separate, external function -- it can also be an anonymous function made directly in the <tt>setlistener()</tt> call:
 
setlistener("/sim/signals/exit", func { print("bye") });    # say "bye" on exit
 
Beware, however, that the contents of a function defined within the <tt>setlistener</tt> call are not evaluated until the call is actually made. If, for instance, local variables change before the setlistener call happens, the call will reflect the current value of those variables ''at the time the callback function is called'', not the value ''at the time the listener was set''.
 
For example, with this loop, the function will always return the value 10--even if mynode[1], mynode[2], mynode[3] or any of the others is the one that changed. It is because the contents of the setlistener are evaluated after the loop has completed running and at that point, i=10:
 
var output = func(number) {
    print("mynode", number, " has changed!"); #This won't work!
}
for(i=1; i <= 10; i = i+1) {
    var i = setlistener("mynode["~i~"]", func{ output (i); });
}
 
You can also access the four available function properties (or just one, two, or three of them as you need) in your anonymous function. Here is an example that accesses the first value:
for(i=1; i <= 10; i = i+1) {
    var i = setlistener("mynode["~i~"]", func (changedNode) { print (changedNode.getPath() ~ " : " ~ changedNode.getValue()); });
}
 
Attaching a function to a node that is specified as <tt>props.Node()</tt> hash:
 
var node = props.globals.getNode("/sim/signals/click", 1);
setlistener(node, func { gui.popupTip("don't click here!") });
 
Sometimes it is desirable to call the listener function initially, so that it can pick up the node value. In the following example a listener watches the view number, and turns the HUD on in cockpit view, and off in all other views. It doesn't only do that on writing to "view-number", but also once when the listener gets attached, thanks to the third argument "1":
 
setlistener("/sim/current-view/view-number", func(n) {
    setprop("/sim/hud/visibility[0]", n.getValue() == 0);
}, 1);
 
There's no limit for listeners on a node. Several functions can get attached to one node, just as one function can get attached to several nodes. Listeners may write to the node they are listening to. This will not make the listener call itself causing an endless recursion.
 
=== Signals ===
 
In addition to "normal" nodes, there are "signal" nodes that were created solely for the purpose of having listeners attached:
 
* <tt>/sim/signals/exit</tt> ... set to "true" on quitting FlightGear
* <tt>/sim/signals/reinit</tt> ... set to "true" right before resetting FlightGear (Shift-Esc), and to "false" afterwards
* <tt>/sim/signals/click</tt> ... set to "true" after a mouse click at the terrain. Hint that the geo coords for the click spot were updated and can be retrieved from /sim/input/click/{longitude-deg,latitude-deg,elevation-ft,elevation-m}
* <tt>/sim/signals/screenshot</tt> ... set to "true" right before the screenshot is taken, and set to "false" after it. Can be used to hide and reveal dialogs etc.
* <tt>/sim/signals/nasal-dir-initialized</tt> ... set to "true" after all Nasal "library" files in $FG_ROOT/Nasal/ were loaded and executed. It is only set once and can only be used to trigger listener functions that were defined in one of the Nasal files in that directory. After that signal was set Nasal starts loading and executing aircraft Nasal files, and only later are <tt>settimer()</tt> functions called and the next signal is set:
* <tt>/sim/signals/fdm-initialized</tt> ... set to "true" when then FDM has just finished its initialization
* <tt>/sim/signals/reinit-gui</tt> ... set to "true" when the GUI has just been reset (e.g. via Help menu). This is used by the gui.Dialog class to reload Nasal-loaded XML dialogs.
* <tt>/sim/signals/frame</tt> ... triggered at the beginning of each iteration of the main loop (a.k.a. "frame"). This is meant for debugging purposes. Normally, one would just use a settimer() with interval 0 for the same effect. The difference is that the signal is guaranteed to be raised at a defined moment, while the timer call may change when subsystems are re-ordered.
 
==Built-in functions==
 
===sort(vector, function)===
Creates a new vector containing the elements in the input vector sorted in ascending order according to the rule given by function, which takes two arguments (elements of the input vector) and should return less than zero, zero, or greater than zero if the first argument is, respectively, less than, equal to, or greater than the second argument. Despite being implemented with ANSI C qsort(), the sort is stable; "equal" elements in the output vector will appear in the same relative order as they do in the input.
 
Because you can define the sort function, sort allows you to create a list of keys sorting a hash by any criterion--by key, value, or (if, for instance the hash values are hashes themselves) any subvalue.
 
vec = [100,24,45];
sortvec = sort (vec, func (a,b) cmp (a,b));
debug.dump (sortvec); #output is [24,45,100]
 
Here is an example of how to output the contents of a hash in sorted order.  Note that the function does not actually sort the hash but returns a list of the hash keys in sorted order.
 
var airport = {
  "LOXZ": "Zeltweg",
  "LOWI": "Innsbruck",
  "LOXL": "Linz Hoersching",    # the last comma is optional
};
var sortedkeys= sort (keys(airport), func (a,b) cmp (airport[a], airport[b]));
foreach (var i; sortedkeys)
  print (i, ": ", airport[i]);
 
The output is:
 
  LOWI: Innsbruck
  LOXL: Linz Hoersching
  LOXZ: Zeltweg 
 
If the hash values are themselves hashes, sorting by any of the subvalues is possible.  For example:
 
var airport = {
    "LOXZ": {city: "Zeltweg", altitude_m: 1300 },
    "LOWI": {city: "Innsbruck", altitude_m: 2312 },
    "LOXL": {city: "Linz Hoersching", altitude_m: 1932 },
};
 
#return a list of the hash keys sorted by altitude_m
var sortedkeys= sort (keys(airport), func (a,b) airport[a].altitude_m - airport[b].altitude_m);
 
foreach (var i; sortedkeys)
  print (i, ": ", airport[i].city, ", ", airport[i].altitude_m);
 
Note that ''sort'' will return errors, and in FG 2.4.0 may even stop working, if the sort function you provide returns errors.  A common cause of this is if your sort vector contains both string and numeric values.  The cmp function will return an error for numeric values, and arithmetic operations you may use to sort numeric values will return errors if performed on a string.  The error in these cases is typically "function/method call on uncallable object".
 
=== Other useful built-in functions ===
 
Other basic built-in Nasal functions such as append, setsize, subvec, typeof, contains, delete, int, num, keys, pop, size, streq, cmp, substr, sprintf, find, split, rand, call, die, bind, math.sin, math.pi, math.exp, math.ln math.e, io.read, io.write, regex.exec, and others of that sort,  are detailed in [http://www.plausible.org/nasal/lib.html this external document].
 
=== Useful functions in the Nasal directory ===
Other functions are available in the Nasal files found in the Nasal directory of a FlightGear install. Simply open those Nasal files in text editor to see what is inside.  Reference those functions by putting the filename in front of the function, method, variable, or object you wish to use.  For instance, to use the method Coord.new() in the file geo.nas, you simply write:
 
geo.Coord.new()
 
=== Distance calculations ===
 
To calculate the distance between two points (in two different ways):
# mylat1, mylong1, mylat2, mylong2 are lat & long in degrees
# myalt1 & myalt2 are altitude in meters
var GeoCoord1 = geo.Coord.new();
GeoCoord1.set_latlon(mylat1, mylong1,myalt1);
var GeoCoord2 = geo.Coord.new();
GeoCoord2.set_latlon(mylat2, mylong2, myalt2);
var directDistance = GeoCoord1.direct_distance_to(GeoCoord2);
var surfaceDistance = GeoCoord1.distance_to(GeoCoord2);
 
The results are distances in meters.
 
* distance_to - returns distance in meters along Earth curvature, ignoring altitudes; useful for map distance
* direct_distance_to - returns distance in meters direct; considers altitude, but cuts through Earth surface
 
=== Other useful geographical functions ===
Other useful geographical functions are found in geo.nas (in the <tt>[[$FG_ROOT]]/Nasal</tt> directory of a FlightGear installation). geo.nas also includes documentation/explanation of the functions available.
 
==Developing and debugging in Nasal==
===Developing Nasal code===
Because code in the Nasal directory is parsed only at FlightGear startup, testing and debugging Nasal code can by slow and difficult.
 
FlightGear provides a couple of ways to work around this issue:
 
====Nasal Console====
 
The Nasal Console is available in FlightGear's menu (Debug/Nasal Console).  Selecting this menu opens a Nasal Console dialog.
 
This dialog has several tabs, of which each can hold separate Nasal code snippets, all of which are saved on exit
and reloaded next time. This is useful for little tests, or for executing code for which writing a key binding is just too much
work, such as "props.dump(props.globals)".
 
If you want to add more tabs (radio buttons in the Nasal Console dialog) to hold more code samples, just add more &lt;code&gt; nodes to autosave.xml.
 
[[Nasal Console]]
 
====Loading/reloading Nasal code without re-starting FlightGear====
A common problem in testing and debugging Nasal programs is that each testing step requires stopping and re-starting FlightGear, a slow process.
 
Below is described a technique for loading and executing a Nasal file while FlightGear is running.  FlightGear will parse the file, display any errors in the FlightGear console window, and then execute the code as usual.
 
Using this technique, you can start FlightGear, load the Nasal code you want to test observe any errors or test functionality as you wish, make changes to the Nasal file, reload it to observe parse errors or change in functionality, and so on to repeatedly and quickly run through the change/load/parse/test cycle without needing to re-start FlightGear each time.
 
The key to this technique is the function io.load_nasal(), which loads a nasal file into a nasal namespace.
 
Step-by-step instructions showing how to use this technique to load, parse, and test a Nasal file while FlightGear is running:
 
=====Create the Nasal file to test=====
Create a text file named $FG_ROOT/foo/test.nas with this text:
 
  print("hi!");
  var msg="My message.";
  var hello = func { print("I'm the test.hello() function") }
 
Notes: You can create the file in any directory you wish, as long as Nasal can read the directory--but the file IOrules in the Nasal directory restricts which directories Nasal may read and write from. 
 
You can give the file any name and extension you wish, though it is generally most convenient to use the .nas extension with Nasal files.
 
=====Load the file and test=====
Start FlightGear.  You can import the file above into FlightGear by typing the following into the Nasal Console dialog and executing the code:
 
  io.load_nasal(getprop("/sim/fg-root") ~ "/foo/test.nas", "example");
 
getprop("/sim/fg-root") gets the root directory of the FlightGear installation, ~ "/foo/test.nas" appends the directory and filename you created.  The final variable "example" tells the namespace to load for the Nasal file.
 
You'll see the message "hi!" on the terminal, and have function "example.hello()" immediately available. You can, for instance, type "example.hello();" into one of the Nasal console windows and press "Execute" to see the results; similarly you could execute "print (example.msg);".
 
If you find errors or want to make changes, simply make them in your text editor, save the file, and execute the io.load_nasal() command again in the Nasal Console to re-load the file with changes.
 
 
It's worth noting that Nasal code embedded in XML GUI dialog files can be reloaded by using the "debug" menu ("reload GUI").
 
You may also want to check out the remarks on [[Nasal scripting language#Memory management|Memory management]].
 
==== Managing timers and listeners ====
 
Note: If your Nasal program sets listeners, timer loops, and so on, they will remain set even when the code is reloaded, and reloading the code will set additional listeners and timer loops. 
 
This can lead to extremely slow framerates and unexpected behavior.  For timers you can avoid this problem by using the loopid method (described above); for listeners you can create a function to destroy all listeners your Nasal program creates, and call that function before reloading the program.  (And cleaning up timer loops and listeners is a best practice for creating Nasal programs in FlightGear regardless.)
 
The same problem may occur while resetting or re-initializing parts of FlightGear if your code isn't prepared for this. And obviously this applies in particular also to any worker threads you may have started, too!
 
For complex Nasal scripts with many timers and listeners, it is therefore generally a very good idea to implement special callbacks so that your scripts can respond to the most important simulator "signals", this can be achieved by registering script-specific listeners to signals like "reinit" or "freeze" (pause): the corresponding callbacks can then suspend or re-initialize the Nasal code by suspending listeners and timers.
Following this practice helps ensure that your code will behave properly even during simulator resets.
 
In other words, it makes sense to provide a separate high-level controller routine to look for important simulator events and then pause or re-initialize your main Nasal code as required.
 
If you are using [[Nasal scripting language#System-wide Nasal code|System-wide Nasal modules]], you should register listeners to properly re-initialize and clean up your Nasal code.
 
In its simplest form, this could look like this:
 
<syntaxhighlight lang="php">
var cleanup = func {}
setlistener("/sim/signals/reinit", cleanup);
</syntaxhighlight>
 
This will invoke your "cleanup" function, whenever the "reinit" signal is set by the FlighGear core.
 
Obviously, you now need to populate your cleanup function with some code, too.
 
One of the easiest ways to do this, is removing all listeners/timers manually here, i.e. by adding calls to removelistener():
 
<syntaxhighlight lang="php">
var cleanup = func {
  removelistener(id1);
  removelistener(id2);
  removelistener(id3);
}
</syntaxhighlight>
 
This would ensure that the corresponding listeners would be removed once the signal is triggered.
 
Now, keeping track of all listeners manually is tedious.
 
On the other hand, you could just as well use a vector of listener IDs here, and then use a Nasal foreach loop:
 
<syntaxhighlight lang="php">
var cleanup = func(id_list) {
  foreach(var id; id_list)
  removelistener(id);
}
</syntaxhighlight>
 
Obviously, this would require that you maintain a list of active listeners, too - so that you can actually pass a list of IDs to the cleanup function.
 
This is one of those things that can be easily done in Nasal, too - just by introducing a little helper wrapper:
 
<syntaxhighlight lang="php">
var id_list=[];
var store_listener = func(id) append(id_list,id);
</syntaxhighlight>
 
The only thing required here, would be replacing/wrapping the conventional "setlistener" call with calls to your helper:
 
<syntaxhighlight lang="php">
store_listener( setlistener("/sim/foo") );
store_listener( setlistener("/foo/bar") );
</syntaxhighlight>
 
If you were to do this consistently across all your Nasal code, you'd end up with a high level way to manage all your registered listeners centrally.
 
You could further generalize everything like this:
 
<syntaxhighlight lang="php">
var id_list=[];
var store_listener = func(property) append(id_list,setlistener(property) );
store_listener("/sim/foo/bar");
</syntaxhighlight>
 
This will ensure that any "store_listener" call stores the listener's ID in the id_list vector, which makes it possible to easily remove all listeners, too:
 
<syntaxhighlight lang="php">
var cleanup_listeners = func {
  foreach(var l; id_list)
    remove_listener(l);
}
</syntaxhighlight>
</syntaxhighlight>


Similarly, you could just as well "overload" functions like settimer() setlistener() in your script, this can be easily achieved by saving a handle to the original functions and then overriding them in your script:
[[File:Vim-nasal-syntax-highlighting.png]]
 
<syntaxhighlight lang="php">
var original_settimer = settimer;
var original_setlistener = setlistener;
</syntaxhighlight>
 
Now, you have handles stored to the original functions, to make sure that you are referring to the correct version, you can also refer to the "globals" namespace.
 
Obviously, it makes sense to only store and clean up those listeners that are not themselves required to handle initialization/resets, otherwise you'd remove the listeners for your init routines, too.
 
 
Next, you can easily override settimer/setlistener in your script:
 
 
<syntaxhighlight lang="php">
var original_settimer = settimer;
var original_setlistener = setlistener;
 
var settimer = func(function, time, realtime=0) {
print("Using your own settimer function now");
}
 
 
var setlistener = func(property, function, startup=0, runtime=1) {
  print("Using your own setlistener function now!");
}
</syntaxhighlight>
 
In order to call the old implementation, just use the two handles that you have stored:
 
* original_settimer
* original_setlistener
 
<syntaxhighlight lang="php">
var original_settimer = settimer;
var original_setlistener = setlistener;
 
var settimer = func(function, time, realtime=0) {
print("Using your own settimer function now");
original_settimer(function, time, realtime);
}
 
 
var setlistener = func(property, function, startup=0, runtime=1) {
  print("Using your own setlistener function now!");
  original_setlistener(property, function, startup, runtime);
}
</syntaxhighlight>
 
So this is a very simple and elegant way to wrap and override global behavior. So that you can easily implement script-specific semantics and behavior, i.e. to automatically store handles to registered listeners:
 
<syntaxhighlight lang="php">
var original_settimer = settimer;
var original_setlistener = setlistener;
 
var cleanup_listeners = [];
 
var settimer = func(function, time, realtime=0) {
print("Using your own settimer function now");
original_settimer(function, time, realtime);
}
 
 
var setlistener = func(property, function, startup=0, runtime=1) {
  print("Using your own setlistener function now!");
  var handle = original_setlistener(property, function, startup, runtime);
  append(cleanup_listeners, handle);
}
</syntaxhighlight>
 
Thus, you can now have a simple "cleanup" function which processes all listeners stored in "cleanup_listeners" using a foreach loop and removes them:
 
<syntaxhighlight lang="php">
var original_settimer = settimer;
var original_setlistener = setlistener;
 
var cleanup_listeners = [];
 
var remove_listeners = func {
foreach(var l; cleanup_listeners) {
  removelistener(l);
}
}
 
var settimer = func(function, time, realtime=0) {
print("Using your own settimer function now");
original_settimer(function, time, realtime);
}
 
 
var setlistener = func(property, function, startup=0, runtime=1) {
  print("Using your own setlistener function now!");
  var handle = original_setlistener(property, function, startup, runtime);
  append(cleanup_listeners, handle);
}
</syntaxhighlight>
 
The only thing that's needed now to handle simulator resets, is registering an "anonymous" listener which triggers your "remove_listeners" callback upon simulator reset:
 
<syntaxhighlight lang="php">
  _setlistener( "/sim/signals/reinit", remove_listeners );
</syntaxhighlight>
 
Note how we're using the low level _setlistener() call directly here, to avoid adding the listener id to the "cleanup" vector, which would mean that we're also removing this listener - i.e. the cleanup would then only work once.
 
Now, you'll probably have noticed that it would make sense to consider wrapping all these helpers and variables inside an enclosing helper class, this can be accomplished in Nasal using a hash.
 
This would enable you to to implement everything neatly organized in an object and use RAII-like patterns to manage Nasal resources like timers, listeners and even threads.
 
===Debugging===
The file debug.nas, included in the Nasal directory of the FlightGear distribution, has several functions useful for debugging Nasal code.  These functions are available to any Nasal program or code executed by FlightGear.
 
Aside from those listed below, several other useful debugging functions are found in debug.nas; see the debug.nas file for the list of functions and explanation.
 
Note that the debug module makes extensive use of ANSI terminal color codes.  These create colored output on Linux/Unix systems but on other systems they may add numerous visible control codes.  To turn off the color codes, go to the internal property tree and set
 
/sim/startup/terminal-ansi-colors=0
 
Or within a Nasal program:
 
setprop ("/sim/startup/terminal-ansi-colors",0);
 
====debug.dump====
debug.dump([<variable>])            ... dumps full contents of variable or of local variables if none given
The function debug.dump() dumps the contents of the given variable to the console. On Unix/Linux this is done with some syntax coloring. For example, these lines
 
  var as = props.globals.getNode("/velocities/airspeed-kt", 1);
  debug.dump(as);
 
would output
 
  </velocities/airspeed-kt=1.021376474393101 (DOUBLE; T)>
 
The "T" means that it's a "tied" property. The same letters are used here as in the property-browser. The angle brackets seem superfluous, but are useful because debug.dump() also outputs compound data types, such as vectors and hashes. For example:
 
  var as = props.globals.getNode("/velocities/airspeed-kt", 1);
  var ac = props.globals.getNode("/sim/aircraft", 1);
  var nodes = [as, ac];
  var hash = { airspeed_node: as, aircraft_name: ac, all_nodes: nodes };
  debug.dump(hash);
 
yields:
 
  { all_nodes : [ </velocities/airspeed-kt=1.021376474393101 (DOUBLE; T)>,
  </sim/aircraft="bo105" (STRING)> ], airspeed_node : </velocities/airspe
  ed-kt=1.021376474393101 (DOUBLE; T)>, aircraft_name : </sim/aircraft="bo
  105" (STRING)> }
 
====debug.backtrace====
  debug.backtrace([<comment:string>]}  ... writes backtrace with local variables
  debug.bt                            ... abbreviation for debug.backtrace
 
The function debug.backtrace() outputs all local variables of the current function and all parent functions.
 
 
====debug.benchmark====
debug.benchmark(<label:string>, <func> [, <repeat:int>])
... runs function <repeat> times (default: 1) and prints execution time in seconds,prefixed with <label>.
 
This is extremely useful for benchmarking pieces of code to determin
====debug.exit====
  debug.exit()                        ... exits fgfs
 
== Related content ==
{{Forum|30|Nasal}}
* [[:Category:Nasal]]
 
=== External links ===
* http://www.plausible.org/nasal


{{Appendix}}
{{Nasal Efforts}}


[[Category:Nasal]]
-->[[Category:Nasal]]

Latest revision as of 19:17, 28 August 2016

Nasal is FlightGear's built-in scripting language. Originally written and developed by Andy Ross for a personal project, it was integrated into FlightGear in November 2003, and has been continuously developed, improved, and refined since then. Over time, it has become probably FlightGear's most powerful, and has been used to create a huge variety of systems, ranging from wildfires to Control Display Units.

Within FlightGear, Nasal supports the reading and writing of internal properties, accessing internal data via extension functions, creating GUI dialogs and much, much more. Please see the right navigation bar to get additional information.

Highlight parse.png