Howto:Creating a Canvas GUI dialog file: Difference between revisions
m (→Creating MFD dialogs: add example: space shuttle DPS dialog (procedurally created using Canvas)) |
|||
| Line 79: | Line 79: | ||
== Creating MFD Dialogs == | == Creating MFD Dialogs == | ||
<gallery> | |||
Dps-keypad-dialog-using-canvas.png|DPS keypad for the space shuttle using a procedurally-generated Canvas dialog | |||
</gallery> | |||
<syntaxhighlight lang="nasal"> | <syntaxhighlight lang="nasal"> | ||
## | ## | ||
Revision as of 12:56, 11 October 2015
| This article is a stub. You can help the wiki by expanding it. |

| The FlightGear forum has a subforum related to: Canvas |
Targeted FlightGear versions: >= 3.20
First of all, we're going to add a new menu item to open our new dialog. This involves adding a new translation entry, as well as the actual menubar entry itself.
Navigate to the sub-menu where you'd like to add your new dialog, e.g. "Equipment" in this case, and then add a key:
<equipment>Equipment</equipment>
<canvas-demo-dialog>Canvas Demo Dialog</canvas-demo-dialog>
Next, open $FG_ROOT/gui/menubar.xml and navigate to the corresponding sub-menu and add a new item/binding to load your dialog:
<item>
<name>canvas-demo-dialog</name>
<binding>
<command>nasal</command>
<script>
canvas.loadDialog("CanvasDemo");
</script>
</binding>
</item>
Creating the actual dialog file
Next, open/create $FG_ROOT/Nasal/canvas/gui/dialogs/CanvasDemo.nas and add some boilerplate code:
var DemoDialog = {
  new: func(width=140,height=160)
  {
    var m = {
      parents: [DemoDialog],
      _dlg: canvas.Window.new([width, height], "dialog")
                         .set("title", "VBoxLayout")
                         .set("resize", 1),
    };

    m._dlg.getCanvas(1)
          .set("background", canvas.style.getColor("bg_color"));
    m._root = m._dlg.getCanvas().createGroup();

    var vbox = canvas.VBoxLayout.new();
    m._dlg.setLayout(vbox);

    # this is where you can add widgets from $FG_ROOT/Nasal/canvas/gui/widgets, e.g.:
    for(var i = 0; i < 5; i += 1 )
      vbox.addItem(
        canvas.gui.widgets.Button.new(m._root, canvas.style, {})
                                 .setText("Button #" ~ i)
      );

    var hint = vbox.sizeHint();
    hint[0] = math.max(width, hint[0]);
    m._dlg.setSize(hint);

    return m;
  },
};

var demo = DemoDialog.new();
Finally, start FlightGear and open your new dialog
Adding Widgets
In order to keep your dialog sufficiently generic, you'll want to refrain from adding too much custom functionality to it, and instead decompose your functionality into a collection of widgets. Widgets are GUI controls like a label, button, checkbox etc - i.e. these widgets have a certain appearance and may respond to events such as being clicked for example. Whenever you create custom widgets instead of adding all the code to a single dialog, you'll end up with reusable components that can be easily other in other dialogs. In addition, you are making sure to establish a losely-coupled design, so that your widgets are sufficient generic and do not contain any use-case specific logic.
This means for example that a generic PropertyBrowser could be easily reused in other dialogs/windows requiring a corresponding property browser. But this also meanns that such a property browser widget should also be modularized, i.e. by using a lower-level ListView or TreeView widget and merely parameterizing that by showing properties. This approach has the added advantage that the corresponding ListView/TreeView widgets could be re-used in other places, such as for example an aircraft list, a Nasal Namespace Browser.
Likewise, a widget-focused approach means that useful functionality like a Interactive Nasal REPL can be easily used in other places, without developers having to do any refactoring.
We're also trying to make sure that Canvas Widgets can be easily used not just by GUI dialogs but also by Canvas-based instruments/MFDs - without any code duplication or Copy&Paste being required.
Creating MFD Dialogs
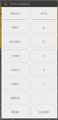
DPS keypad for the space shuttle using a procedurally-generated Canvas dialog

<syntaxhighlight lang="nasal">
- helper function for registering events (callbacks) with buttons (wrapped in a closure)
var createButton = func(root, label, clickAction) { var button = canvas.gui.widgets.Button.new(root, canvas.style, {} )
       .setText(label);
       #.setFixedSize(150, 32);
button.listen("clicked", clickAction ); return button; }
var (width,height) = (240,480); var title = 'DPS Keypad';
- create a new window, dimensions are WIDTH x HEIGHT, using the dialog decoration (i.e. titlebar)
var window = canvas.Window.new([width,height],"dialog").set('title',title);
- adding a canvas to the new window and setting up background colors/transparency
var myCanvas = window.createCanvas().set("background", canvas.style.getColor("bg_color"));
- creating the top-level/root group which will contain all other elements/group
var root = myCanvas.createGroup();
- create a new layout
var myHBox = canvas.HBoxLayout.new();
- assign the layout to the Canvas
myCanvas.setLayout(myHBox);
- list of all buttons we want to set up
var Buttons=[ [ 'FAULT', 'GPC', 'I/O RST', 'ITEM', 'EXEC', 'OPS', 'SPEC', 'RSM', ],
[ 'SYS', 'A', 'D', '1', '4', '7', '-', 'CLEAR', ],
];
- button setup
foreach(var col; Buttons) { # set up a new vertical box var vbox = canvas.VBoxLayout.new(); # add it to the top-level hbox myHBox.addItem(vbox);
foreach(var btn; col) { print("Setting up button:", btn); var button=createButton(root:root, label: btn, clickAction:func {print("button clicked:");}); # add the button to the vbox vbox.addItem(button); }
}
</syntaxhiglight>
Using Layouts
| Note This section still needs to be written (volunteers invivted to help!)-In the meantime, please refer to $FG_ROOT/Nasal/canvas/gui/dialogs/AircraftCenter.nas |
Using Styling
| Note This section still needs to be written (volunteers invivted to help!)-In the meantime, please refer to $FG_ROOT/Nasal/canvas/gui/styles/DefaultStyle.nas |