|
|
| Line 1: |
Line 1: |
| * Last updated: 12/2013
| |
| * Contributors: Seabutler, Macnab, Callahanp, Hooray
| |
| * Status: WIP (as of 12/2013)
| |
| * Also see: the discussion page at [[Howto talk:Build FlightGear with NetBeans using CMake]]
| |
| * Written after the FlightGear 2.4 release, for NetBeans 7.0.1
| |
| * Updated after the Flightgear 2.12 release, for NetBeans 7.2.1
| |
| * Looking for volunteers to help with updating for post 2.12, any and all help appreciated!
| |
| * Need more people on Windows to try and update this
| |
|
| |
|
| |
| <font color="red">This article hasn't been updated in a while, so any updates are appreciated. But if you are feeling completely lost, see [[Superbuild]] or [[Scripted Compilation on Linux Debian/Ubuntu]] instead !</font>
| |
|
| |
| == Important == | | == Important == |
| The latest CMake-specific build instructions can be found in $FG_SRC/README.cmake: {{Flightgear file|README.cmake}}
| |
|
| |
| If you encounter any CMake-related bugs while trying to build SimGear and/or FlightGear, please consider filing a bug report here: {{Tickets}}
| |
|
| |
| If you think the instructions are lacking some details, you are invited to add them as required. Also, if you think that some more specific screen shots would help, please do feel free to upload new screen shots here: [[Special:UploadWizard]]
| |
|
| |
| Don't worry if you don't know how to embed these images, you can simply leave a comment on the article's talk page, so that we can update the article accordingly. Thanks!
| |
|
| |
| == Todo ==
| |
| * Add an outline of the steps to create and use the build environment.
| |
| * FG 2.11+
| |
| * latest version of NetBeans, check all steps involved and update screen shots as required
| |
| * CVS support no longer required
| |
| * Callahanp mentioned some issues related to debug libs: verify!
| |
|
| |
| == Windows: Getting a compiler ==
| |
| On Windows, people need to download and install a C++ compiler separately. NetBeans supports a number of different compilers. Installing and setting up compilers on Windows is covered here: http://netbeans.org/community/releases/71/cpp-setup-instructions.html
| |
|
| |
| The simplest option to get started is probably using the MinGW (Minimalist GNU for Windows) package http://mingw.org/wiki/Getting_Started (or from Qt/Trolltech: http://qt.nokia.com/downloads/windows-cpp (skip the Qt download at that page, just use the [ftp://ftp.qt.nokia.com/misc/MinGW-gcc440_1.zip MinGW download link])).
| |
|
| |
| Assuming you are proceeding with that mingw.org link:
| |
| # log in as a user with administrator rights (as per the above netbeans.org link, you should install MinGW as admin)
| |
| # browse to the above mingw.org Getting Started page, click the mingw-get-inst link on that page, download and run mingw-get-inst-20120421.exe (latest as of 2012 04 26). You need to be connected to the internet while installing, the downloaded file is just a downloader/installer.
| |
| # accept all defaults during its install (location C:\MinGW), plus click for C++ Compiler, and MSYS Basic System, click Next, Install, Finish (if you change the default location, they strongly recommend you do not use a path with spaces, and you will have to interpret the remaining steps with your changed location)
| |
| # currently (2012 04 26) the installer fails to install gcc and some other things, so check if C:\MinGW\bin contains gcc, and if it doesn't, then open a command prompt and
| |
| #* cd C:\MinGW\bin
| |
| #* mingw-get install gcc gmp libgmp
| |
| # add MinGW to your path as follows (the mingw.org page referenced above recommends not changing path variables system wide, however I could not make their alternative methods work for even compiling the NetBeans hello world project, so I include this step):
| |
| #* right-click on My Computer > Properties > Advanced > Environment Variables
| |
| #* double click on Path
| |
| #* add ;C:\MinGW\msys\1.0\bin;C:\MinGW\bin to the end of the existing stuff (note the semi-colon separators; DO NOT remove or alter any of the previous contents or your windows setup may barf)
| |
| #* click OK, OK to close the My Computer Properties windows
| |
|
| |
|
| |
| == Windows: Getting CMake ==
| |
| Go to [http://www.cmake.org CMake] and click the download icon. You can download the installer or the zip package. If you use the zip package, extract to a folder of your choice, and then add whereextracted\bin to your path, as explained in the section above.
| |
|
| |
|
| | The latest CMake-specific build instructions can be found in $FG_SRC/README.cmake: {{Flightgear file|README.cmake}}. If you encounter any CMake-related bugs while trying to build SimGear and/or FlightGear, please consider filing a bug report here: {{Tickets}}. If you think the instructions are lacking some details, you are invited to add them as required. Also, if you think that some more specific screen shots would help, please do feel free to upload new screen shots here: [[Special:UploadWizard]]. Don't worry if you don't know how to embed these images, you can simply leave a comment on the article's talk page, so that we can update the article accordingly. Thanks! |
|
| |
|
| == Download and install NetBeans == | | == Download and install NetBeans == |
| NetBeans is a multi-platform IDE (integrated development environment) that supports a number of programming languages, C and C++ among them.
| |
|
| |
| NetBeans is a highly modular and very powerful IDE with a huge range of features, using the following steps, it took me about 30 minutes to set up a working FlightGear build environment in NetBeans, including the time required for the repository checkouts.
| |
|
| |
| Go to http://netbeans.org/downloads/ in order to download the latest version of NetBeans for your OS/platform.
| |
|
| |
| You can either choose the full download (~200 MB) or just the C/C++ bundle which is about 50 MB.
| |
|
| |
| After downloading NetBeans, you'll need to install it.
| |
|
| |
|
| |
| == Installing required modules (plugins) ==
| |
| After starting NB for the first time, it needs to be extended with required plugins.
| |
| Using the plugin installer, you need to install the following plugins in order to work with repositories:
| |
|
| |
| * svn (subversion)
| |
| * git
| |
|
| |
| In NetBeans, just go to the Tools menu and select "Plugins":
| |
|
| |
| [[File:NetBeans Plugins.png]]
| |
|
| |
| Go to the Installed tab and see which of the above are listed. (Latest version has svn and git installed.) To get the missing ones,
| |
| go to the Available Plugins tab, select the ones needed and click Install.
| |
|
| |
| == Checking out the required dependencies ==
| |
| {{Out of date}}
| |
| All important FlightGear repositories are hosted at {{project infrastructure|name}}.
| |
|
| |
| You will need to check out (with git it's called "cloning") the repositories for the following dependencies:
| |
|
| |
| {{Build dependency}}
| |
| <!--
| |
| * Boost http://svn.boost.org/svn/boost/trunk
| |
| * OpenAL svn://connect.creativelabs.com/OpenAL
| |
| * OpenSceneGraph (OSG) http://svn.openscenegraph.org/osg/OpenSceneGraph/tags/OpenSceneGraph-3.0.1
| |
| * PLIB http://svn.code.sf.net/p/plib/code/trunk
| |
| * {{simgear source|text=SimGear}}
| |
| * {{flightgear source|text=FlightGear}}
| |
| -->
| |
|
| |
| Note that it should usually be sufficient to download the latest RELEASE for Boost, OpenAL, and PLIB.
| |
| Only FG, SG and OSG should preferably be checked out from their corresponding repositories. Obviously, you could even use the latest stable OSG release, too (that is, if you don't intend to do any OSG and/or SimGear coding!).
| |
|
| |
| You can do this easily in NetBeans by going to the "Team" menu,
| |
| this is where you can find sub menus for all supported source
| |
| code management systems.
| |
|
| |
| Firstly, create a folder where you are going to put everything. Use this folder whenever you are asked for Local Folder or Parent Directory. In the screenshots it is home/fgfs.
| |
|
| |
|
| |
|
| |
| If you are going to use RELEASE versions of OpenAL, Boost, etc., go here [ftp://ftp.ihg.uni-duisburg.de/FlightGear/Win32/MSVC/ 3rdParty] and download either fgfs-win32-VS100-3rdParty+OSG-yymmdd or fgfs-x64-VS100-3rdParty+OSG-20120411 depending on whether you are doing a 32-bit or 64-bit build.
| |
|
| |
|
| |
| Boost: Source (not necessary): As of 12/2012, the download size is 754MB. Click Team and then Subversion and then Checkout. Type in (or copy and paste) the link above into Repository URL. Click Next and type in the path of your newly created folder into Local Folder (or use Browse.) Click Finish to download. Click Close.
| |
|
| |
| Boost: Release: Extract 3rdParty zip file (fgfs-xxxxxxx-yymmdd) to home/fgfs. This will create 3rdParty and boost_1_44_0 folders
| |
|
| |
|
| |
| OpenAL: Source (not necessary): Link above currently doesn't work.
| |
|
| |
| OpenAL; Release: Already done by the step for Boost.
| |
|
| |
|
| |
| PLIB: Source (not necessary): As of 12/2012, the download size is 1.3MB. Click Team and then Subversion and then Checkout. Type in (or copy and paste) the link above into Repository URL. Click Next and type in the path of your newly created folder into Local Folder (or use Browse.) Click Finish to download. Click Close.
| |
|
| |
| PLIB: Release: Already done by the step for Boost.
| |
|
| |
|
| '''Note: The latest version of OSG supported by FlightGear <= 3.0 is OpenSceneGraph 3.1.8 [{{simgear url|commit=d0b77639c2f401c531e0cddd8931eb1e8ef8035f}}].
| | NetBeans is a multi-platform IDE (integrated development environment) that supports a number of programming languages, C and C++ among them. NetBeans is a highly modular and very powerful IDE with a huge range of features. Go to https://netbeans.apache.org/ in order to download the latest version of NetBeans for your OS/platform. After downloading NetBeans, you'll need to install it. |
| '''
| |
| OSG: Source: Only necessary if you are going to work on OSG or Simgear): As of 12/2012, the download size is 50MB. Click Team and then Subversion and then Checkout. Type in (or copy and paste) the link above into Repository URL. Click Next and type in the path of your newly created folder into Local Folder (or use Browse.) Click Finish to download. Click Close.
| |
|
| |
|
| OSG: Release: Download [http://flightgear.simpits.org:8080/job/OSG-stable-Win/lastSuccessfulBuild/artifact/*zip*/archive.zip OpenSceneGraph] and extract from the archive.zip file the folder OpenSceneGraph to home\fgfs.
| | {{Note| According to the latest release notes [https://netbeans.apache.org/download/nb120/index.html#_c_c release notes 12.0] the C++ plugin is not ported to the new Apache infrastructure. You have to enable Netbeans 8.2 plugin center and install C/C++ plugin from it. It will be available in the future releases in the NetBeans core.}} |
|
| |
|
| | == Linux: getting & compiling == |
|
| |
|
| SimGear: As of 12/2012, the download size is 14MB. Click Team and then Git and then Clone. Type in (or copy and paste) the link above into Repository URL. Click Next and select next*. Click Next and type in the path of your newly created folder into Parent Directory (or use Browse.) Click Finish to download. Click Close.
| | Please take a look at generic page: [[Building_FlightGear]] or [[Scripted Compilation on Linux Debian/Ubuntu|Building on Linux using the download_and_compile.sh bash script]] |
|
| |
|
| | == Windows: getting & compiling == |
|
| |
|
| FlightGear: As of 12/2012, the download size is 43MB. Click Team and then Git and then Clone. Type in (or copy and paste) the link above into Repository URL. Click Next and select next*. Click Next and type in the path of your newly created folder into Parent Directory (or use Browse.) Click Finish to download. Click Close.
| | Please take a look at the generic page regarding Windows compilation: [[Building using CMake - Windows]] |
|
| |
|
| == Folder Structure == | | == Folder Structure == |
| You need separate folders in which the project build outputs will be created. Following the example of using home/fgfs, in home create folders sgbuild, fg build and, if building osg, osgbuild.
| |
|
| |
| Your completed folder structure should be
| |
|
| |
| : home /
| |
| :: .svn /
| |
| :: fgbuild /
| |
| :: fgfs /
| |
| ::: 3rdParty /
| |
| ::: boost_1_44_0 /
| |
| :::: boost /
| |
| ::: OpenSceneGraph /
| |
| ::: simgear /
| |
| ::: flightGear /
| |
| :: osgbuild / (If building OSG)
| |
| :: sgbuild /
| |
|
| |
| Some of the above folders will have sub-folders, but they are part of installing/downloading the packages.
| |
|
| |
|
| |
| == Windows: Fixing the backslashes ==
| |
| In NetBeans, go to Tools, Options and click on the C/C++ tab. In the list of folders, change all the backslashes to forward slashes.
| |
|
| |
|
| | You need separate folders in which the project build outputs will be created. If you download and create folders according to the build environment in Windows/Linux OS there is nothing new. |
|
| |
|
| == Creating new projects from existing sources == | | == Netbeans project import == |
|
| |
|
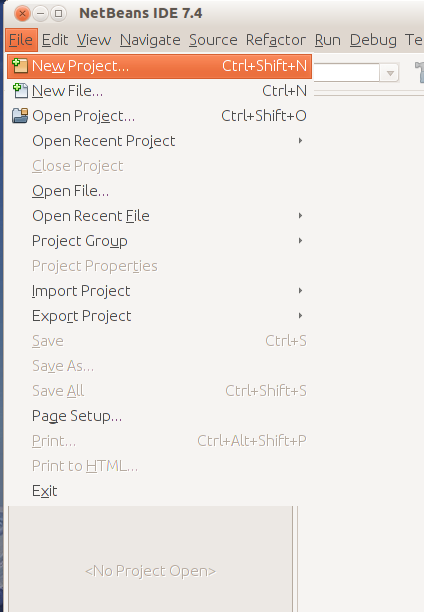
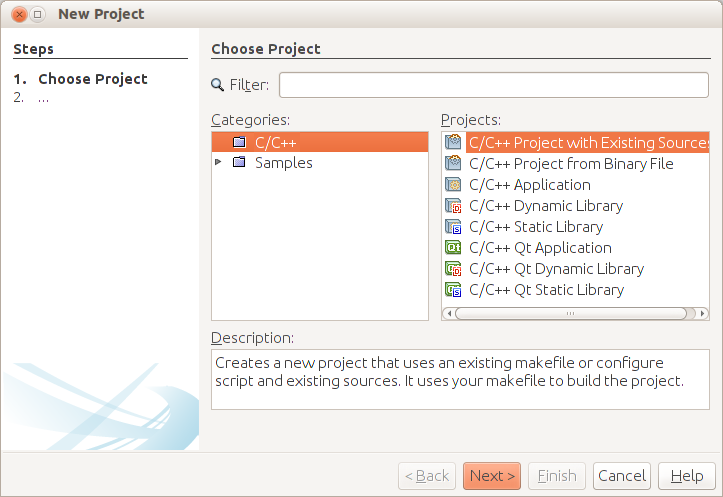
| After checking out the repository, you'll want to use the NetBeans project wizard to CREATE A NEW PROJECT FROM EXISTING SOURCES for each dependency: | | After checking out the repository, you'll want to use the NetBeans project wizard to CREATE A NEW PROJECT FROM EXISTING SOURCES for each dependency: |
| Line 166: |
Line 30: |
|
| |
|
| [[File:NetBeans New Project Existing.png]] | | [[File:NetBeans New Project Existing.png]] |
|
| |
|
| |
|
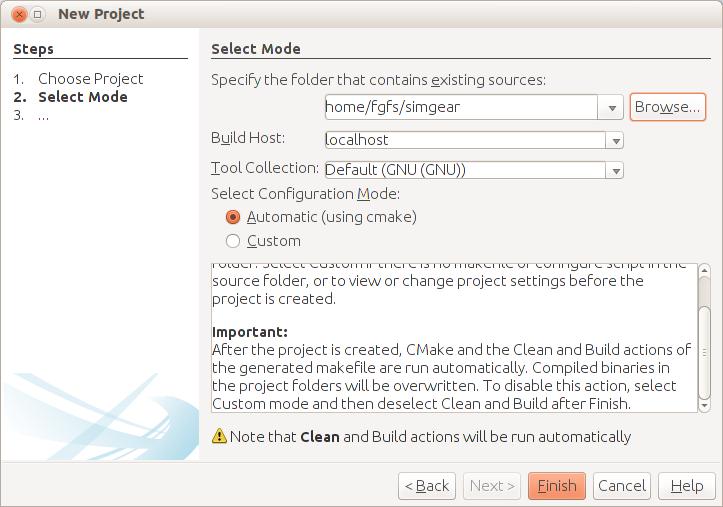
| Specify the folder where the checked out sources can be found: | | Specify the folder where the checked out sources can be found: |
| Line 172: |
Line 35: |
| [[File:NetBeans New Project Automatic.png]] | | [[File:NetBeans New Project Automatic.png]] |
|
| |
|
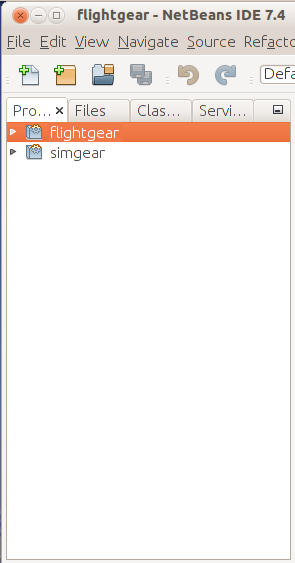
| | | Click Finish. NetBeans will attempt to build the project, which will fail, as no dependencies have been set. Ignore it, the project will still be set-up. Repeat above steps for the simgear code. Finally, you should see all projects neatly structured in NetBeans: |
| Click Finish. | |
| | |
| NetBeans will attempt to build the project, which will fail, as no dependencies have been set. Ignore it, the project will still be set-up. | |
| | |
| Repeat above for simgear (and osg if you are going to work on osg or simgear.) | |
| | |
| | |
| Finally, you should see all projects neatly structured in NetBeans: | |
|
| |
|
| [[File:NetBeans Current Projects.png]] | | [[File:NetBeans Current Projects.png]] |
|
| |
|
| == Setting up project dependencies == | | == Disable code indexing == |
| | |
| You only need to know that there's a dependency chain: SimGear depends on BOOST, OpenAL, PLIB and OSG, while FlightGear depends on SimGear and OSG.
| |
| | |
| So, just bring up a context menu for each configured project and go to "Properties":
| |
| | |
| [[File:NetBeans Project Properties.png]]
| |
| | |
|
| |
|
| Next, go to "RELATED PROJECTS" and set up the dependencies:
| |
|
| |
| [[File:NetBeans Dependencies.png]]
| |
|
| |
|
| |
| == Disable code indexing ==
| |
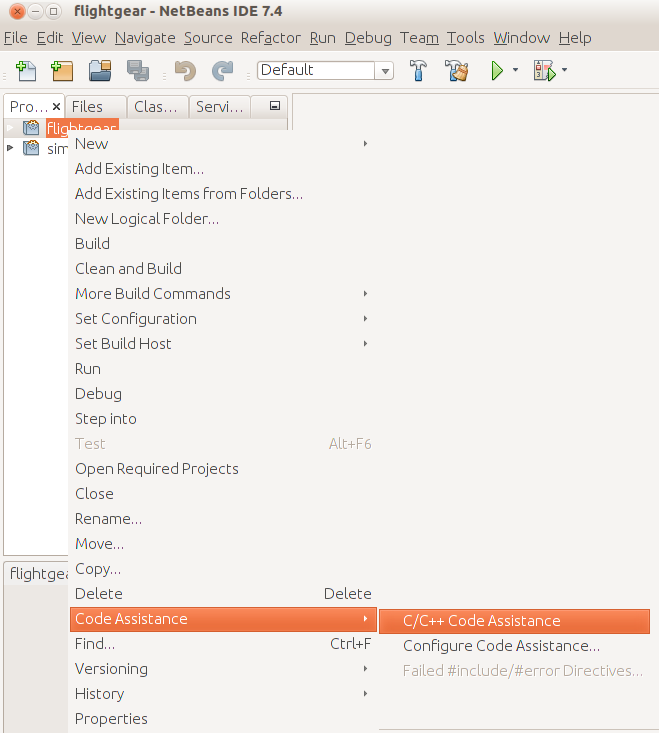
| By default, NetBeans will keep on trying and index all your sources, this may slow down the IDE considerably, so it's a good idea to disable this feature if you don't need it (CONTEXT MENU/RIGHT CLICK on project, go to CODE ASSISTANCE and then uncheck the marked entry): | | By default, NetBeans will keep on trying and index all your sources, this may slow down the IDE considerably, so it's a good idea to disable this feature if you don't need it (CONTEXT MENU/RIGHT CLICK on project, go to CODE ASSISTANCE and then uncheck the marked entry): |
|
| |
|
| [[File:NetBeans Code Assistance.png]] | | [[File:NetBeans Code Assistance.png]] |
|
| |
|
| | == Debugging using Gdb/Netbeans as a IDE == |
|
| |
|
| == Staying up to date ==
| |
| Staying "up to date" is actually fairly easy once everything is set up, you only need to right click on each repository (project/dependency) and go to the SCM sub menu (i.e. "Git" for FlightGear/SimGear and "Subversion" for OSG) and then click on "pull" or "update" accordingly:
| |
|
| |
| [[File:Netbeans-staying-up2date.png]]
| |
|
| |
|
| |
| == Optional Stuff ==
| |
| === Setting up the Jenkins build server ===
| |
| <font color="red>This step is not required, it's only for people using a Jenkins build server locally, or for core developers using the official [[FlightGear Build Server]]</font>
| |
| Jenkins/Hudson are "continuous integration" servers, i.e. they can be configured to check out and build sources automatically. NetBeans comes with built-in support for Jenkins/Hudson, this means that the official FlightGear build server at {{build link}} can be directly integrated into your IDE.
| |
|
| |
| This allows all people to easily track the build server, and allows core developers to trigger builds, too.
| |
|
| |
| That's also pretty easy, just go to SERVICES and then right click on "Hudson Builders":
| |
|
| |
| [[File:Setting-up-jenkins-CI-in-netbeans-step1.png]]
| |
|
| |
|
| |
| Next, fill in the URL of the Jenkins CI server:
| |
|
| |
| [[File:Setting-up-jenkins-CI-in-netbeans-step2.png]]
| |
|
| |
|
| |
| Once completed, you should see this:
| |
|
| |
| [[File:Jenkins-integration-in-netbeans.png]]
| |
|
| |
| === Setting up remote development ===
| |
|
| |
| Remote development involves setting up a SSH connection profile in NetBeans in order to connect to a Unix/Linux server so that you can remotely build FlightGear and its dependencies, this can for example be useful for cross-compilation using mxe, but also if you don't want to, or cannot, set up all required tools, such as compilers, locally.
| |
|
| |
| Also, on Windows, this makes it possible to use a Linux sever for building, debugging and instrumenting/profiling FlightGear, while editing the source code on a Windows box. This means that you can use standard Linux tools such as gcov,gprof or valgrind while editing your code under Windows.
| |
|
| |
| To get started, you should have an understanding of Linux and using SSH. In particular, you should know how to set up a SSH connection, including authentication (SSH keys). Obviously, for NetBeans it really doesn't matter if the Linux/Unix server is running in the same LAN or across the internet in the form of an affordable VPS box. You could even run a virtual private server on Windows using VMWare/VirtualBox or CoLinux.
| |
|
| |
| Once you have set up a new account to the corresponding Linux box, you only need to switch to the "Services" tab, go to "C/C++ Build Hosts", open a context menu and "add a new host":
| |
|
| |
| [[File:Netbeans-set-up-remote-building-step1.png]]
| |
|
| |
|
| |
| Next, add the address (or hostname), and the correct SSH port:
| |
|
| |
| [[File:Netbeans-set-up-remote-building-step2.png]]
| |
|
| |
|
| {{Building}}
| |
|
| |
|
| [[Category:Howto|Build FlightGear with NetBeans using CMake]] | | [[Category:Howto|Build FlightGear with NetBeans using CMake]] |
| [[Category:Development|Build FlightGear with NetBeans using CMake]] | | [[Category:Development|Build FlightGear with NetBeans using CMake]] |
