Howto:Animated jetways: Difference between revisions
m (→Using the jetways: Update CRJ) |
(→Adding animated jetways in scenery: Documentation on manual editing) |
||
| Line 46: | Line 46: | ||
Where '''X-M''', '''Y-M''', and '''Z-M''' are the X/Y/Z coordinates of the door in meters and '''HOOD-DEG''' is the jetway hood rotation amount. To specify more doors, just add more door elements. | Where '''X-M''', '''Y-M''', and '''Z-M''' are the X/Y/Z coordinates of the door in meters and '''HOOD-DEG''' is the jetway hood rotation amount. To specify more doors, just add more door elements. | ||
= Adding animated jetways in | = Adding support in scenery = | ||
== Placing jetways == | |||
Launch FlightGear in your favorite aircraft. The author uses the [[Bluebird]]. You ''cannot'' use the [[UFO]] because its scenery-editing function will interfere with the jetway editor. Go to AI > Jetway Settings and tick the "Enable jetway editor" checkbox. Then click the "Open Editor" button. | |||
[[File:Animated-jetway-editor.jpg]] | |||
With the editor enabled, click anywhere on the ground to place an animated jetway, which will flash to indicate it is selected. The jetway editor is similar to the UFO's scenery model editor. You can Alt-click on the terrain to move the current selected jetway. Ctrl-click selects the jetway closest to the click position (the new jetway will flash to indicate it's selected). Shift-click deselects the current jetway. | |||
The dialog is used to adjust the selected jetway. The top sliders adjust position and orientation, and the bottom ones adjust the jetway itself. The offsets that the bottom sliders control can be used to model jetways that are in obscure configurations. | |||
When you are finished editing your airport jetway layout, click the "Export" button. A jetway definition file will be created and written to <tt>$FG_HOME/Export/ICAO.xml</tt>, where <tt>ICAO</tt> is the ICAO code of the nearest airport. (The exact location of this file is printed to the console window.) This file should be submitted to Terrasync (see [[FlightGear Scenery Database#Contribute]]). | |||
== Auto-converting static/obsolete jetways == | |||
{{WIP}} | {{WIP}} | ||
Revision as of 21:42, 23 June 2011
Animated jetways are dynamic jetway models that connect to your aircraft when you are pulled up at the gate. FlightGear touts the most advanced animated jetways in the flight simulator market, beating those of Microsoft Flight Simulator and X-plane in features- a testament to the flexibility of FlightGear. This article describes how to obtain and use the jetways and interface them with aircraft and scenery.
Obtaining and installing
Git versions of FlightGear later than June 17, 2011 include the animated jetway system. Nothing extra has to be installed.
Downloads for other versions of FlightGear, including updated files implementing the system for some aircraft, can be found on the first post of this thread on the FlightGear Forums. Read the included README for installation instructions. Note that FG 2.0.0 users will NOT be able to get support for new airports added through Terrasync.
Using the jetways
Start FlightGear in any animated jetway-compatible aircraft. Currently, these include the following:
- Boeing 717 (separate download) (support available in Git)
- Boeing 777-200ER (separate download)
- Bombardier CRJ700
Fly (or spawn) to any airport equipped with animated jetways. Ensure you have the latest scenery from TerraSync, so you don't get conflicts between animated and static jetways! At the moment, the following airports are animated jetway-compatible:
- London Gatwick Airport (EGKK)*
- Amsterdam Airport Schiphol (EHAM)
- Denver International Airport (KDEN)*
- Las Vegas McCarran International Airport (KLAS)*
- San Francisco International Airport (KSFO)
- Ted Stevens Anchorage International Airport (PANC)*
* - Indicates the jetways for this airport were auto-converted and do not have gate numbers
Adding support in aircraft
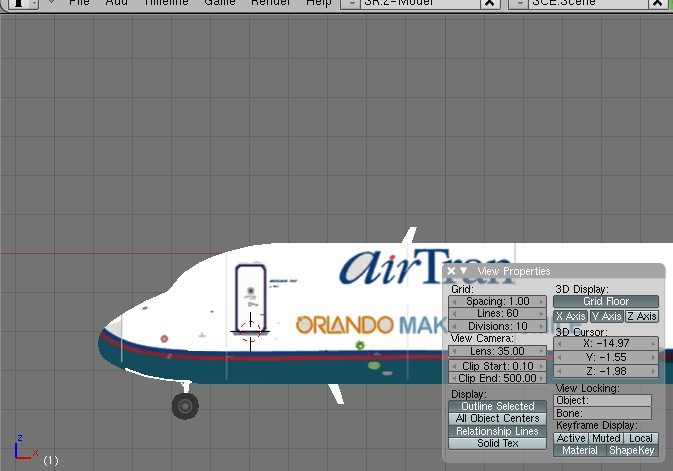
Open up your aircraft's main model in your favorite 3d modeling software (the author prefers Blender). Move the model around to account for any offsets you have in the main model file. Then get the coordinates of the door.
Now add the following code in your aircraft's -set.xml (remember to merge the tags properly):
 <sim>
  <model>
   <door>
    <position-x-m type="float">X-M</position-x-m>
    <position-y-m type="float">Y-M</position-y-m>
    <position-z-m type="float">Z-M</position-z-m>
    <jetway-hood-deg type="float">HOOD-DEG</jetway-hood-deg>
   </door>
  </model>
 </sim>
Where X-M, Y-M, and Z-M are the X/Y/Z coordinates of the door in meters and HOOD-DEG is the jetway hood rotation amount. To specify more doors, just add more door elements.
Adding support in scenery
Placing jetways
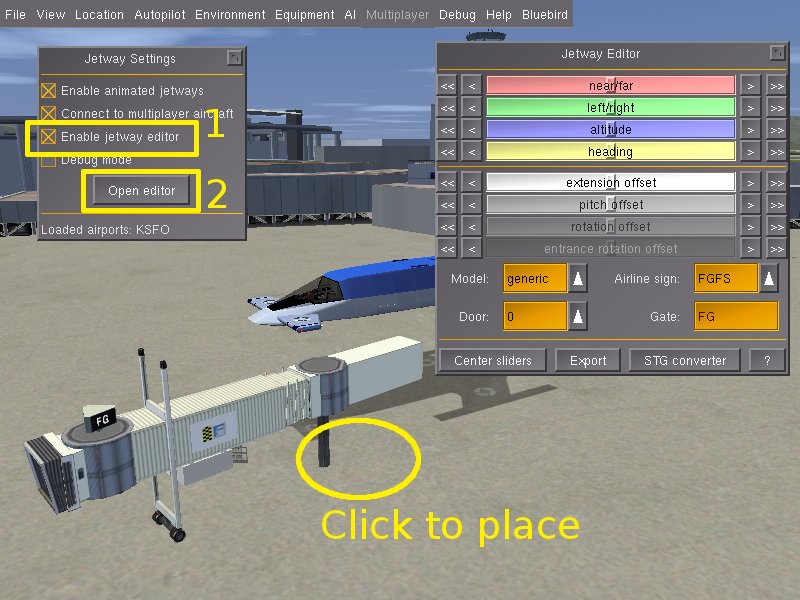
Launch FlightGear in your favorite aircraft. The author uses the Bluebird. You cannot use the UFO because its scenery-editing function will interfere with the jetway editor. Go to AI > Jetway Settings and tick the "Enable jetway editor" checkbox. Then click the "Open Editor" button.
With the editor enabled, click anywhere on the ground to place an animated jetway, which will flash to indicate it is selected. The jetway editor is similar to the UFO's scenery model editor. You can Alt-click on the terrain to move the current selected jetway. Ctrl-click selects the jetway closest to the click position (the new jetway will flash to indicate it's selected). Shift-click deselects the current jetway.
The dialog is used to adjust the selected jetway. The top sliders adjust position and orientation, and the bottom ones adjust the jetway itself. The offsets that the bottom sliders control can be used to model jetways that are in obscure configurations.
When you are finished editing your airport jetway layout, click the "Export" button. A jetway definition file will be created and written to $FG_HOME/Export/ICAO.xml, where ICAO is the ICAO code of the nearest airport. (The exact location of this file is printed to the console window.) This file should be submitted to Terrasync (see FlightGear Scenery Database#Contribute).
Auto-converting static/obsolete jetways
| Work in progress This article or section will be worked on in the upcoming hours or days. See history for the latest developments. |

