Howto:Animated jetways: Difference between revisions
m (Out of date) |
(→Related content: + List stg files with non-AI jetway scenery objects) |
||
| (43 intermediate revisions by 11 users not shown) | |||
| Line 1: | Line 1: | ||
'''Animated jetways''' are dynamic {{Wikipedia|jetway}} models that connect to your aircraft when you are pulled up at a gate. [[FlightGear]] boasts the most advanced animated jetways in the flight simulator market, beating those of Microsoft Flight Simulator and X-Plane in features — a testament to the flexibility of FlightGear. This article describes how to obtain and use the jetways and interface them with aircraft and scenery. | |||
' | This feature was broken for a while from end of 2016 up to 2018.2. FlightGear couldn't write the temporary model files in FG_HOME. Meanwhile this issue is solved. <ref>{{cite web | ||
|url = https://sourceforge.net/p/flightgear/mailman/flightgear-devel/thread/57E1A8F5.8020005%40gmx.de/#msg35381005 | |||
|title = <nowiki> AI Jetways broken in 2016.3.1 </nowiki> | |||
|author = <nowiki> several </nowiki> | |||
|date = Sep 20th, 2016 | |||
|added = Sep 20th, 2016 | |||
|script_version = 0.40 | |||
}}</ref> | |||
A workaround was to use jetways.nas modified by icare38.<ref>{{cite web | |||
|url = https://forum.flightgear.org/viewtopic.php?f=5&t=8728&hilit=animated+jetways&start=360#p305747 | |||
|title = <nowiki> AI Jetways broken in 2016.3.1 </nowiki> | |||
|author = <nowiki> icare38 </nowiki> | |||
|date = Feb 29th, 2017 | |||
|added = Feb 29th, 2017 | |||
|script_version = 0.40 | |||
}}</ref> | |||
= | == Compatible airports and aircraft == | ||
This section lists the airports having animated jetways, as well as the aircraft and AI aircraft supporting them, as of September 2015. | |||
The compatible airports are: | |||
* [[London Gatwick Airport]] (EGKK)* | |||
* [[Amsterdam Airport Schiphol]] (EHAM) | |||
* Denver International Airport (KDEN)* | |||
* Las Vegas McCarran International Airport (KLAS)* | |||
* [[San Francisco International Airport]] (KSFO) | |||
* Ted Stevens Anchorage International Airport (PANC)* | |||
''<nowiki>*</nowiki> indicates the jetways for this airport were auto-converted and do not have gate numbers.'' | |||
The aircraft supporting animated jetways are: | |||
* [[Boeing 717]] | |||
* [[Boeing 747-8i]] | |||
* [[Boeing 757-200]] and -300 | |||
* [[Boeing 767-300]]/ER | |||
* [[Boeing 777-200ER]] | |||
* [[Bombardier CRJ700]] | |||
* [[McDonnell Douglas MD-11]] | |||
* [[Tupolev Tu-144]] | |||
The [[Interactive traffic|AI aircraft]] supporting animated jetways are: | |||
* [[Airbus A319]] | |||
* [[Airbus A320]] | |||
* [[Airbus A321]] | |||
* [[Boeing 737]] | |||
* [[Boeing 747-400]] | |||
* [[McDonnell Douglas MD-80]] | |||
== | == Obtaining and installing == | ||
FlightGear 2.4.0 and later include the animated jetway system. Nothing extra has to be installed. | |||
== Using the jetways == | |||
# Start FlightGear in any compatible aircraft. Make sure to have animated jetways enabled (AI->Jetway->EnableAnimatedJetways and View->RenderingOptions->AnimatedJetways) | |||
# Fly (or spawn) to any airport equipped with animated jetways. You can tell if a jetway is animated by pressing {{key press|Ctrl|C}}; if the polygons are highlighted in yellow, then it is animated. | |||
{{note|Ensure you have the latest scenery from [[TerraSync]] so you do not get conflicts between animated and static jetways.}} | |||
<ol start="3"> | |||
<li>Taxi up to an animated jetway and park near it, then click it. If your aircraft is supported and parked well enough, the jetway will extend, rotate, and connect.</li> | |||
</ol> | |||
An easy use case eg. is to spawn FlightGear with a 777-200 (which is supported) at KSFO parking position E60. You will see the jetway through the cockpit window. Click on it and it will start moving. | |||
== Development == | |||
=== Available jetway models === | |||
The {{fgdata file|Models/Airport/Jetway/generic.xml|t=generic jetway model}} in FGData is broken, but there is [http://scenemodels.flightgear.org/app.php?c=Models&a=view&id=2211 a repaired version in the TerraSync scenery repository]. | |||
== | Available jetway models in the object database are listed here https://scenery.flightgear.org/app.php?c=Models&a=browse&shared=21. Only some of them can be used as animated jetway. These are: | ||
{| class="wikitable" | |||
! Model file !! Link !! Used at || Remarks | |||
|- | |||
| generic.xml || https://scenery.flightgear.org/app.php?c=Models&a=view&id=2211 || KSFO || This model might cause a collision with your aircraft if you move too close. | |||
|} | |||
The number of occurences in the database probably is misleading because usages in ''ICAO''.jetways.xml are not counted here. | |||
The | |||
=== Adding support in aircraft === | |||
# Open up the main model of your aircraft in your favorite 3D modeling software (such as [[Blender]]). | |||
# Move the model around to account for any offsets you have in the main model file, then get the coordinates of the door. | |||
[[File:Animated-jetway-tutorial.jpg]] | [[File:Animated-jetway-tutorial.jpg]] | ||
<ol start="3"> | |||
<li>Add the following code in your aircraft's -set.xml (remember to merge the tags properly):</li> | |||
</ol> | |||
<syntaxhighlight language="xml"> | <syntaxhighlight language="xml"> | ||
<sim> | |||
<model> | |||
<door> | |||
<position-x-m type="float">X-M</position-x-m> | |||
<position-y-m type="float">Y-M</position-y-m> | |||
<position-z-m type="float">Z-M</position-z-m> | |||
<jetway-hood-deg type="float">HOOD-DEG</jetway-hood-deg> | |||
</door> | |||
</model> | |||
</sim> | |||
</syntaxhighlight> | </syntaxhighlight> | ||
: where <tt>X-M</tt>, <tt>Y-M</tt>, and <tt>Z-M</tt> are the X/Y/Z coordinates of the door in meters and <tt>HOOD-DEG</tt> is the jetway hood rotation amount. To specify more doors, just add more door elements. | |||
<ol start="4"> | |||
<li>Add the following code into your XML model file to enable the jetways to connect to your aircraft over the [[multiplayer]] network:</li> | |||
</ol> | |||
<syntaxhighlight language="xml"> | <syntaxhighlight language="xml"> | ||
<nasal> | |||
<load> | |||
var model = cmdarg(); | |||
model.getNode("door[0]/position-x-m", 1).setValue(X-M); | |||
model.getNode("door[0]/position-y-m", 1).setValue(Y-M); | |||
model.getNode("door[0]/position-z-m", 1).setValue(Z-M); | |||
model.getNode("door[0]/jetway-hood-deg", 1).setValue(HOOD-DEG); | |||
</load> | |||
</nasal> | |||
</syntaxhighlight> | </syntaxhighlight> | ||
: Again, replace <tt>X-M</tt>, <tt>Y-M</tt>, <tt>Z-M</tt> and <tt>HOOD-DEG</tt> with their respective values. To add more doors, duplicate the last four lines of [[Nasal]] code and replace <tt>[0]</tt> with <tt>[1]</tt> or <tt>[2]</tt>. | |||
==== Adding support in AI aircraft ==== | |||
Follow the steps for regular aircraft above, but only add in the Nasal code. | |||
== | |||
Background: The model definition of AI (and MP) aircraft is not available in Nasal. So any door definition located as property inside any XML file is not available for the jetways module. For that reason AI aircraft xml files must contain an embedded piece of Nasal code for writing the door information into the AI models property tree. This is an example taken from the MD80 AI aircraft: | |||
<syntaxhighlight | <syntaxhighlight lang="xml"> | ||
<?xml version="1.0"?> | |||
<PropertyList> | |||
... | |||
<nasal> | |||
<load> | |||
var model = cmdarg(); | |||
model.getNode("door[0]/position-x-m",1).setValue(-19.241); | |||
model.getNode("door[0]/position-y-m",1).setValue(-1.529); | |||
model.getNode("door[0]/position-z-m",1).setValue(2.505); | |||
model.getNode("door[0]/jetway-hood-deg",1).setValue(3); | |||
</load> | |||
</nasal> | |||
... | |||
</PropertyList> | |||
</syntaxhighlight> | </syntaxhighlight> | ||
=== Adding support in scenery === | |||
==== Placing jetways ==== | |||
# Launch FlightGear in your favorite aircraft, such as the [[Bluebird]]. | |||
{{note|You ''cannot'' use the [[UFO]] because its scenery editing function will interfere with the jetway editor.}} | |||
<ol start="2"> | |||
<li>Go to {{menu item|AI|Jetway Settings}} and tick the '''Enable jetway editor''' checkbox, then click the {{button|Open Editor}} button. | |||
[[File:Animated-jetway-editor.jpg]] | |||
<li>With the editor enabled, click anywhere on the ground to place an animated jetway, which will flash to indicate it is selected. The jetway editor is similar to the UFO scenery model editor. You can {{key press|Alt}}+click on the terrain to move the current selected jetway. {{key press|Ctrl}}+click selects the jetway closest to the click position (the new jetway will flash to indicate it is selected). {{key press|Shift}}+click deselects the current jetway.</li> | |||
</ol> | |||
[[File:Animated-jetway- | |||
: The dialog is used to adjust the selected jetway. The top sliders adjust position and orientation and the bottom ones adjust the jetway itself. The offsets that the bottom sliders control can be used to model jetways that are in obscure configurations. The dropdown menus at the very bottom of the dialog control various properties of the jetway, such as the model, gate number, airline sign and door number. The following models are available: | |||
:* Generic | |||
:* Glass | |||
:* [[EHAM]] gate | |||
:* [[EHAM]] 747 gate | |||
<ol start="4"> | |||
<li>When you are finished editing your airport jetway layout, click the {{button|Export}} button. A jetway definition file will be created and written to <tt>$FG_HOME/Export/ICAO.xml</tt>, where <tt>ICAO</tt> is the ICAO code of the nearest airport. (The exact location of this file is printed to the console window.) This file should be [[FlightGear Scenery Database#Contribute|submitted to TerraSync]].</li> | |||
</ol> | |||
= | ==== Auto-converting static/obsolete jetways ==== | ||
{{WIP}} | |||
== Future development == | |||
* | {{See also|AI Jetway Objects}} | ||
Ryan A Young, the original developer of the animated jetway code, is planning to rewrite it as a C++ subsystem. This would bring several advantages: | |||
* some hacks in the current [[Nasal]] code would be removed, and the system would be faster and more reliable; | |||
* the model files could be streamlined and the jetways could be automatically placed on the ground, irrespective of the employed scenery; | |||
* performance could be improved by letting the user decide how many jetways would be rendered; | |||
* they could be integrated with AI traffic.<ref>{{cite web | |||
| url = http://sourceforge.net/p/flightgear/mailman/message/34725917/ | |||
| title = <nowiki>[Flightgear-devel] Animated jet bridges redux</nowiki> | |||
| author = <nowiki>Ryan A Young</nowiki> | |||
| date = Dec 29th, 2015 | |||
}}</ref> | |||
= | == Related content == | ||
* [[List stg files with non-AI jetway scenery objects]] | |||
* [[Ramp Marshall]] | |||
* {{forum link|title=The animated jetway project|t=8728}} | |||
{{Appendix}} | |||
[[Category:Scenery]] | [[Category:Scenery]] | ||
[[Category:Scenery enhancement]] | [[Category:Scenery enhancement]] | ||
Revision as of 20:22, 12 August 2019
Animated jetways are dynamic jetway ![]() models that connect to your aircraft when you are pulled up at a gate. FlightGear boasts the most advanced animated jetways in the flight simulator market, beating those of Microsoft Flight Simulator and X-Plane in features — a testament to the flexibility of FlightGear. This article describes how to obtain and use the jetways and interface them with aircraft and scenery.
models that connect to your aircraft when you are pulled up at a gate. FlightGear boasts the most advanced animated jetways in the flight simulator market, beating those of Microsoft Flight Simulator and X-Plane in features — a testament to the flexibility of FlightGear. This article describes how to obtain and use the jetways and interface them with aircraft and scenery.
This feature was broken for a while from end of 2016 up to 2018.2. FlightGear couldn't write the temporary model files in FG_HOME. Meanwhile this issue is solved. [1] A workaround was to use jetways.nas modified by icare38.[2]
Compatible airports and aircraft
This section lists the airports having animated jetways, as well as the aircraft and AI aircraft supporting them, as of September 2015.
The compatible airports are:
- London Gatwick Airport (EGKK)*
- Amsterdam Airport Schiphol (EHAM)
- Denver International Airport (KDEN)*
- Las Vegas McCarran International Airport (KLAS)*
- San Francisco International Airport (KSFO)
- Ted Stevens Anchorage International Airport (PANC)*
* indicates the jetways for this airport were auto-converted and do not have gate numbers.
The aircraft supporting animated jetways are:
- Boeing 717
- Boeing 747-8i
- Boeing 757-200 and -300
- Boeing 767-300/ER
- Boeing 777-200ER
- Bombardier CRJ700
- McDonnell Douglas MD-11
- Tupolev Tu-144
The AI aircraft supporting animated jetways are:
Obtaining and installing
FlightGear 2.4.0 and later include the animated jetway system. Nothing extra has to be installed.
Using the jetways
- Start FlightGear in any compatible aircraft. Make sure to have animated jetways enabled (AI->Jetway->EnableAnimatedJetways and View->RenderingOptions->AnimatedJetways)
- Fly (or spawn) to any airport equipped with animated jetways. You can tell if a jetway is animated by pressing Ctrl+C; if the polygons are highlighted in yellow, then it is animated.
| Note Ensure you have the latest scenery from TerraSync so you do not get conflicts between animated and static jetways. |
- Taxi up to an animated jetway and park near it, then click it. If your aircraft is supported and parked well enough, the jetway will extend, rotate, and connect.
An easy use case eg. is to spawn FlightGear with a 777-200 (which is supported) at KSFO parking position E60. You will see the jetway through the cockpit window. Click on it and it will start moving.
Development
Available jetway models
The generic jetway model in FGData is broken, but there is a repaired version in the TerraSync scenery repository.
Available jetway models in the object database are listed here https://scenery.flightgear.org/app.php?c=Models&a=browse&shared=21. Only some of them can be used as animated jetway. These are:
| Model file | Link | Used at | Remarks |
|---|---|---|---|
| generic.xml | https://scenery.flightgear.org/app.php?c=Models&a=view&id=2211 | KSFO | This model might cause a collision with your aircraft if you move too close. |
The number of occurences in the database probably is misleading because usages in ICAO.jetways.xml are not counted here.
Adding support in aircraft
- Open up the main model of your aircraft in your favorite 3D modeling software (such as Blender).
- Move the model around to account for any offsets you have in the main model file, then get the coordinates of the door.

- Add the following code in your aircraft's -set.xml (remember to merge the tags properly):
<sim>
 <model>
  <door>
   <position-x-m type="float">X-M</position-x-m>
   <position-y-m type="float">Y-M</position-y-m>
   <position-z-m type="float">Z-M</position-z-m>
   <jetway-hood-deg type="float">HOOD-DEG</jetway-hood-deg>
  </door>
 </model>
</sim>- where X-M, Y-M, and Z-M are the X/Y/Z coordinates of the door in meters and HOOD-DEG is the jetway hood rotation amount. To specify more doors, just add more door elements.
- Add the following code into your XML model file to enable the jetways to connect to your aircraft over the multiplayer network:
 <nasal>
  <load>
   var model = cmdarg();
   model.getNode("door[0]/position-x-m", 1).setValue(X-M);
   model.getNode("door[0]/position-y-m", 1).setValue(Y-M);
   model.getNode("door[0]/position-z-m", 1).setValue(Z-M);
   model.getNode("door[0]/jetway-hood-deg", 1).setValue(HOOD-DEG);
  </load>
</nasal>- Again, replace X-M, Y-M, Z-M and HOOD-DEG with their respective values. To add more doors, duplicate the last four lines of Nasal code and replace [0] with [1] or [2].
Adding support in AI aircraft
Follow the steps for regular aircraft above, but only add in the Nasal code.
Background: The model definition of AI (and MP) aircraft is not available in Nasal. So any door definition located as property inside any XML file is not available for the jetways module. For that reason AI aircraft xml files must contain an embedded piece of Nasal code for writing the door information into the AI models property tree. This is an example taken from the MD80 AI aircraft:
<?xml version="1.0"?>
<PropertyList>
        ...
        <nasal>
                <load>
                 var model = cmdarg();
                 model.getNode("door[0]/position-x-m",1).setValue(-19.241);
                 model.getNode("door[0]/position-y-m",1).setValue(-1.529);
                 model.getNode("door[0]/position-z-m",1).setValue(2.505);
                 model.getNode("door[0]/jetway-hood-deg",1).setValue(3);
                </load>
        </nasal>
        ...
</PropertyList>
Adding support in scenery
Placing jetways
- Launch FlightGear in your favorite aircraft, such as the Bluebird.
| Note You cannot use the UFO because its scenery editing function will interfere with the jetway editor. |
- Go to AI→Jetway Settings and tick the Enable jetway editor checkbox, then click the Open Editor button.
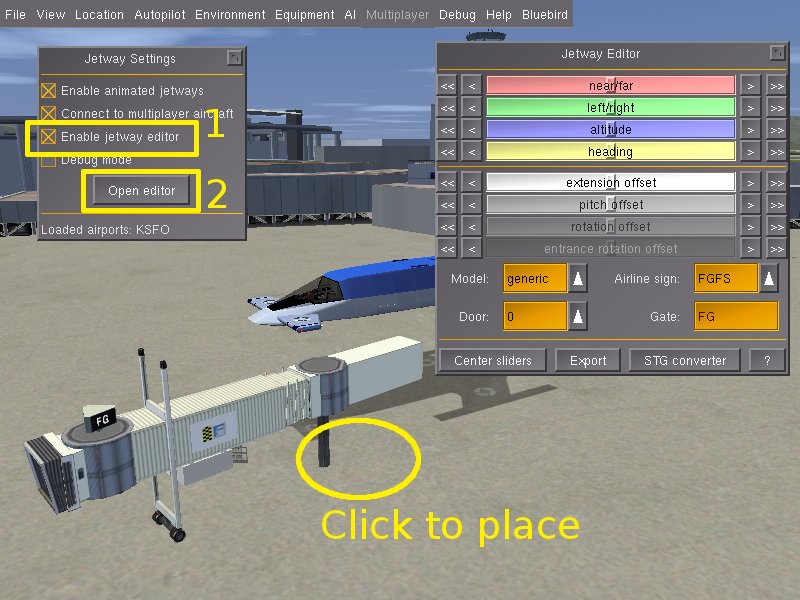
- With the editor enabled, click anywhere on the ground to place an animated jetway, which will flash to indicate it is selected. The jetway editor is similar to the UFO scenery model editor. You can Alt+click on the terrain to move the current selected jetway. Ctrl+click selects the jetway closest to the click position (the new jetway will flash to indicate it is selected). ⇧ Shift+click deselects the current jetway.

- The dialog is used to adjust the selected jetway. The top sliders adjust position and orientation and the bottom ones adjust the jetway itself. The offsets that the bottom sliders control can be used to model jetways that are in obscure configurations. The dropdown menus at the very bottom of the dialog control various properties of the jetway, such as the model, gate number, airline sign and door number. The following models are available:
- When you are finished editing your airport jetway layout, click the Export button. A jetway definition file will be created and written to $FG_HOME/Export/ICAO.xml, where ICAO is the ICAO code of the nearest airport. (The exact location of this file is printed to the console window.) This file should be submitted to TerraSync.
Auto-converting static/obsolete jetways
| Work in progress This article or section will be worked on in the upcoming hours or days. See history for the latest developments. |
Future development
Ryan A Young, the original developer of the animated jetway code, is planning to rewrite it as a C++ subsystem. This would bring several advantages:
- some hacks in the current Nasal code would be removed, and the system would be faster and more reliable;
- the model files could be streamlined and the jetways could be automatically placed on the ground, irrespective of the employed scenery;
- performance could be improved by letting the user decide how many jetways would be rendered;
- they could be integrated with AI traffic.[3]
Related content
- List stg files with non-AI jetway scenery objects
- Ramp Marshall
- The animated jetway project topic on the forum

References
|