Howto:Add instruments to a cockpit: Difference between revisions
Openflight (talk | contribs) No edit summary |
m (Johan G moved page Howto:Adding instruments to an aircraft to Howto:Add instruments to a cockpit: More to the point; Grammar) |
||
| (18 intermediate revisions by 3 users not shown) | |||
| Line 1: | Line 1: | ||
This is one way '''how to add instruments to a cockpit'''. While many of the aircraft for FlightGear have both rather detailed and completely instrumented cockpits, many aircraft either only have the most basic instruments or even none at all. | |||
Fortunately, adding already existing instruments to a cockpit is a relatively easy task. The biggest difficulty is actually placing them accurately. | |||
For aircraft that are licensed under the [[GNU GPL]] (all aircraft on the official download page are), instruments can be re-used in other aircraft when released under the same license. | |||
For aircraft that are | |||
== Workflow == | |||
Adding instruments consists of a few major steps: | Adding instruments consists of a few major steps: | ||
# Locate an FG aircraft with a similar instrument. | |||
# Copy XML tags relevant to the instrument files into XML file of the aircraft you want to update. | |||
# Edit the updated aircraft file to place the instrument. | |||
== Example == | |||
Let's update the instruments of the [[Bombardier Dash 8|Dash 8-300Q]] for a start. | |||
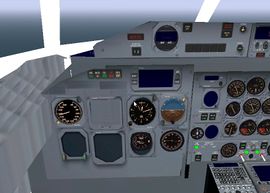
The existing aircraft, version v20101217 from the version 2.6 aircraft download page has the following set of basic flight instruments. | |||
* Air Speed Indicator (ASI) | |||
* Altimeter | |||
* Artificial Horizon | |||
[[File:dhc8300q.jpg|thumb|270px|Cockpit of the Dash 8 with some instruments missing.]] | |||
We can see that our aircraft is lacking the following: | |||
* Vertical Speed Indicator (VSI) | |||
* Electronic Flight Systems Information (EFSI) | |||
* Electronic Horizontal Situation Indicator (EHSI) | |||
* Radio Magnetic Indicator (RMI) | |||
* VOR instrument | |||
First let's add the VSI (Vertical Speed Indicator) . Locate the tags for the ASI in a similar aircraft config file, the Beech 1900D (B1900D). These appear in the B1900D.xml file as follows: | |||
<syntaxhighlight lang="xml"> | |||
<model> | |||
<name>VSI 1 gauge</name> | |||
<path>Aircraft/b1900d/Models/Instruments/vsi.xml</path> | |||
<offsets> | |||
<x-m>-4.860</x-m> | |||
<y-m>-0.280</y-m> | |||
<z-m>-0.082</z-m> | |||
<pitch-deg>-10</pitch-deg> | |||
</offsets> | |||
</model> | |||
</syntaxhighlight> | |||
Copy this set of tags as shown above into the Dash8 300Q xml file in the models folder. The file is named dhc8-300Q.xml | |||
The instrument now has to be placed in position. | |||
We will use an existing instrument, the Air Speed Indicator of the DHC8 as a reference. The DHC 8 pilot ASI has the following settings. | |||
<syntaxhighlight lang="xml"> | |||
<model> | |||
<name>Pilot asi</name> | |||
<path>Aircraft/dhc8/Models/Instruments/asi300-3d.xml</path> | |||
<offsets> | |||
'''<x-m>-8.927</x-m> | |||
<y-m>-0.702</y-m> | |||
<z-m>2.382</z-m>''' | |||
<pitch-deg>0</pitch-deg> | |||
</offsets> | |||
</model> | |||
</syntaxhighlight> | |||
Copy the <code><offsets> ... </offsets></code> section and paste it into the offsets section of the VSI instrument, replacing the existing settings. | |||
<syntaxhighlight lang="xml"> | |||
<model> | |||
<name>VSI 1 gauge</name> | |||
<path>Aircraft/b1900d/Models/Instruments/vsi.xml</path> | |||
<offsets> | |||
'''<x-m>-8.927</x-m> | |||
<y-m>-0.702</y-m> | |||
<z-m>2.382</z-m>''' | |||
<pitch-deg>0</pitch-deg> | |||
</offsets> | |||
</model> | |||
</syntaxhighlight> | |||
You will find that the VSI, the new instrument, will appear on top of the existing one. This confirms that the instrument appears in the cockpit. | |||
To place the instrument in a correct location, use the following adjustments: | |||
* <code><x-m></code> Distance of the instrument from the pilot (depth) | |||
* <code><y-m></code> Sideways location of the instrument | |||
* <code><z-m></code> Vertical location of the instrument | |||
< | Using the offsets for an existing instrument, the altimeter, ALT, the VSI can be placed directly on top of the altimeter. The Y value for the altimeter is <code><y-m>-0.44</y-m></code>. To move the VSI down, experiment with different values of the z value, 2.182, 2.282, 2.382 etc. | ||
< | |||
Finally, adjust the depth of the instrument (x - value) | |||
== A shortcut: multiple copies of an instrument== | |||
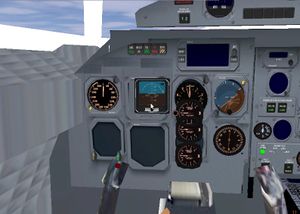
FlightGear allows the creation of the same instrument copies in different locations in the cockpit. We can use this to our advantage: placing copies of the same instrument in different locations in the cockpit and selecting the right one. | |||
[[File:MultipleVSI.jpg|thumb|VSI in multiple locations. Choose the best. ]] | |||
== Instrument path == | |||
The path can be left as follows, or the instrument related files (.ac, xml and image files) can be copied to the DHC8 folder and the reference can be changed to that folder: | |||
<syntaxhighlight lang="xml"> | |||
<path>Aircraft/b1900d/Models/Instruments/vsi.xml</path> | |||
</syntaxhighlight> | |||
can be changed to | |||
<syntaxhighlight lang="xml"> | |||
<path>Aircraft/dhc8/Models/Instruments/vsi.xml</path> | |||
</syntaxhighlight> | |||
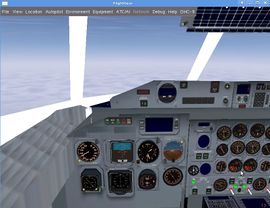
[[File:dhc8addedinstruments.jpg|thumb|270px|Several instruments added. Fine adjustment needed.]] | |||
== Related content == | |||
=== Wiki articles === | |||
* [[Avionics and instruments]] | |||
== External links == | |||
* {{wikipedia|Flight instruments}} | |||
* [http://www.faa.gov/library/manuals/aviation/instrument_flying_handbook/media/FAA-H-8083-15A%20-%20Chapter%2003.pdf FAA Instrument Flying Handbook] (Free e-book) | |||
http:// | |||
[[Category:Aircraft enhancement]] | |||
[[Category:Howto]] | [[Category:Howto]] | ||
Latest revision as of 09:45, 13 June 2015
This is one way how to add instruments to a cockpit. While many of the aircraft for FlightGear have both rather detailed and completely instrumented cockpits, many aircraft either only have the most basic instruments or even none at all.
Fortunately, adding already existing instruments to a cockpit is a relatively easy task. The biggest difficulty is actually placing them accurately.
For aircraft that are licensed under the GNU GPL (all aircraft on the official download page are), instruments can be re-used in other aircraft when released under the same license.
Workflow
Adding instruments consists of a few major steps:
- Locate an FG aircraft with a similar instrument.
- Copy XML tags relevant to the instrument files into XML file of the aircraft you want to update.
- Edit the updated aircraft file to place the instrument.
Example
Let's update the instruments of the Dash 8-300Q for a start.
The existing aircraft, version v20101217 from the version 2.6 aircraft download page has the following set of basic flight instruments.
- Air Speed Indicator (ASI)
- Altimeter
- Artificial Horizon
We can see that our aircraft is lacking the following:
- Vertical Speed Indicator (VSI)
- Electronic Flight Systems Information (EFSI)
- Electronic Horizontal Situation Indicator (EHSI)
- Radio Magnetic Indicator (RMI)
- VOR instrument
First let's add the VSI (Vertical Speed Indicator) . Locate the tags for the ASI in a similar aircraft config file, the Beech 1900D (B1900D). These appear in the B1900D.xml file as follows:
    <model>
        <name>VSI 1 gauge</name>
        <path>Aircraft/b1900d/Models/Instruments/vsi.xml</path>
        <offsets>
            <x-m>-4.860</x-m>
            <y-m>-0.280</y-m>
            <z-m>-0.082</z-m>
            <pitch-deg>-10</pitch-deg>
        </offsets>
    </model>
Copy this set of tags as shown above into the Dash8 300Q xml file in the models folder. The file is named dhc8-300Q.xml
The instrument now has to be placed in position.
We will use an existing instrument, the Air Speed Indicator of the DHC8 as a reference. The DHC 8 pilot ASI has the following settings.
    <model>
     	<name>Pilot asi</name>
        <path>Aircraft/dhc8/Models/Instruments/asi300-3d.xml</path>
        <offsets>
            '''<x-m>-8.927</x-m>
            <y-m>-0.702</y-m>
            <z-m>2.382</z-m>'''
            <pitch-deg>0</pitch-deg>
        </offsets>
    </model>
Copy the <offsets> ... </offsets> section and paste it into the offsets section of the VSI instrument, replacing the existing settings.
    <model>
        <name>VSI 1 gauge</name>
        <path>Aircraft/b1900d/Models/Instruments/vsi.xml</path>
        <offsets>
            '''<x-m>-8.927</x-m>
            <y-m>-0.702</y-m>
            <z-m>2.382</z-m>'''
            <pitch-deg>0</pitch-deg>
        </offsets>
    </model>
You will find that the VSI, the new instrument, will appear on top of the existing one. This confirms that the instrument appears in the cockpit.
To place the instrument in a correct location, use the following adjustments:
<x-m>Distance of the instrument from the pilot (depth)<y-m>Sideways location of the instrument<z-m>Vertical location of the instrument
Using the offsets for an existing instrument, the altimeter, ALT, the VSI can be placed directly on top of the altimeter. The Y value for the altimeter is <y-m>-0.44</y-m>. To move the VSI down, experiment with different values of the z value, 2.182, 2.282, 2.382 etc.
Finally, adjust the depth of the instrument (x - value)
A shortcut: multiple copies of an instrument
FlightGear allows the creation of the same instrument copies in different locations in the cockpit. We can use this to our advantage: placing copies of the same instrument in different locations in the cockpit and selecting the right one.
Instrument path
The path can be left as follows, or the instrument related files (.ac, xml and image files) can be copied to the DHC8 folder and the reference can be changed to that folder:
<path>Aircraft/b1900d/Models/Instruments/vsi.xml</path>
can be changed to
<path>Aircraft/dhc8/Models/Instruments/vsi.xml</path>
Related content
Wiki articles
External links
- FAA Instrument Flying Handbook (Free e-book)


