FlightGearMap: Difference between revisions
No edit summary |
(→Use) |
||
| Line 25: | Line 25: | ||
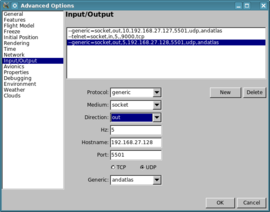
[[File:The_advance_settings_of_FGRun_showing_a_configuration_of_two_devices_for_FlightGearMap.png|thumb|270px|Configuration using FGRun in the advance settings panel, sending data to two devices.]] | [[File:The_advance_settings_of_FGRun_showing_a_configuration_of_two_devices_for_FlightGearMap.png|thumb|270px|Configuration using FGRun in the advance settings panel, sending data to two devices.]] | ||
[[File:deployment_flightgearmap_3devices. | [[File:deployment_flightgearmap_3devices.jpg|thumb|270px|A possible deployment using three devices, a tablet and two mobile phones: instrument panel, comm panel and map.]] | ||
It is strongly recommended to connect several Android devices. My preferred configuration includes a tablet on the table to show the instrument panel and two mobile phones, one to show the current position on a map and the other showing the communication panel. This can be achieved using this configuration: | It is strongly recommended to connect several Android devices. My preferred configuration includes a tablet on the table to show the instrument panel and two mobile phones, one to show the current position on a map and the other showing the communication panel. This can be achieved using this configuration: | ||
Revision as of 17:03, 21 May 2013
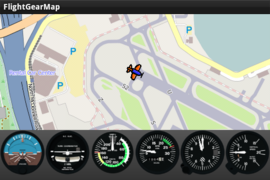
 The map & simple panel at KSFO. | |
| Developed by | Juan Vera del Campo |
|---|---|
| Initial release | 1.0 (April 25, 2012) |
| Latest release | 1.5 (June 9, 2012) |
| OS | Android |
| Development status | Active (2012-) |
| License | GNU General Public License |
| Website | |

FlightGearMap is an Android application that displays live FlightGear data in the form of some basic instruments and a moving map.
Use
- On your computer, copy andatlas.xml to the directory $FG_ROOT/Protocol. Always use the last version of this file, it will probably change after an update of the application.
- Connect your Android device to the local Wifi network and run the application. A dialog should appear with the IP of your device after few seconds.
- Run FlightGear with the following command, where
--generic=socket,out,5,the-ip-of-your-android-device,5501,udp,andatlas --telnet=9000(when using FGRun, this can be set via Advanced > Input/Output. See figure.).
- the-ip-of-your-android-device: the IP shown by your Android device.
- 5: the rate in Hz at which data is transmitted. Increasing this value will lead to smoother movements of the map and instruments.
- If you want to modify the instruments from your device (for example, frequencies, radials, switches...), enter the IP of your computer in the Settings menu of FlightGearMap.
It is strongly recommended to connect several Android devices. My preferred configuration includes a tablet on the table to show the instrument panel and two mobile phones, one to show the current position on a map and the other showing the communication panel. This can be achieved using this configuration:
--generic=socket,out,10,192.168.127.127,5501,udp,andatlas --generic=socket,out,1,192.168.127.128,5501,udp,andatlas --telnet=9000
Where 10,192.168.0.2 is the IP of my tablet receiving 10 updates per second, and 192.168.127.128 the IP of the phone showing the map receiving one position every second. The phone showing the communication panel doesn't receive anything and doesn't need a --generic line, but the computer's IP must be set in the Settings menu.
Features
There are several panels available:
- Only a map showing the position of the aircraft
- A map and some basic controls, including a HSI
- A generic panel for single engine aircrafts, especially the Cessna 172P. You can configure some instruments of this panel using the Setting menu: the type of ASI, the type of heading indicator (simple heading, RMI, HSI) and the additional instrument (manifold pressure or radar altimeter). The Radio Magnetic Indicator (RMI) shows the course to the NDB and NAV1 stations. The HSI is coupled to NAV1. The additional instrument appears when the RMI or the HSI are selected.
- A Cessna 337G Skymaster panel.
Known Issues
- In the different heading indicators, you cannot calibrate the heading to match the magnetic compass when decoupled.
- In the HSI, HDG warning flag and TO/FROM indicators are not included. The glideslope pointers are always visible, even if there is no ILS approach available.
- In the radar altimeter, you can move the bug but there is no warning light when flying under the selected height.
- Some aircraft models, such as the Cessna 172, filter the movement of the NAV indicators to smooth them. Most of the aircrafts do not filter these movements, and in these cases the smoothed values are not available. The provided andatlas.xml file uses unfiltered values, but if you fly mainly on the Cessna 172, you might prefer modifying andatlas.xml to send the filtered properties instead of raw data.
- The DME instrument shows distance and ground speed to the selected station. You cannot select time to the station.
- The Cessna 337G Skymaster model includes lots of additional instruments that do not fit on the screen. The main missing switches are the magnet selectors and start engine buttons, but you will also miss the cowl flap switches. Some other instruments are not included, as the EGT and the fuel flow indicators.
- Since there are many different autopilot models and they are not compatible between them, they are not simulated. The Heading bug indicator is the only exception, if supported by your autopilot.
Related content
External links
- FlightGearMap (Google Play)
- Forum topic

