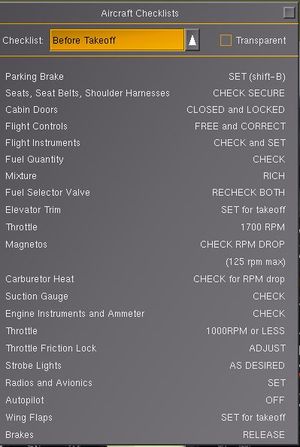
Aircraft checklists
As of V2.9, FlightGear can display aircraft checklists in a standardized way, under Help > Aircraft Checklists. To learn more about creating custom checklists, see $FG_ROOT/Docs/README.checklists and the c172p as the reference implementation. Increasingly, the Tutorials system is also extended such that it may make use of aircraft checklists.
Checklists are situated under /sim/checklists. As the checklists may be quite long, it is recommended that they are put in a separate file using the following entry in the -set.xml file of the aircraft:
<checklists include="c172-checklists.xml"/>
Each individual checklist is created under a <checklist> XML tag, with the following sub-properties:
<title>The name of the checklist<page>One or more pages from the checklist, containing one or more of the following:<item>A checklist item, containing<name>The item name, to appear on the left hand side of the checklist<value>One or more values, to appear on the right hand side of the checklist. Second and and subsequent <value> tags are displayed underneath each other. It is recommended that the <value> tags are kept short, to minimize the size of the displayed checklist.<condition>An optional condition node that evaluates when the checklist item is complete. Incomplete checklist items are shown in yellow, while completed items are shown in green.<marker>An optional marker node that is used to display a circle around a control when the user clicks a "?" button next to the item. This contains <x-m>, <y-m>, <z-m> and <scale> sub-elements and uses the<binding>Zero or more XML bindings that are used by the simulator to execute the checklist item if the user clicks on a ">" button next to the item.
For simple checklists the <page> element can be omitted and <item> entries placed directly under the <checklist>.
The following example shows a simple checklists XML file:
 <PropertyList>
  <checklist>
    <title>After Landing</title>
    <item>
      <name>Carburetor Heat</name>
      <value>COLD</value>
      <condition>
        <equals>
          <property>/controls/anti-ice/engine[0]/carb-heat</property>
          <value>0</value>
        </equals>
      </condition>
      <marker>
        <x-m>-0.3225</x-m>
        <y-m>-0.0850</y-m>
        <z-m>-0.2117</z-m>
        <scale>2.0500</scale>
      </marker>
      <binding>
        <command>property-assign</command>
        <value>0</value>
      </binding>
    </item>
    <item>
      <name>Wing Flaps</name>
      <value>UP</value>
    </item>
  </checklist>
  <checklist>
    <title>Getting hamburger</title>
    <page>
      <item>
    ...
      </item>
    </page>
  </checklist>
 </PropertyList>
See the Cessna 172P for an example of how this all fits together.
Reloading Checklists
Cut and paste this little code snippet in nasal console and excecute it :
var checklist="777-200-checklists.xml";
var checklist_path=sprintf("%s/%s",getprop("/sim/aircraft-dir"),checklist);
var data = io.read_properties(checklist_path,"/sim/checklists");
Change the first variable to the name of the file you are editing.
External link
- $FG_ROOT/Docs/README.checklists
- Aircraft Checklists (mailing list)
