Extra EA-500/autopilot
Extra500 Autopilot
General
The Extra500 uses an STEC-55X autopilot which you can find in the top middle of the glareshield. It is rate-based (using the turn-coordinator in the RH panel for turn rate information) and has a large collection of modes and functions. These include auto-trim and yaw trim.
On the main panel there are three switches related to autopilot operation.
- Autopilot Master: switches the autopilot on/off. The middle switch position is for FD (Flight Director). The function of the autopilot is the same in this mode except the servos are not coupled. Thus the pilot must follow the flight director symbol on the IFD him/herself.
- Autopilot Pitch Trim: Enables electric trim and auto-trim when a pitch mode is engaged
- Autopilot yaw damper: Enables the yaw trim. The Yaw Trim poti can be used to adjust the yaw trim setting.
Limitations
- Airspeed: 90-190 KIAS
- Flaps: 0-15 deg
- Flight Phases: prohibited during take-off and landing, CAT I operations only
- Altitude: above 200 feet AGL while in approach, above 800 feet in all other flight phases
Servos
The Autopilot, when engaged, drives a total of four servos.
- Roll servo
- Pitch servo
- Yaw servo
- Pitch trim servo
They all directly link into the Extra500 control cables, thus if the autopilot moves the servos you can see the yoke, rudder pedals and trim wheel move. The servos can be over powered by pressing and holding o. Release it and the autopilot has full control again. Use with extreme caution. The speed of the controls is limited in this mode to 'simulate' the larger force the pilot has to overcome. This can lead to unexpected behavior. Also, you can easily bring the aircraft in a situation the autopilot cannot cope with, consequently it will disengage itself.
Pilot Yoke
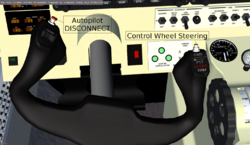
The pilot yoke has two autopilot related push buttons:
- The disconnect switch: By far the most important one. So important we made the d a keyboard shortcut! It disconnects ALL servos.
- The CWS (Control Wheel Steering) switch. Keyboard shortcut: c
Autopilot Computer
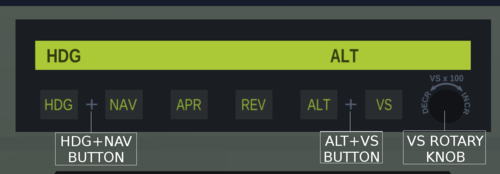
The AP computer has a display, mode knobs and a rotary knob.
The display indicates which mode is active, if the AP is ready or failed and the set vertical speed. The mode knobs (obviously) set the modes and the rotary knob the vertical speed.
Hotkeys
| Key | Function |
|---|---|
| Alt+1 | HDG |
| Alt+2 | HDG + NAV |
| Alt+3 | NAV |
| Alt+4 | APR |
| Alt+5 | REV |
| Alt+6 | ALT |
| Alt+7 | ALT + VS |
| Alt+8 | VS |
| Alt+9 | VS -100 |
| Alt+0 | VS +100 |
Functionality
Roll modes
HDG mode
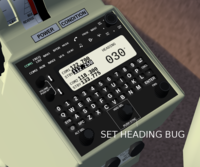
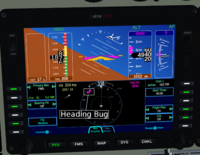
With the Heading mode active, the autopilot will turn the aircraft with maximum standard turn rate to the desired heading. This is set using the middle rotary knob on the keyboard and depicted in the compass rose and the moving map by the heading bug. The heading bug is normally magenta open, but changes to filled magenta when the heading mode is active, indicating the roll servo is in control.
NAV mode
Pressing the NAV button the autopilot will activate the NAV mode. The aircraft will be steered to follow FMS (Flight Management System: the active flightplan), NAV1 or NAV2 steering commands, depending on to what the "Primary Nav" is set. If FMS is selected, GPSS mode is also available by pressing the NAV button a second time, see below. The Course can be set using the LH lower rotary button on the IFD and Nav frequencies with the keyboard. If the aircraft is far from the commanded leg/course, the autopilot will try and intercept it with a 45 deg angle. If you are getting close, it will turn in to the leg/course. The intercept angle can be changed by setting the heading bug accordingly and pressing the + between the HDG and NAV button, thus activating
HDG+NAV mode
This means the aircraft is in heading mode until the autopilot needs to turn into the leg/course. HDG mode will be automatically cancelled and NAV mode will take over. On the real AP, both HDG and NAV need to be pushed simultaneously. As most people only have one mouse on their computer, there is a + in between for this purpose.
NAV/GPSS mode
This mode is only available when the "Primary Nav" is set to FMS and a flightplan is active. Activate it by pressing the NAV button twice. The autopilot will now cut the corners. Thus when approaching a waypoint, the aircraft will turn onto the next leg before the waypoint is overflown.
NAV/REV mode
Allows you to fly the backcourse of a localizer without changing a frequency or course. Thus the inbound course must be set and the aircraft will fly the outbound course. Activate by pressing the REV button when NAV is already active.
Pitch modes
Note that for ANY pitch mode to be engaged, a roll mode must be active!
ALT mode
Press the ALT button and the AP will hold the current altitude
VS mode
Follows the commanded vertical speed. You set the vertical speed with the rotary knob on the autopilot itself. It can be set before engaging, after engaging and can be changed at any time.
ALT+VS mode
This mode will take your aircraft to a pre-selected altitude:
- Use the LH lower rotary knob on the keypad to set your target altitude.
- Set your vertical speed using the autopilot rotary knob (not necessary: the vertical speed will be set to the default value if nothing is set)
- And press the + between the ALT and VS knob.
The autopilot will automatically level off and disengage the VS mode (thus only ALT mode remains active) when you arrive at the target altitude. When you are still climbing (or descending) you can change the target altitude or vertical speed at any time.
Special modes
CWS mode
The Control Wheel Steering mode works as follows:
- Engage the AP in both any roll and pitch mode
- Press and HOLD c (CAUTION: AP servos will disengage!)
- Bring the aircraft in the wished turn rate and vertical speed
- Release c
The autopilot will keep holding the turn rate and vertical speed.


